
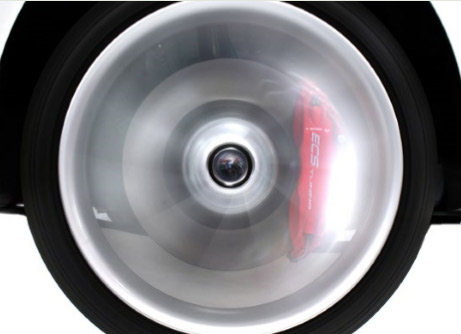
The ECS Big Brake Kit provides big improvements in braking power with a specially packaged kit containing quality brake components from the best names in the business.
Start with large diameter ECS two-piece, drilled and slotted floating rotors that dampen lateral vibration for smooth, strong stops.
Add ECS premium calipers, stainless reinforced brake lines, and upgraded Hawk pads, and your modified ride will brake with sure-footed authority.
This post will take you through the installation process and help you install more aggressive brakes on your VW MK5 or MK6.
Here is what you will find in the package once you unbox your new Big Brake Kit:
- Two-piece semi- floating rotors – assembled, trued, and balanced (2)
- ECS Tuning Exact-Fit stainless steel reinforced brake lines (2)
- 1 liter ATE Super Blue brake uid
- ECS Tuning 993T Big Brake Calipers (2)
- Caliper-to-carrier bolts (4)
- Hawk Performance brake pads
- ECS Tuning caliper carriers (2)
- Brake pad dampers (8)
High temp brake lube
Tools
- 3/8-inch ratchet • T30 Torx© driver • T55 Torx driver
M6 hex driver - 11mm brake line wrench
- 14mm combination wrench/socket
- 17mm combination wrench
- 19mm socket
- 21mm socket
- 10-150 ft lb torque wrench (ES2221244)
- inch-pound torque wrench (for banjo bolt)
- impact driver with Phillips driver (ES11416) or Phillips screwdriver • common screwdriver
Step 1

Safely raise and support the car.
Remove the wheel bolt trim caps.
Loosen the wheel bolts and remove the wheel and tire.
Step 2
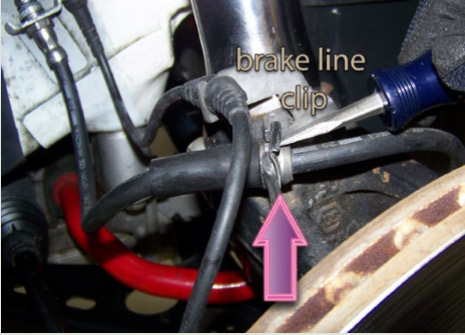
Using a common screwdriver, pry the u-shaped retainer clip from the brake hose bracket at the strut knuckle.
Step 3

Follow the brake hose to the chassis. Using the same common screwdriver or similar tool, pry the u-shaped retainer clip from the chassis support bracket.
Step 4
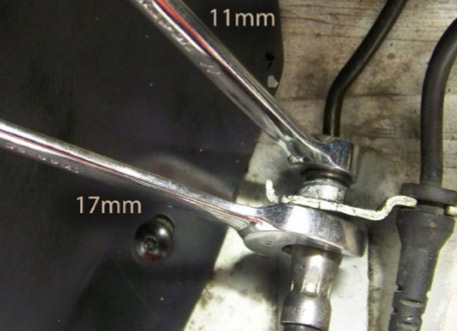
Using an 11mm brake line wrench and a 17mm backing wrench, loosen and disconnect the rigid brake line from the brake hose.
Tip: Transfer the rubber cap from the caliper brake bleeder screw to the end of the disconnected rigid brake line. This will keep brake fluid from draining onto the floor.
Step 5
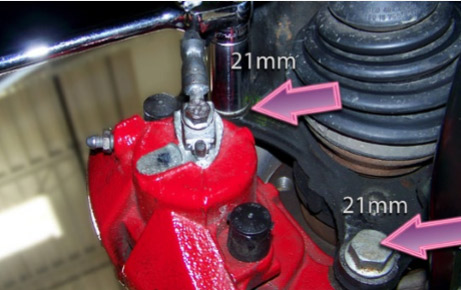
Using an 21mm socket and ratchet, loosen and remove the caliper retaining bolts from the knuckle. Keep the bolts handy; we’ll need them to attach the new caliper carrier.
Step 6

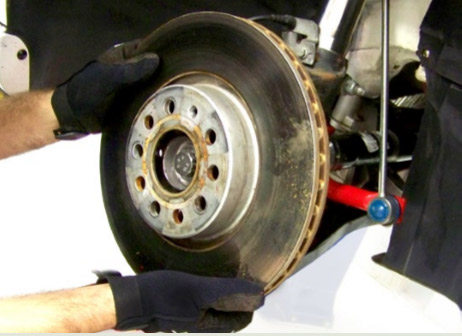
Slide the caliper forward, o the rotor.
Remove the caliper and flexible hose together.
Step 7

Remove the Phillips-head rotor set screw (arrow).
Step 8
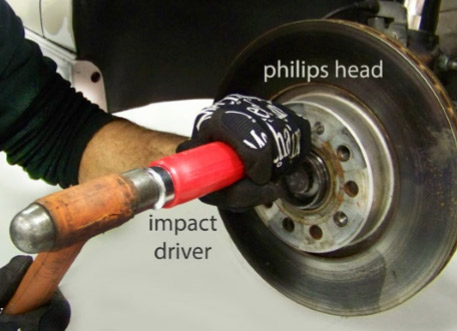
For rusted set screws, an impact driver (ES11416) with a Phillips-head bit is far more e ective than a common Phillips screwdriver. (As you strike the head of the driver, it forces the bit against the screw head and rotates it in a single motion to prevent rounding.)
Note: If you round out the screw head, you will have to drill out the old screw.
Step 9
• Remove the old rotor.
• Clean away any heavy rust or scale from the face of the rotor hub. A drill or die grinder with a mild abrasive disk works well.
Step 10

Remove the three T30 Torx head screws from the brake rotor shield.
Remove the shield.
Note: If you live in an area where the car is exposed to road salt or ocean spay, you may wish to reinstall and tighten the rotor shield bolts in their holes with a dab of anti-seize compound. Doing so will keep the threaded holes in the knuckle clean, should you need them in the future.
Step 11
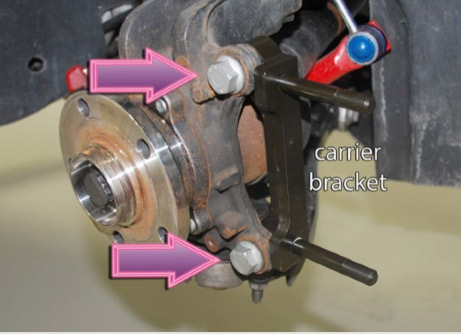
Using the two caliper bolts removed in Step 5, bolt the caliper carrier to the knuckle, as shown here.
The carriers are identical; no left or right to worry about.
Step 12

Using a 21 mm socket, torque the caliper carrier-to-knuckle bolts to 142 ft-lb (190 Nm).
Step 13

Install the new rotor on the hub. Use brake cleaner (or a similar) to remove the thin lm of oil applied to the rotor braking faces.
Install the set screw and hand tighten with a screwdriver.
Note: ECS Tuning has replacement set screws made of stainless steel to resist corrosion better than the original plain steel screws. (ES257461)
Step 14

Your kit contains brake damper discs in two di erent diameters to match the large and small brake pistons.
Install two large and two small disks in the matching pistons in each caliper.
Step 15

Install the calipers onto the caliper carrier studs.
Extremely Important: The brake calipers must be installed with the brake bleeder screws at the top; install them upside down and you won’t be able to properly bleed the brakes.
Make sure both attachment nuts are screwed in hand-tight before torquing either to specification. This will ensure that the caliper seats flush against the carrier.
Step 16

Using a 12-point 14mm socket, tighten the caliper attachment nuts to 88 ft-lb (120 Nm).
Step 17
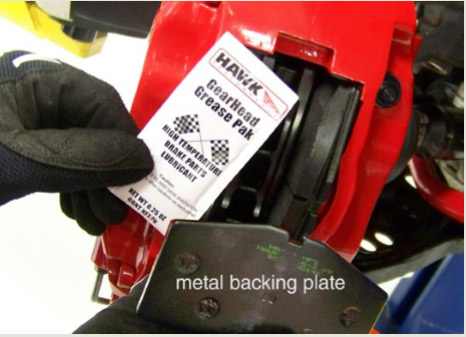
Your Hawk Performance brake pads are packaged with a 7 gram packet of brake paste. This paste is used to reduce pad noise, when applied properly.
Apply 1-2 grams of brake paste to each brake pad metal backing plate. Spread a thin lm of paste over the metal surface of each pad, concentrating on the general areas where the pad will contact the caliper pistons.
CAUTION: Do not apply too much paste, and NEVER allow any paste to get onto the friction surface.
Step 18

Slide the brake pads into the caliper with the slotted friction lining facing toward the rotor.
If you wish, you may wipe a thin lm of brake paste onto the upper and lower edges of the metal backers (arrows) to help them slide freely and reduce brake noise.
Apply the paste sparingly, and DO NOT allow any paste to get onto the friction surface.
Step 19

Install the brake shim over the brake pads, as shown. The “v” in the stamped metal shield should engage the notches in the pads.
Insert the caliper bolt tubes against the brake shim. Press inward on the tubes as you slide the long pad retainer bolts through them.
Screw the long bolts into the caliper body threaded holes, and hand tighten them.
Step 20

Attach the new ECS Tuning Exact Fit brake lines to the calipers.
Your new brake lines come complete with a banjo bolt and two new copper sealing washers. Make sure you have one copper washer on either side of the hose fitting, as shown.
Step 21

Insert the banjo bolt through the washers and hose tting.
Thread the bolt into the fluid hole in the rear of the caliper body.
Snug the the banjo bolt using a 14mm wrench, then final torque to 12 ft-lb (144 inch-pounds). Use a small torque wrench, calibrated in inch-pounds instead of a larger, general purpose torque wrench adjusted to its lowest setting.
Step 22
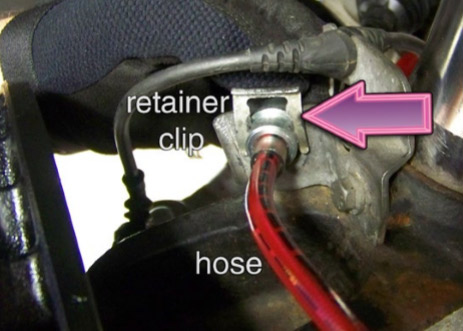
Route the new brake hose over the knuckle and attach it to the support bracket with the u-shaped clip removed in Step 2.
Make sure the clip straddles the groove in the hose collar.
Push the clip all the way down until it snaps in place in the support bracket.
Step 23

Make your nal brake hose connection by screwing the rigid brake line at the chassis into the Exact-Fit brake hose.
Reinstall the u-shaped retainer clip, then hand-tighten the fitting.
Step 24

Have an assistant turn the steering wheel back and forth as you watch the hose and speed sensor cables. Make sure the brake hoses do not rub or bind as the steering is turned back and forth.
Repeat all steps shown so far to install the opposite side brake kit.
Step 25

Bleed the brake hydraulic system.
Your kit includes a 1 liter container of brake uid.
Add uid to the brake reservoir, then pedal or power bleed the system to remove all air. Be sure to bleed at both bleeder screws on each caliper.
(ECS Tuning has a video demonstrating general brake bleeding procedures, available free online.)
Step 26
Here’s a final quality control list to ensure trouble free braking.
After bleeding the system, correct the fluid level in the brake fluid reservoir. Pump the brake pedal several times. The pedal should be hard, and stay hard as you maintain pedal pressure. Check for fluid leaks. Even if the pedal feels good, visually inspect all hose connections for leaks.
Turn the steering from side to side one more time. Make sure the brake lines do not rub or contact any components.
Reinstall the wheels. Tighten the wheel bolts on a star pattern to 89 ft-lb (120 Nm). Make sure your wheels spin freely and that they do not contact the brake caliper.
Your brake installation is not complete until you bed the brakes. Bedding makes your brakes work as they should. Use the instructions on the brake box, or follow the steps below.
1) Test your brakes before going out on the highway. The pedal should feel rm and responsive. If it is soft or spongy, check that all air has been removed by the bleeding process, and that there are no uid leaks.
2) Take the car out on the road. At vehicle speeds of 50-60mph, gently apply the brakes several times to slow, but not stop, the vehicle. This warms the brakes.
3) Make 6-10 stops from 35 mph to 5 mph, applying moderate pedal pressure.
3) Cruise for several minutes without applying the brakes, allowing them to cool.
4) Make 2-3 moderately hard stops from 45 to 5 mph. Brake aggressively, but not hard enough to trigger the ABS.
5) Do not ride the pedal. Either apply the brakes to slow the vehicle or fully release them.
Let the brakes cool for 10-15 minutes. Then drive normally.
Thanks!
Thank you for purchasing an ECS Tuning Big Brake Kit. We appreciate your business, and hope this installation
guide has been helpful.
Find this kit and everything else in our expansive catalog of Golf parts right here at ECS Tuning!