Introduction
Part Number ES#2215317
LED bulbs are a stunning revolution for the world of automotive lighting and it’s easy to see why. LED bulbs are vastly superior to stock bulbs, as they have a higher light output and are far more efficient. Installing these Ziza LED bulbs is a breeze, as you just pop out the old bulb and insert a new one, giving you incredible lighting in a matter of moments. This kit will transform your entire interior to bright white light.
This Ziza LED Master Interior Lighting Kit includes bulbs for the vanity lights, trunk lights, front dome lights, rear dome lights, and glove box lights. Installation is straightforward with our custom tailored installation instructions designed around your specific model. Ziza interior LEDs allow you to transform the look of your interior in moments.
Improve your interior lighting experience, open your door to a world of stunning light from Ziza.
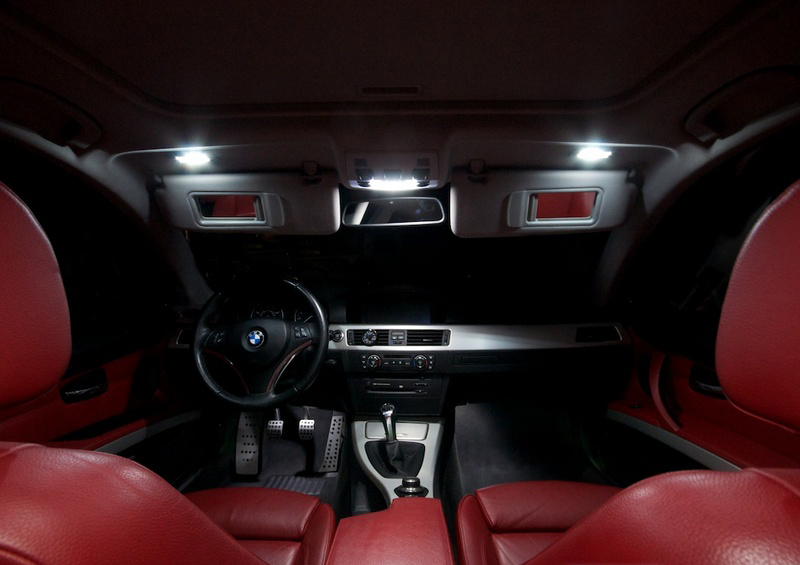
Interior Lighting Locations

General Tips
- When prying down on the assemblies to remove them, pry on the notched end of the lens. Insert the narrow tool tip between the lens plastic and any metal collar used to reinforce the lens mounting hole. Push in on the retaining clip first to compress and release it. Then pry down.
- The spring bulb retainer is also the circuit conductor. If necessary, gently bend the metal retainer so it holds the bulb tight. This will help prevent intermittent or flickering LED operation caused by a loose connection.
- Install the bulbs with the LEDs facing toward the lens.
Front Dome and Vanity LED Installation
Front Dome – Step 1
The front dome light console is secured in the head- liner by plastic tabs at the rear and by a pair of metal spring clips at the front. The metal clips snap against the edge of the headliner to hold the console in place.

Front Dome – Step 2
To give you a better idea what the metal spring clips look like, and where they are located, here is a shot of the console after it has been removed.
The spring clips (arrows) must be compressed to release the console.
To access the clips, we will drop the headliner down.

Front Dome – Step 3
Lower both sun visors, and pull them o to the side, out of your way.
Using a T20 Torx® driver, unscrew and remove the sun visor attachment clips.

Front Dome – Step 4
Gently lower the front edge of the headliner, and reach up between the headliner and the roof of the car; push against the metal console clips to release them, and drop the console down.

Front Dome – Step 5
Twist and pull the three bulb holders to remove them from their sockets in the rear of the console panel.
Remove the original bulbs and insert a new 8-chip LED in each holder.
These are polarity sensitive. If they do not work when tested, remove and rotate the bulb holders 180 degrees.

Front Dome – Step 6
Insert the rear of the console into the headliner as shown and tip the front upward until the clips snap in place.
Replace the sun visor clips.

Front Dome – Step 6
Insert the rear of the console into the headliner as shown and tip the front upward until the clips snap in place.
Replace the sun visor clips.

Vanity Mirror Lights – Step 1
Using a non-marring trim removal tool, pry down on the light assembly as shown to release it from the headliner.

Vanity Mirror Lights – Step 2
Remove the original lament festoon bulb and insert a new 42mm festoon LED array in its place.
Install it with the LED chips facing the lens.
The LEDs are polarity sensitive. If it does not light when first installed, flip the array end-for-end, and retest.
Snap the assembly back into the headliner and repeat the process at the other vanity light.

Rear Dome LED Installation
Rear Dome – Step 1
Place your thumbs against the front edge of the rear dome light console and push toward the rear of the car. This compresses the spring clips.
Drop the front of the console down.

Rear Dome – Step 2
Use the same procedures used on the front dome light to replace the three original bulbs with 8-chip LEDs.
As always, test the LEDs. If one or more does not work initially, remove and rotate them 180 degrees to reverse their polarity.
Snap the console back into the headliner when all LEDs are working.

Glove Box Footwell Puddle Trunk Console
Glove Box
Using a trim removal tool, pry down the glove box light assembly. Pry on the side of the light assembly away from the light control switch rod; pivot the light downward.
Insert a new festoon LED in the bulb holder. Test operation and flip end-for-end if the bulb does not work initially.
Reinstall the light assembly.

Footwell
Using a trim removal tool, pry down a footwell light assembly.
Remove the original glass bulb.
Insert a new 8-chip wedge base LED into the bulb holder. Test operation and ip the LED over if the bulb does not work initially.
Reinstall the light assembly.
Repeat the process at the other footwell light.

Puddle Lamps – Step 1
Pry down on the notched end of the puddle lamp assemblies in the door bottoms.

Puddle Lamps – Step 2
Twist and pull to remove the puddle lamp bulb holder from the light assembly.
Replace the original bulb with a 8-chip wedge style LED. Test the LED and flip it over to reverse the polarity if it does not work initially.
Insert the LED/bulb holder into the light assembly and twist to lock it in place.
Snap the light back into the door bottom. Repeat the process at the opposite door.

Trunk Lamp – Step 1
Pry down on the notched end of the trunk light assembly.
The rear of the assembly is covered by a metal heat shield. Pry o the shield to expose the bulb beneath it.
Remove the original bulb.

Trunk Lamp – Step 2
Install a new 42mm festoon in the bulb holder, with the LED chips facing toward the lens.
Test LED operation. Flip the LED end-for-end in the bulb holder if it does not light initially.
Replace the metal shield and snap the light assembly back in place in the trunk.

Rear Footwell – Step 1
The E92 has two footwell lights located on the sides of the center console.

Rear Footwell – Step 2
Use a non-marring trim removal tool, pry the light from the side wall of the console.

Rear Footwell – Step 3
Press on the two plastic locking tabs (arrows) and raise the light socket assembly from the gray housing.

Rear Footwell – Step 4
Flip the housing over and remove the original wedge base bulbs.
Insert two of the micro wedge bulbs, one in each wedge socket.
Test the lights. Reinstall the light socket assembly in the housing and snap it back in place in the console.

Rear Footwell – Step 5
Replace the light assembly in the console. Repeat the process on the opposite side.

Interested in purchasing?
Master LED Interior Lighting Kit


