Introduction:
Part numbers: ES#2723829, ES#2804354
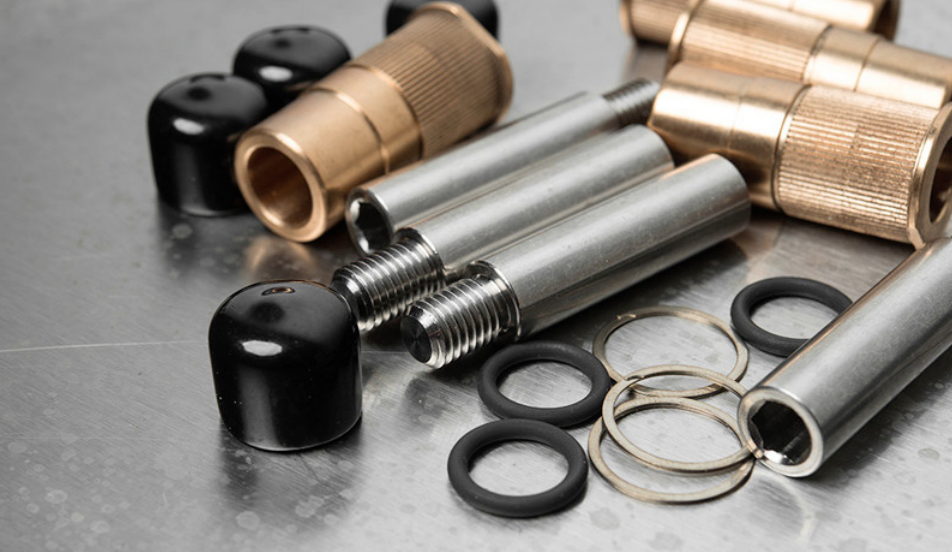
The ECS Bronze Caliper Guide Pin Bushing Kit for your BMW offers the following features:
• Oil Impregnated Bronze Caliper Bushings
• Precision ground 304 Stainless Steel Guide Pins
• Rubber dust cap and O-ring for maximum protection against contamination
• Allows for better braking force for enhanced overall braking performance
• Lessens caliper deflection
• Enhanced pedal feel
• Reduced uneven pad wear
• Easy installation
ECS Tuning Performance Caliper Guide Bushing Installation Tool Set: We have developed a tool set to make this install even easier! It is available on our website at ES#3154107.

Replacing the caliper guide pin bushings on your BMW is a rewarding project that an experienced technician will be able to complete in an afternoon, plan accordingly based on your experience level. Before you begin, read and familiarize yourself with these instructions and make sure you have all the required tools on hand. Thank you for purchasing our Bronze Caliper Guide Pin Bushing Kit, we appreciate your business!
Kit Contents:
ES#272723829

ES#2804354

Required Tools:
• Protecta-Sockets (for lug nuts) ES#2221243
• 3⁄8” Drive Ratchet ES#2765902
• 3⁄8” Drive Torque Wrench ES#2221245
• 3⁄8” Drive Deep and Shallow Sockets ES#2763772
• 3⁄8” Drive Extensions ES#2804822
• Hydraulic Floor Jack ES#2834951
• Torx Drivers and Sockets ES#11417/8
• 1⁄2” Drive Deep and Shallow Sockets ES#2839106
• 1⁄2” Drive Ratchet
• 1⁄2” Drive Extensions
• 1⁄2” Drive Torque Wrench ES#2221244
• 1⁄2” Drive Breaker Bar ES2776653
• Bench Mounted Vise
• Crows Foot Wrenches
• Hook and Pick Tool Set ES#2778980
• 1⁄4” Drive Ratchet ES#2823235
• 1⁄4” Drive Deep and Shallow Sockets ES#2823235
• 1⁄4” Drive Extensions ES#2823235
• Plier and Cutter Set ES#2804496
• Flat and Phillips Screwdrivers ES#2225921
• Jack Stands ES#2763355
• Ball Pein Hammers • Pry Bar Set ES#1899378
• Electric/Cordless Drill
• Caliper Hangers
• Drill Bits
• Punch and Chisel Set
• Hex Bit (Allen) Wrenches and Sockets ES#11420
• Thread Repair Tools ES#1306824
• Open/Boxed End Wrench Set ES#2765907
• C-Clamp
• Die Grinder with Wire Brush
• Wheel Hanger
Shop Supplies and Materials:
Standard Shop Supply Recommendations: We recommend that you have a standard inventory of automotive shop supplies before beginning this or any automotive repair procedure. The following list outlines the basic shop supplies that we like to keep on hand. Shop supplies with a hyperlink are available on our website.
• Hand Cleaner/Degreaser – Click Here
• Pig Mats – for protecting your garage floor and work area from spills and stains – Click Here
• Spray detailer – for rapid cleaning of anything that comes into contact with your paint such as brake fluid – Click Here
• Micro Fiber Towels – for cleaning the paint on your car – Click Here
• Latex Gloves – for the extra oily and dirty jobs – Click Here
• Medium and High Strength Loctite Thread lock compound – to prevent bolts from backing out – Click Here
• Anti-Seize Compound – to prevent seizing, galling, and corrosion of fasteners – Click Here
• Aerosol Brake/Parts Cleaner – for cleaning and degreasing parts
• Shop Rags – used for wiping hands, tools, and parts
• Penetrating oil – for helping to free rusted or stuck bolts and nuts
• Mechanics wire – for securing components out of the way
• Silicone spray lube – for rubber components such as exhaust hangers
• Paint Marker – for marking installation positions or bolts during a torquing sequence
• Plastic Wire Ties/Zip Ties – for routing and securing wiring harnesses or vacuum hoses
• Electrical tape – for wrapping wiring harnesses or temporary securing of small components
Installation Notes:
RH refers to the passenger side of the vehicle.
• LH refers to the driver side of the vehicle.
• Always use the proper torque specifications.
• If applicable to this installation, torque specifications will be listed throughout the document and at the end as well.
• Please read all of these instructions and familiarize yourself with the complete process BEFORE you begin.
General Preparation and Safety Information:
ECS Tuning cares about your health and safety. Please read the following safety information. This information pertains to automotive service in general, and while it may not pertain to every job you do, please remember and share these important safety tips.
• Park your car in a safe, well lit, level area.
• Shut the engine off and remove the key from the ignition switch.
• Make sure any remote start devices are properly disabled.
• ALWAYS wear safety glasses.
• Make sure the parking brake is applied until the vehicle is safely lifted and supported.
• If using an automotive lift, be sure and utilize the factory specified lift points. Lifting a vehicle in an incorrect location can cause damage to the suspension/running gear.
• When lifting a vehicle using a jack, always utilize the factory specified lift points. Lifting a vehicle in an incorrect location can cause damage to the suspension/running gear. ALWAYS support the vehicle with jack stands.
• Always read and follow all safety information and warnings for the equipment you are using.
Technical Notes:
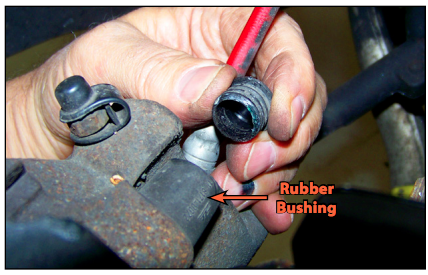
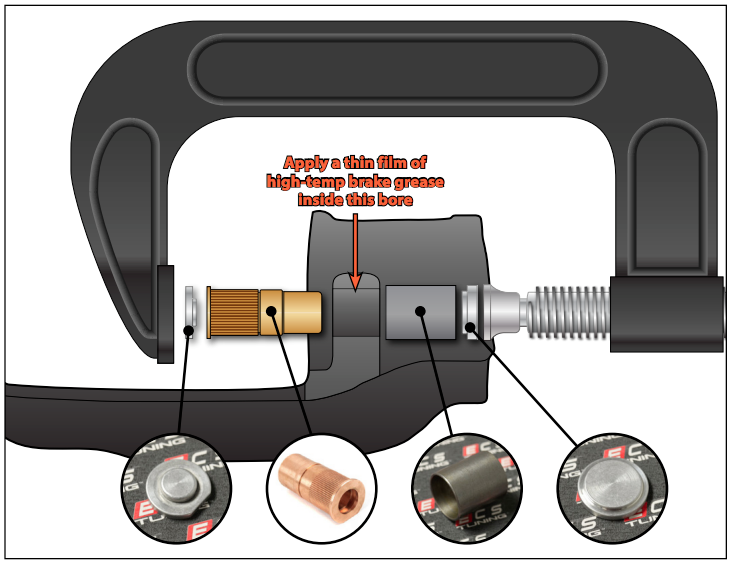
BMW’s leave the factory with rubber guide pin bushings in their calipers. The bushings are the contact sleeves for polished caliper guide pins, which are used to mount the calipers to the caliper carriers. The guide pins allow the caliper body to self-center as the brakes are applied, dividing braking force evenly between the inner and outer brake pads. OEM rubber bushings are somewhat compliant and selected because they provide a brake feel that is considered to be suitable for the average motorist who uses the car as a daily driver.
When the rubber bushings wear or compress, however, braking response can turn from pleasant and effective to soft and unpredictable. Bushing bores enlarged by wear and compression can let the caliper body rock on its slide pins. This reduces braking efficiency and often leads to uneven pad wear.
Even if the stock rubber bushings are not worn or hardened, motorists who take their car to the track for the occasional “spirited” driving session, may find brake pedal feel and braking performance below expectations, even if they have upgraded to premium brake pads and rotors.
One option for brake repair and performance upgrade is to replace the original equipment rubber with bushings made of bronze. The inner bore of the bronze bushing is precision machined for a tight fit, so calipers slide smoothly on their pins, without rocking. This gives the brake pedal a harder and more responsive feel. For this installation, we will be using a BMW 540i, but the procedure will be relevant for all applicable vehicles.

Removing the Stock Rubber Bushing:
Step 1:
1⁄2” Breaker Bar, 17mm Socket, Wheel Hanger
Safely raise and support the vehicle, then remove the front wheels.
The photos in this installation may not represent your application, they are meant to be used as a guide.

Step 2:
Flat Blade Screwdriver
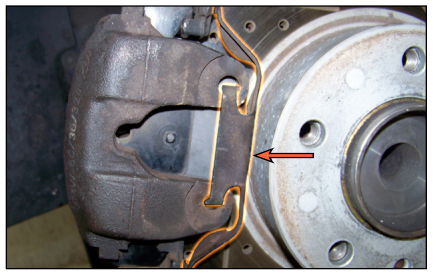
To remove the caliper spring clip, pry back slightly to take the tension off of the spring, then pop its arms from the holes in the caliper (arrows).

Step 3:
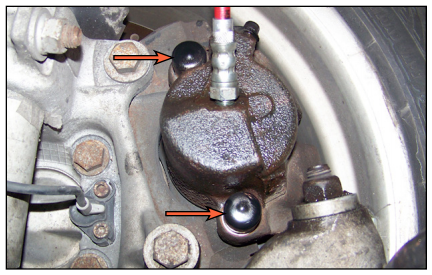
Flat Blade Screwdriver
Gently pry the black protective caps from the ends of each rubber guide pin bushing, there are two per caliper.
Step 4:
3⁄8” Ratchet, 7mm Hex Bit Socket, Caliper Hanger
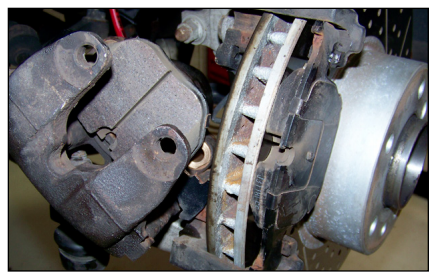
Loosen and remove both guide pins from each caliper, then pull the caliper body off of the rotor, and remove the brake pads from the caliper. Finally, hang the caliper from the strut to protect the brake hose.
TECH TIP: If the bushings are dry or have heavy accumulations of road salt and dirt, the guide pins can be hard to remove even when screwed all the way out. It may be necessary to help them along with pliers in extreme cases.

Step 5:
Pliers
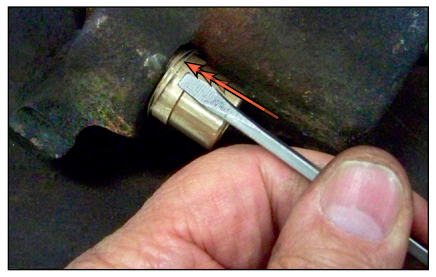
Remove the old bushings from the caliper by grabbing the rubber, then twisting and pulling them out of their bore. Note how much rust has accumulated between the bushing and the caliper (arrow).
Note: We have removed the caliper from the vehicle to provide better photos for these instructions, but in most cases, you can remove and install the bushings with the brake hose still connected, eliminating the need to bleed the brakes afterwards. Please ensure that the caliper is suspended properly during this installation and is not hanging from the hose.
Step 6:
Wire Brush or Small Sanding Barrel, Die Grinder
File or sand the bushing bores in the caliper (arrow) to remove any rust or corrosion, the end result should be a clean, shiny bore hole. The new bronze bushings are designed to fit precisely inside the bore with no play, so be careful to not remove any metal while removing the rust or corrosion.
CAUTION: Failure to properly clean the bore can cause the guide pins to stick inside the bushings.

Installing the Bronze Bushings:
Performance Caliper Guide Bushing Installation Tool Set:
For ease of installation, we have developed a toolset specifically for this job. It is available on our website at ES#3154107, and it contains all of the components to install the bushings into either iron or aluminum calipers.
NOTE: The bronze bushings are a “press fit” part, which means they will not slide in without some sort of mechanical assistance.
CAUTION: Due to the soft nature of bronze, use of the Performance Caliper Guide Bushing Installation Tool Set is HIGHLY recommended to prevent damage to the bushings.
Iron or Aluminum Brake Calipers:
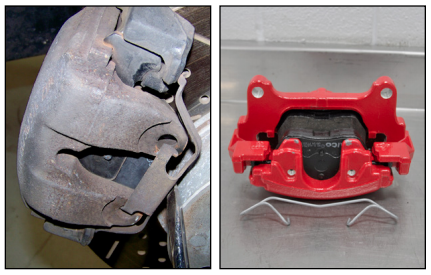
Before you can install the new bushings you will need to determine what material the calipers are made of, either iron or aluminum. Iron calipers are magnetic and are usually rusty if they are not painted. Aluminum calipers will not rust and are not magnetic so you can tell them apart easily.
Installing the Bronze Bushings – Iron Calipers:
Step 1:
Prepare for the bushing installation by aligning the bronze bushing with the caliper bore and positioning the tools as shown. Once all of the components are in place, the c-clamp can then be threaded in slightly to hold everything in position.
NOTE: Be sure to install the short and long bushings in their proper locations (if applicable).
Step 2:
NOTE: Be sure to line up the notches on the bushing and the insert with the caliper piston as shown in the inset photo. This will prevent them from tearing the piston boot as they are installed.
You can now begin to slightly tighten the c-clamp, which will press the bushing into the caliper bore. This illustration shows the bushing as it would appear while being installed into the caliper. Notice that the sleeve is shown to be slightly transparent so you can see how the bushing will be able to slide into the sleeve without the risk of damage or bottoming out.

Step 3:
Continue to tighten the c-clamp until the bushing is fully seated into the caliper. Notice the way that the sleeve protects the leading edge of the bushing, preventing it from being crushed while installing it. NOTE: It is VERY important to stop tightening the c-clamp as soon as the bushing is fully installed. Even with the install tool in place you can still crush the back end of the bushing if you apply too much pressure once it is seated into the caliper (shown in the inset photo).
NOTE: It is VERY important to stop tightening the c-clamp as soon as the bushing is fully installed. Even with the install tool in place you can still crush the back end of the bushing if you apply too much pressure once it is seated into the caliper (shown in the inset photo).

Installing the New Bushings – Aluminum Calipers:
Step1:
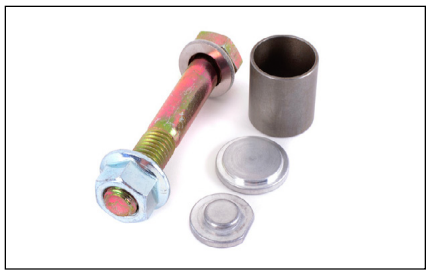
Prepare for the bushing installation by aligning the bronze bushing with the caliper bore and positioning the tools as shown. The bolt can then inserted through all of the components shown in the illustration, then threaded in slightly to hold everything in position.
NOTE: Be sure to install the short and long bushings in their proper locations (if applicable).

Step 2:
NOTE: Be sure to line up the notch on the bushing with the caliper piston as shown in the inset photo. This will prevent the bushing from tearing the piston boot as it is installed. It is also VERY important that you HOLD the nut with a wrench while tightening the bolt. If the nut rotates it can cause serious damage to the bushing.
You can now begin to slightly tighten the bolt, which will press the bushing into the caliper bore. This illustration shows the bushing as it would appear while being installed into the caliper. Notice that the sleeve is shown to be slightly transparent so you can see how the bushing will be able to slide into the sleeve without the risk of damage or bottoming out.

Step 3:
Continue to tighten the bolt until the bushing is fully seated into the caliper. Notice the way that the sleeve protects the leading edge of the bushing, preventing it from being crushed while installing it.
NOTE: It is VERY important to stop tightening the bolt as soon as the bushing is fully installed. Even with the install tool in place you can still crush the back end of the bushing if you apply too much pressure once it is seated into the caliper (shown in the inset photo). It is also VERY important that you HOLD the nut with a wrench while tightening the bolt. If the nut rotates it can cause serious damage to the bushing.

Step 4:
Install the guide pins into each bushing and try to slide them back and forth, they should move freely in and out by hand. If the guide pins do not move freely inside the bushings, this is typically caused by failing to properly clean the caliper bushing bores during step 6. Excess rust inside the bore can cause the bushing to deform inward slightly after installation, restricting the movement of the guide pins. If you experience this you can use a wire brush to remove a small amount of bronze from inside the bushing and re-testing until the pins move freely. Be sure to blow out any removed material with compressed air or a mild parts cleaner.

Step 5:
Install the supplied o-ring into each bronze bushing, ensure the o-ring is completely seated before continuing to the next step.
NOTE:
This photo was taken with the bushings out of the caliper for better visibility. DO NOT install the o-rings until the bushings have been installed into the caliper and you have test fit the guide pins.

Step 6:
Small Pick or Small Flat Blade Screwdriver
Install the circular spring retainer clip onto the new bushing. It is easiest to open the end of the clip slightly and spiral it over the bushing as shown in the photo.

Step 7:
Small Flat Blade Screwdriver
Press the spring clip inward until it snaps into the groove in the bushing, then repeat this process to install the spring clip into the other bushing.
Step 8:
Reinstall the brake pads into the caliper and caliper carrier.
Step 9:
Apply a film of high-temperature brake grease to the new guide pins as shown in the photo.

Step 10:
3⁄8” Torque Wrench, 7mm Hex Bit Socket
Slide the pins into the new bushings, then screw them into the caliper carrier by hand to prevent cross-threading them. Finally, torque the pins to 30 Nm (25 Ft-lbs).

Step 11:
Reinstall the caliper spring clip.
Step 12:
1⁄2” Torque Wrench, 17mm Socket
Slide the new black protective caps over the ends of the bronze bushings to keep water and dirt away from the guide pins. Repeat this process on the opposite side of the vehicle. Torque the wheels to 120 Nm (89 Ft-lbs).
Torque Specifications:
Brake Caliper Guide Pins: 30 Nm (25 Ft-lbs)
Wheels: 120 Nm (89 Ft-lbs)


