
Introduction:
Part Number: ES#2842067
The Ziza LED angel eye set from ECS Tuning offers the following:
• LED angel eyes designed to be a perfect fit and a direct replacement to the OEM angel eyes
• Integrated long-lasting, high-quality LED’s
• Plug-and-play for ease of installation and elimination of “bulb out” warnings
• Brilliantly bright lighting and visual appeal

Installing this Ziza LED angel eye set on your BMW E9X is a quick and easy project that requires only basic tools and experience. Enhance the exterior of your BMW E9X by replacing your dim, dull angel eyes with Ziza LED angel eyes. The time investment to benefit ratio is strongly in your favor, as this will only take you about an hour. Thank you for purchasing our ECS Tuning Ziza LED angel eye set. We appreciate your business!
Required Tools
• Wheel Hanger: ES#2636265
• 1/2” Drive Torque Wrench: ES#2221244
• 17mm Protecta-Socket: ES#2221243
• Impact Wrench (for lug nuts)
• Torx Drivers: T15: ES#11417
• 1/4” Ratchet
• 1/4” Sockets: 8mm, 10mm
• Flat Blade Screwdriver(s): ES#2225921
Removing the original Angel Eye Bulbs
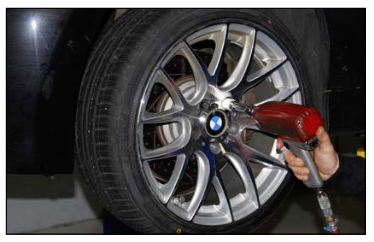
Step 1:
Safely raise and support the vehicle and remove the front wheels. We are using a Protecta-Socket so we do not damage the finish on the wheels and a wheel hanger to support the wheel once the lug bolts are removed.
Step 2:
8mm Socket, 1/4” Ratchet
The forward section of each front fender liner must be removed to access the bottom of the headlights and the Angel Eye bulbs. Begin by removing the four screws underneath the front that secure each one to the front bumper cover and insulation panel.

Step 3:
8mm Socket, 1/4” Ratchet
Remove the screw holding the forward fender liner to the brake duct.
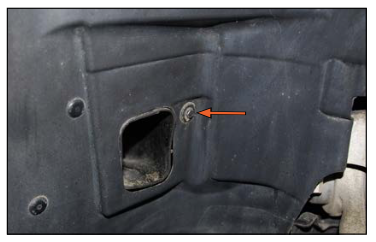
Step 4:
10mm Socket, 1/4” Ratchet
Remove the nut securing the lower corner of the forward fender liner to the body.

Step 5:
8mm Socket, 1/4” Ratchet
Remove the two screws holding the forward fender liner to the edge of the fender.

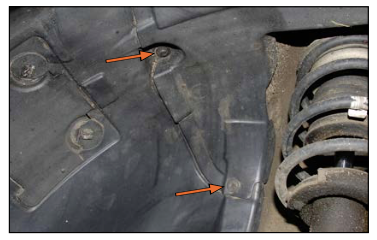
Step 6:
8mm Socket, 1/4” Ratchet
Remove the two upper mounting screws.
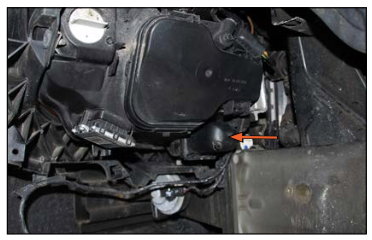
Step 7:
Pull the forward fender liner out and disconnect the tire pressure monitor controller, then set the fender liner to the side.

Step 8:
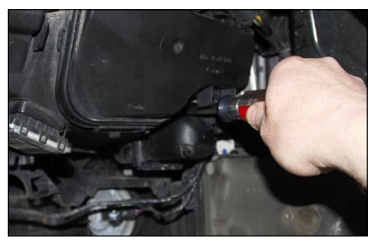
Locate the Angel Eye bulb cap on the lower side of each headlamp.
Step 9:
Each cap is held in place by two tabs, one on the top and one on the bottom. This picture of a removed cap shows the two tabs which hold it in place.

Step 10:
Flat Blade Screwdriver
Pry the tabs towards the cap (pry the top one down and the bottom one up), then pull the cap back off the headlamp assembly. You will not be able to see the top one, but you can easily access it and pop it loose with a screwdriver.
Step 11:
Pull the two wires off of the original bulb.
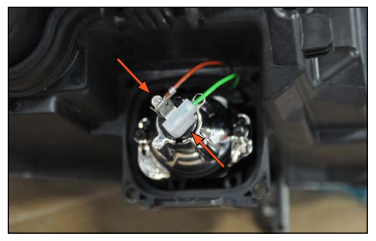
Step 12:
T15 Torx
Remove the two torx screws and remove the original bulb.

Step 13:
Underneath the original bulb you will see a lens and bulb carrier. Pull it out of the headlight housing.
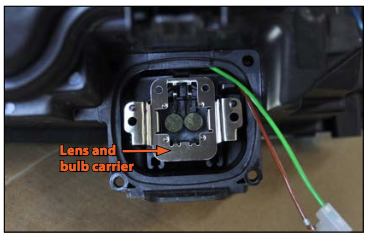
Step 14:
With the lens and bulb carrier removed you will be able to see the ends of the fiber optic rods for the angel eyes.
You are now ready to install the new Ziza angel eye bulbs!

Installing the new Ziza Angel Eye Bulbs
Step 1:
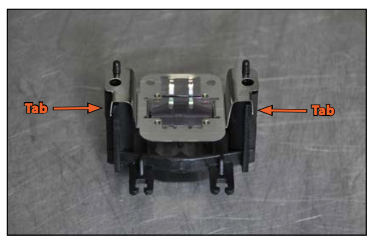
Flat Blade Screwdriver
The original lens is held onto the bulb carrier by two small metal tabs (arrows). Gently pry out the tabs to unhook them and remove the lens from the bulb carrier.
Step 2:
Slide the bulb carrier back into the headlight housing. The fiber optic rods will slide through the center and It will only install one way. At this step, be sure and note the following points:
1. There is an alignment pin above each screw hole.
2. There is a tab protruding from one corner of the housing which prevents you from installing the bulb upside down.

Step 3:
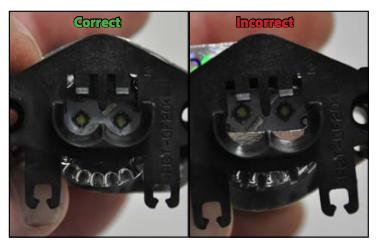
Before you install the bulb, pay attention to the information on this page. Although the bulb and housing are designed to prevent incorrect installation, in the event one of the alignment tabs is missing from your headlight housing you will need to confirm that the new bulb is being installed correctly.
The picture on the left shows the alignment of the new Ziza bulb when it is properly aligned. Note how only the LED’s are visible through the opening in the bulb carrier.
The picture on the right shows the new Ziza bulb when it is misaligned. Note how the LED’s are offset towards the top and part of the metal heatsink is visible through the opening in the bulb carrier.
Step 4:
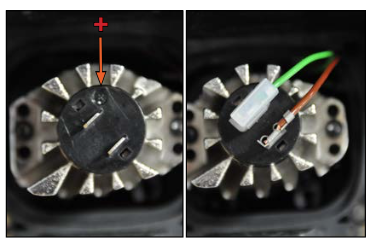
Inspect the new Ziza bulb. You will see that one corner of the bulb protrudes out (arrow). This is designed to interfere with the tab identified in step 2 and force you to flip the bulb over. Also note that the screws are always installed in the center holes.
If you install the bulb upside down, you can cause damage to the fiber optics in your headlamps. Be sure to con rm that you are installing these bulbs the correct way.

Step 5:
T15 Torx
Install the new Ziza bulb into place and install the two screws, one in each center hole.

Step 6:
Connect the wires to the new Ziza bulb. The positive connection on the bulb is marked on the bulb end cap with a small + sign. The green wire connects to this and the brown to the other.
Interested in purchasing?
Ziza LED Angel Eye Bulb Set
Crisp, bright, modern lighting with plug & play installation – no error codes!


