Introduction
Part Numbers: ES2162452, ES2162454, ES2162453, ES2162455
Kit Contents:
Seat tray mounting frame attachment bolt (2) Speed nut
Seat Drawer Titanium Black
Seat Drawer Frame
Preparations:
Estimated Installation Time: 1.5 Hour
Tools Required:
3/8 or 1/2 inch drive ratchet M10 triple square
6-inch extension
T-30 Torx
Diagonal Cutters
Tie wraps
Installation
Step 1:
Use the seat height adjustment lever to jack up the passenger front seat as high as it will go.
This makes room to remove the rear seat bolts.
Note: We are installing a passenger-side tray. A driver side tray is also available and installation is similar.

Step 2:
Slide the front seat fully forward.

Step 3:
Working from the back seat area, remove the two rear seat bolts using a short M10 triple square driver.

Step 4:
Slide the passenger seat fully rearward. Re- move the front seat attachment bolts.

Step 5:
Tilt the front of the passenger seat upward, being careful not to tug on the seat wires. Disconnecting the wires may turn on a seat belt warning light.
Note: To make shooting photos easier, we will remove the seat from the car. You don’t need to remove the seat completely.

Step 6:
The seat tray support bracket attaches to the underside of the seat in four places. There are two plastic hangers that slide into the stamped metal seat bottom at the rear, and two screw attachment holes at the front.

Step 7:
This view shows the underside of the passenger seat. Seat tray guide bracket attachment slots and captive nut locations are highlighted. (Our seat had captive nuts already installed. Two are included in the kit, just in case you need them.)
You cannot install the seat tray support until you move the passenger seat sensor module (highlighted with blue halo for emphasis). It is hung from the stamped metal seat bottom with zip ties at the factory. Carefully cut the zip ties and let the module hang free for now. Do not disconnect any wiring.
Timesaver Tip: While installation steps are similar for both front seats, the driver side seat has no seat sensor module.

Step 8:
Slide the tray guide plastic hangers into the slots in the seat metal. The front hangers will attach to the seat bottom with screws.

This side view of the seat shows how to insert the hangers into the seat support metal slots and then tilt it upward to a horizontal position.

Step 9:
The tray guide has two plastic support hooks that hang on the seat side metal support rod, as shown. As you raise the front of the seat guide, you need to pull the support rod to one side to make room for the hooks.
Timesaver Tip: Removing the seat rod attachment bolt from the rod (arrow) temporarily makes it easier to pull the rod aside until the tray guide is fully raised.

Step 10:
Screw the guide to the captive nuts. Replace the metal rod attachment bolt from Step 9, if you removed it.

Step 11:
Push the seat side trim slots into the rectangular holes in the seat tray guide.

Step 12:
Here is the seat side trim installed in the tray guide.

Step 13:
Reattach the seat sensor module to the bot- tom of the seat with new zip ties. Be careful not to stress any wiring or connectors.

Step 14:
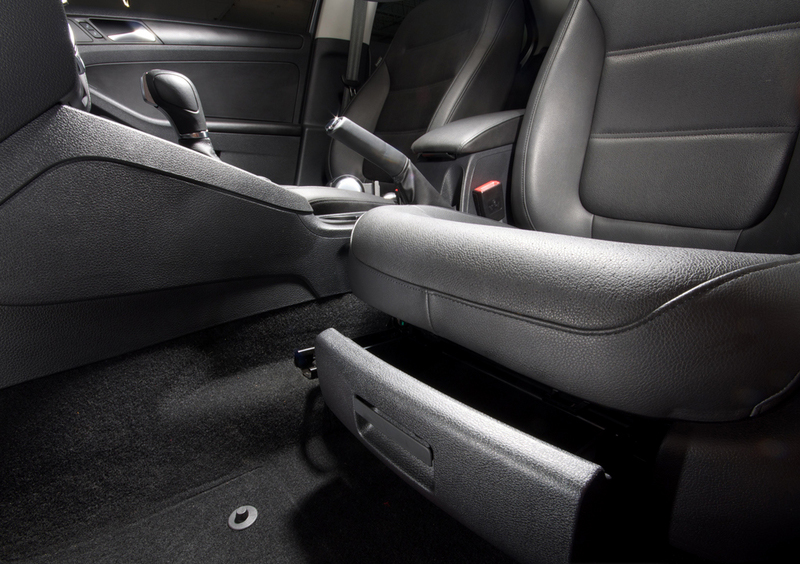
Insert the tray into the guide. Lower the seat and bolt it in place.
Your seat tray is installed and ready to use.

Interested in purchasing?
Seat Tray
Great way of getting extra storage space in your MK6