Introduction
Part Number: ES#2539096
You won’t believe the difference a LED lighting package makes in your car until you see it with your own eyes. LED illumination is a far brighter and friendlier light, crisp and clean, especially when compared to the dingy yellow glow from conventional filament style bulbs.
Now you can do a complete LED conversion using our Audi LED Interior Lighting Kit. It contains all the LEDs needed for a total lighting upgrade. No need for guesswork or complicated ordering of individual bulbs.
Make the job easier and prevent damage to headliners and other interior trim with ECS Tuning Trim and Molding Removal Tool Sets:ES2500877 and ES517779.
General Tips
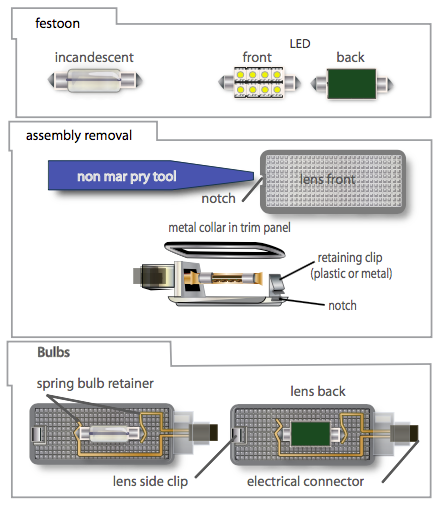
- When prying down on the assemblies to remove them, pry on the notched end of the lens. Insert the narrow tool tip between the lens plastic and any metal collar used to reinforce the lens mounting hole. Push in on the retaining clip first to compress and release it. Then pry down.
- The spring bulb retainer is also the circuit conductor. If necessary, gently bend the metal retainer so it holds the bulb tight. This will help prevent intermittent or flickering LED operation caused by a loose connection.
- Install the bulbs with the LEDs facing toward the lens.
Ziza Interior Lighting Kit Locations

Installation
Front Dome – Step 1:
For demonstration purposes, we will disconnect and remove the front dome light console from the car. You may be able to install the LEDs while the light assembly hangs from its wires, although some will prefer disconnecting the wiring connectors and taking the console to a bench.
To lower the light console, open the sunglasses tray and remove the single T25 Torx screw.

Step 2:
Reach up into the sunglass holder cavity and pull downward on the front of the console to release it from the spring clips holding it in place.

Step 3:
Twist and pull to remove the two wedge base bulb holders located in the rear of the console. Replace the original lament bulbs with 8-chip wedge base LEDs.
The LEDs are polarity sensitive. If either does not work when initially installed and tested, remove the bulb holder and rotate it 180 degrees in the holder to get the LEDs working.

Step 4:
There are two festoon bulbs in the console.
Working from the back of the console, it is possible to pry out the old lament style festoon bulbs and replace them with new 36mm festoon LED arrays.
This is a tight t, however, and may be awkward. The next step shows an alternate approach

Step 5:
Another way to replace the festoon bulbs is to pry the white lens from the front of the console.
Pry carefully at the front edge of the white plastic to pop the lens loose. Use a thin prying device that will not scratch, nick, or mar the plastic lens.

Step 6:
Special note: If you nd it di cult to pry the lens loose from the front, you can push it out from the back of the console.
Insert the trim tool beside one of the original festoon bulbs, and push on the back of the lens near the attachment clips to pop it free.

Step 7:
Remove the old glass festoon bulbs and replace them with the new 36mm festoon LED arrays.
Old and new bulbs are shown here for comparison. Snap the lens back in place.

Step 8:
Reinstall the dome light console.
- Insert the rear of the console into the headliner and push the front upward, as shown.
- Replace the attachment screw removed in Step 2, and close the sunglasses holder to complete the front dome light installation.

Vanity Lights – Step 1:
Use a non-marring trim removal tool, pry down on the notched end of the vanity light to release the spring clip.

Step 2:
Pull the light assembly down and pry o the metal heat shield located on the back of the light assembly.

Step 3:
Pry the old glass festoon bulb from the holder and replace it with a 36mm festoon LED array. The LED chips should face toward the lens, as shown.
Reinstall the heat shield.
Reinstall the light assembly in the headliner, and repeat the process on the opposite side of the car to complete the vanity light installation.

Glove Box Light:
Pry at the notched end of the light housing in the glove box. Pull the light down. Pry o the white plastic heat shield from the back of the light.
Replace the wedge base lament bulb with a 5-chip LED. If the LED does not work when initially tested, rotate it 180 degrees in the bulb holder to get it working.
Reinstall the cover on the assembly, and snap the entire light assembly back in place in the glove box liner.

Puddle Lights:
In similar fashion to the glove box light, pry down at the notched end of the puddle light housing in the door bottom. Pull the light down.
Replace the wedge base lament bulb with an 8-chip LED. If the LED does not work when initially tested, rotate it 180 degrees in the bulb holder to get it working.
Repeat at the opposite door.

Trunk Light – Step 1:
Pry down at the notched end of the light assembly in the roof of the trunk.

Step 2:
Use the non-marring trim tool to pry o the black plastic cover located on the back of the light assembly.

Step 3:
Replace the wedge base lament bulb with a 5-chip LED. If the LED does not work when initially tested, rotate it 180 degrees in the bulb holder to get it working.
Reinstall the plastic cover removed in the previous step.
Reinstall the light assembly in the trunk.

Rear Dome – Step 1:
Use the non-marring trim tool to pry down the rear dome light assembly. Push up and inward to compress the spring clip retainers.
(See next photo for detail.)

Step 2:
This photo shows the exact location of the metal spring clips (arrows) that hold the light assembly in place in the headliner. When removing the light, push against these clips with the tip of the trim tool to com- press them.

Step 3:
Using the non-marring plastic trim removal tool, pry the front trim away from the light assembly. Pry gently at several places until the cover pops off.

Step 4:
Pull the old lament style bulbs straight out of their sockets and replace them with 8-chip LEDs.
Before reinstalling the light, make sure the LEDs work. If the LEDs do not work when initially tested, rotate them 180 degrees in their sockets to get them work- ing.
Snap the assembly back into the headliner to complete the rear dome light installation.

Installation Complete.
Interested in purchasing?
Master LED Interior Lighting Kit
Give your vehicle the complete LED treatment