Introduction
Part Numbers: ES#2859359, ES#2718367

Replacing the transmission mounts on your BMW is a rewarding project that an experienced technician will be able to complete in a weekend. Plan accordingly based on your experience level. Before you begin, read and familiarize yourself with these instructions and make sure you have all the required tools on hand. Thank you for purchasing our polyurethane transmission mount kit, we appreciate your business!
Required Tools
• 3/8”Drive Ratchet: ES#2765902
• 3/8” Drive Torque Wrench: ES#2221245
• 3/8” Socket: ES#2763772
• 13mm Wrench: ES#2765907
• Floor Jack: ES#240941
• Jack Stands: ES#2763355
• Wheel Chocks: ES#2748980
• Wheel Stands: ES#2748979
• Car Ramp – Pair: ES#2748949
• Padded Creeper With Adjustable Headrest: ES#2763705
• Padded Creeper Seat With Tool Tray: ES#2763679
• Two-Shelf Service Cart: ES#2763360
Transmission Mount Installation
Step 1:
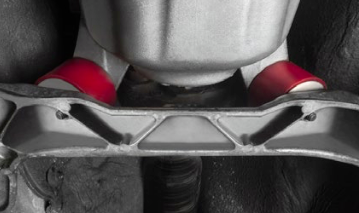
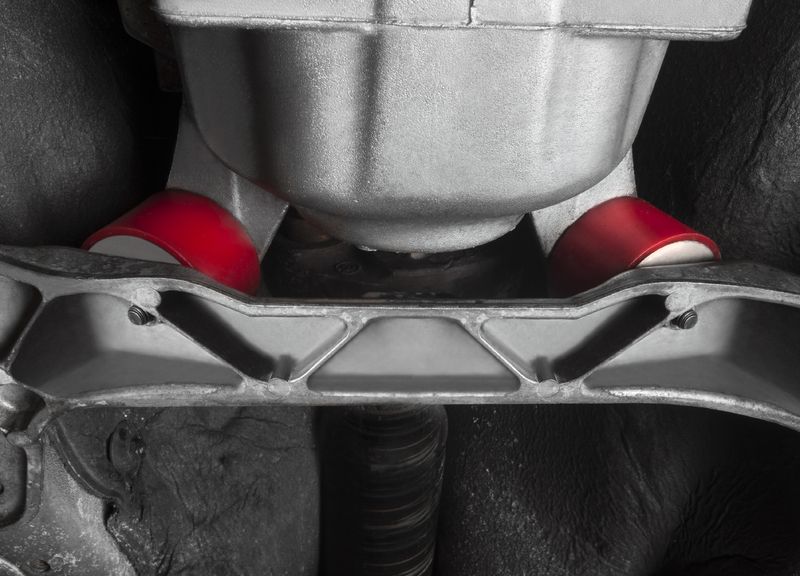
Safely lift and support the vehicle. Remove the belly pan (if equipped) so that the transmission is completely visible. Support the transmission from underneath with a jack or jack stand, be sure to place the support so that the contact point is squarely aligned with the area highlighted in BLUE. The jack or jack stand needs to support the full weight of the transmission without raising it towards the chassis.
Do not raise or lower the transmission more than 5-10cm during this installation. Doing so can damage a number of couplings and linkages throughout the driveline.
![]()
Step 2:
3/8” Ratchet, 13mm Socket
Loosen the crossmember bolts to hand-tightness in the order shown in the photo. DO NOT remove the bolts in this step.
During the following steps, it is possible the transmission may shift. Use extreme caution to ensure the transmission does not shift o of the jack or jack stand.
Step 3:
3/8” Ratchet, 13mm Socket
Loosen and remove the nuts securing the OEM transmission mounts to the crossmember.

Step 4:
Raise the transmission so the mounts are clear of the crossmember, remember to not raise the transmission more than 5-10cm.
![]()
Step 5:
3/8” Ratchet, 13mm Socket, 13mm Wrench
Remove the four bolts securing the transmission crossmember to the chassis and set it aside. The transmission is now completely supported by the jack or jackstand.
Remove the two upper nuts securing the OEM transmission mounts to the transmission, and remove the mounts.
![]()
Step 6:
You will notice that the OEM transmission mounts each have a notch
cut out on the bottom side. This notch aligns with a protrusion on the crossmember, preventing the mount from rotating and further eliminating driveline vibrations from entering the cabin. It is extremely important when installing your new polyurethane mounts that you observe the orientation of the bushing against the crossmember and align the notch in the mount to the protrusion on the crossmsmber as shown in the photos.
Insert the new mounts into the crossmember and hand-tighten the mounts to the crossmember with the supplied hardware.
![]()
Step 7:
Slide the crossmember into position and hand-tighten the upper transmission mount nuts to the transmission, lowering the transmission jack as necessary in order to line up the mounts.
![]()
Step 8:
3/8” Torque Wrench, 13mm Socket
Install the four bolts securing the crossmember to the chassis, and tighten the bolts to 20.4 Nm (15 Ft/lbs).
![]()
Step 9:
3/8” Torque Wrench, 13mm Socket
Lower the weight of the transmission onto the mounts and the crossmember, and torque the upper transmission mount nuts to 21.6 Nm (16 Ft/lbs).
![]()
Step 10:
3/8” Torque Wrench, 13mm Socket
Torque the lower transmission mount nuts to 21.6 Nm (16 Ft/lbs). This is a good time to double check that each nut and bolt is accurately torqued.
![]()
Interested in purchasing?
ECS Polyurethane Transmission Mount Set