Click HERE for Printable PDF
Installation Instructions
Step 1:
If the exterior air temperature sensor in your BMW is stuck at -40 degrees F or +122 degrees F, then there’s a good chance you have:
• a missing air temperature sensor
• a damaged air temperature sensor
• an open or short-circuit in the sensor wiring

Step 2:
Exterior air (also referred to as an ambient air) temperature sensors located in the lower inner fender liner plastic shield are particularly vulnerable to decapitation or disconnection resulting from road hazard impact.
Due to its location, many BMW cars have been known to lose the cover, sensor, and electrical connector in a single blow from ying debris or impact with a concrete curb.

Step 3:
Repairing the sensor and circuit may be as simple as plugging in a new sensor.
If the sensor and wiring have been damaged, however, the ECS Tuning ambient air temperature sensor repair kit can help you fix the wiring, replace the sensor, and get the temperature gauge working again.
The kit is specially designed with two added lengths of wire so you can reposition the sensor in an out-of-the-way location that provides more protection.
Kit Contents
To make your repair easier, we’ve included everything you need to repair the sensor and its wiring.
- a new air temperature sensor with mounting zip tie
- an OEM sensor electrical connector
- two lengths of white wire with OEM electrical connectors crimped in place
- two crimp connectors to join the new wires to the original car harness
- a mounting zip tie to relocate the sensor, if necessary
- zip ties (to secure the wiring)

Kit Contents: Wiring and Connector
Your kit comes with two lengths of white wire that have new, original equipment wire terminals and ribbed rubber seals already crimped in place. Note that the terminal ends have a small raised metal locking tab.
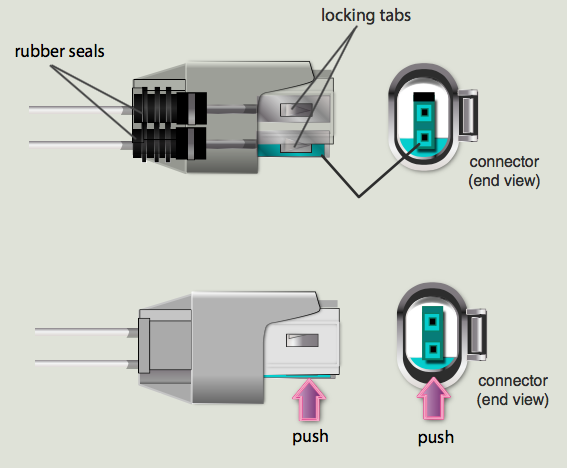
Preparing the Connector
- Make sure the bluish-green plastic center section of the electrical connector is sticking out slightly to one side. (There will be a small gap between the bluish-green insert and the surrounding white plastic, as shown in the illustration to the right.)
- Align the wire terminals so the small locking tabs and “windows” in the connector are both facing up.
- Slide the terminals into the opening in the connector end. Use a small screwdriver or pick to push the wire terminals inward until they snap into place and lock.

Preparing the Connector
When the wires lock in place, give them a tug to be sure they cannot be pulled out.
Use your small pick again and push the rubber seals into the connector all the way, as shown here.
With both wires installed, push the bluish-green insert in until it sits flush with the edge of the white plastic.
Now its time to connect the new wires to the original car harness wires for the temp sensor.
Patching the Wiring Harness
1. Cut back the insulation about 3/8-inch (9-10mm).
- Push the bared ends of the wires into the crimp connector far enough that they overlap in the center. Use a crimping tool to squeeze the connector in the middle, making a tight electrical connection. (Tug the wires to be sure they will not pull apart.)
- Hold the flame of a butane lighter beneath the heat shrinkable plastic on the electrical connector until the plastic shrinks and seals tightly around the wire.

Plug in the Sensor
The connector in the kit is an OEM fit on the sensor itself. Push the sensor into the connector until the lock tab snaps in place.
Once the repair is made and the new sensor is connected, you can reinstall it at its original location, or use the white mounting zip tie in the kit to place it at a safer location, inside a wheel well, or somewhere in the grille or underhood area.
Then use several zip ties from the kit to secure the wires in a safe location.

If your lower shield is intact, you can reinstall the sensor in its original location.
This sensor has been relocated to a safer spot inside the fender well to keep it safe from road hazards. Just be sure it is mounted far enough from the radiator or another heat source, or you will get false readings.


