
Introduction:
Part Number: ES#2804295
The ECS Tuning BMW E9x M3 F10/M5 Big Brake Kit includes the following:
• Two F10 M5 Brembo 6 piston calipers
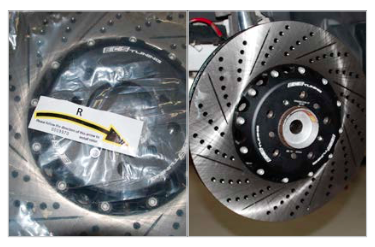
• Two ECS Tuning two piece 382 x 36mm rotors
• Two ECS Tuning Exact-Fit brake lines
• OEM Textar front brake pad set
• Two front brake pad wear sensors
• Caliper mounting bolts and hardware
• Two ECS Tuning in-house engineered caliper brackets
• Pentosin DOT4 brake fluid

Installing the BMW M3 Big Brake Kit is an afternoon project that will give you the superior braking performance of F10 M5 6 piston calipers and the quality and dependability of ECS Tuning in-house engineered brake caliper brackets and hoses, all put together in a kit to give you a smooth, trouble-free installation. These instructions are intended as a general installation guide for someone with previous brake experience. They are not intended as a comprehensive step by step set of instructions. Before you begin, please read and familiarize yourself with these instructions and if you need an additional reference, be sure to have the proper service manuals available. Thank you for purchasing our ECS Tuning BMW Big Brake Kit. We appreciate your business!
F10/M5 Big Brake Kit Contents:

Required Tools:
We recommend that you have a complete selection of tools and equipment necessary for automotive repair. Below is a list of the specific tools that will be required to install your ECS Tuning BMW Big Brake Kit. Additional tools may be required for any issues that arise during installation such as rust, corrosion, or broken and stripped fasteners.
• 17mm Protecta-Socket (for lug nuts): ES#2221243
• 3/8” Drive Torque Wrench: ES#2221245
• 1/2” Drive Torque Wrench: ES#2221244
• 12 x 1.25 Wheel Hanger: ES#2636265
• Flat Blade Screwdriver(s): ES#2225921
• 1/2” Drive Impact
• Line Wrenches: 11mm
• Ball Pein Hammer
• Small Punch
• 1/4” Drive Ratchet
• 1/4” Drive Hex Bits: 6mm
• 3/8” Drive Ratchet
• 3/8” Drive Hex Bits: 10mm
• 1/2” Drive Ratchet
• 1/2” Drive Sockets: 18mm
Installation:
Step 1:
Safely raise and support the vehicle and remove the front wheels. Open the front sensor junction box on each side to expose the connectors for the pad wear and ABS sensors. The box will be in plain view, mounted to the inner fender almost directly behind each front strut.
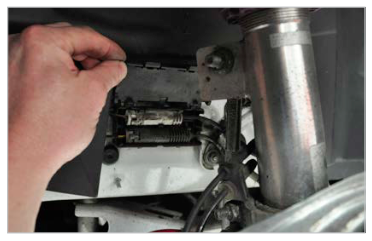
Step 2:
Pull the white connector (pad warning sensor) out of each junction box, depress the locking tab (arrow) and separate the two halves of the connector. Next pull the two pad warning harness reinforcements out of their mounting brackets, one by the junction box and one by the front strut, so the harness is free and only connected to the brake pad in the caliper.
Step 3:
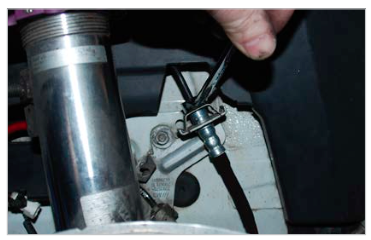
Disconnect the original brake hoses where they meet the hard lines using an 11mm line wrench. Pull each brake hose retainer out of its mounting bracket, located on the upper rear of each steering knuckle.
TECH TIP: Plug the end of the brake lines (a pinched o piece of hose works well for this) to prevent the brake uid from running out. This will make bleeding much easier and keep the mess to a minimum. Be sure to immediately clean any surfaces that come in contact with brake fluid.
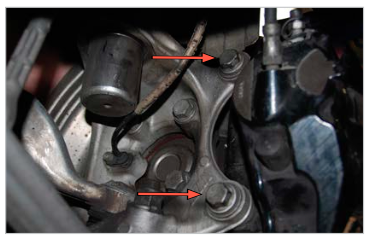
Step 4:
Using an 18mm socket on a 1/2” drive ratchet or breaker bar, remove both original brake caliper mounting bolts on each side (arrows).
Step 5:
Lift the original brake calipers off the front rotors and remove them, then using a 6mm hex bit, remove the two front rotor screws on each side and remove the rotors.

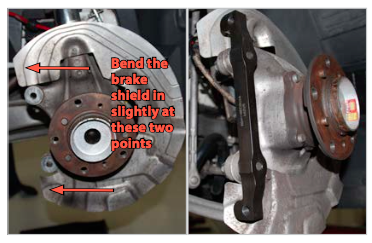
Step 6:
Bolt a new caliper mounting bracket in place on each side using the original caliper mounting bolts. The brake shields will need to be bent inward slightly at each bracket ear. Torque the bolts to 110 Nm (81 Ft-Lbs).
Step 7:
Clean the surface of the new brake rotors with brake parts cleaner to remove any grease or oil. Install the rotors onto each hub and torque the new rotor screws to 16 Nm (12 Ft-lbs). Be sure to install the correct rotor on each side. They will be clearly marked as to which side they are for.
Step 8:
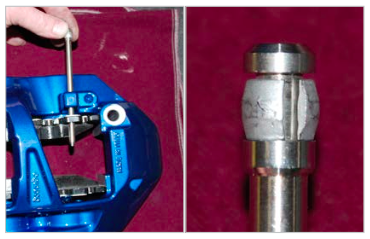
Place each new caliper upside down on a fender cover or soft towel, then install a new pad tension spring into each caliper by pressing down until it is securely clipped in place.

Step 9:
Slide the new brake pads into place in each front caliper.
NOTE: The OEM pads have a special backing and they do not require lubrication at the contact points.

Step 10:
Support the brake pads so they do not fall out, and turn each caliper over. Install two pad retaining pins in each caliper, tapping them in lightly with a punch until each pin is fully seated. The end of each pin has a tensioning collar which will hold the pins in place when seated.
NOTE: In order to align the pad retaining pins, you will have to push the brake pads up into the calipers to overcome the force of the tension springs.
Step 11:
Slide the caliper in place over the rotor and install and torque the caliper bolts to 115 Nm (85 Ft-lbs) using a 10mm hex bit.

Final Installation Steps:
Use the following checklist to complete the installation:
Install the new ECS Exact-Fit brake lines.
Install and connect the new pad warning harnesses.
Bleed the brake calipers: RF Outer, RF Inner, LF Outer, LF Inner.
Seat the brakes, make sure the pedal is firm and check for leaks.
Top o the brake fluid to the correct level.
Install and torque the wheels.
Torque Specifications:
Brake Caliper Bracket Bolts: 110 Nm (81 Ft-lbs)
Brake Caliper Mounting Bolts: 115 Nm (85 Ft-lbs)
Brake Rotor Screws: 16 Nm (12 Ft-lbs)
Wheels: 120 Nm (89 Ft-lbs)
A note about torque to yield or “stretch” bolts: Many bolts will have a torque specification listed in the format – xx Nm+xx degrees (xx Ft-lbs+xx degrees). These bolts are torque to yield bolts, commonly referred to as “stretch” bolts. The correct procedure for torquing these bolts is: Stage One – torque them to the Nm or Ft-lb specification. Stage Two – tighten each one the additional specified number of degrees. To prevent over torquing it is important to mark each fastener with paint immediately after performing the second stage or “stretching” of the bolts.
Pad Break-In and Maintenance:
• Be sure to read the pad break-in procedure included with the pads in the kit. Performing this procedure as specified will guarantee the correct performance and wear from your brake pads.
• To ensure even wear, consistent performance, and long life of your brake pads, it is a good idea to remove the pads once a year and clean any rust, dirt, or debris from the brake pad and caliper.
Your BMW M3 F10 brake conversion is complete!
Interested in purchasing?
ECS Front 6-Piston Big Brake Kit
Upgrade to blue 6-piston F10 M5 calipers, ECS 2-piece rotors, and stainless steel brake lines. Includes fluid and all hardware.


