BMW M5x/S5x Single Vanos Rebuild Kit Installation
BMW’s Vanos variable valve timing system is one of the most recognized systems in the industry. There are a number of different designs, and they all work off of ingeniously simple mechanical principals. Their notoriety, however, is not likely to be from their design and performance, but more so from the fact that they frequently wear out. Luckily, the majority of the problems are caused by worn seals, which can easily be replaced. Today we’re going to be installing our rebuild kit into the single Vanos unit that is found on the 6 cylinder M50TU, M52, and S50 and S52 engines. One of the symptoms of Vanos malfunction is the well known “Vanos rattle”. In the case of the M5x/S5x engines, it’s caused by excessive axial play in the Vanos piston bearings, and we offer a new ECS bearing ring to remedy this problem. Installing the rebuild kit into your M5x/S5x single Vanos is a pretty easy project, and it’ll restore smooth, consistent performance, some of which you may not even realize you’ve lost.
Take your time and enjoy the project. You can generally complete it in an afternoon, but it’s best to plan a whole day so you don’t try to rush through it. The best advice, as always, is to read through these instructions first to familiarize yourself with the project and make sure you have all of the required tools on hand. You’ll see that we don’t get too in-depth until we get down to the Vanos unit itself. The disassembly up to that point is fairly routine, and we’re confident you can handle it. Thank you for looking to ECS Tuning for all your performance and repair needs. We appreciate your business! 17mm or 18mm Vanos piston cap socket. Some early models require the 17mm socket, so it may be best to have both on hand so you are not delayed.
Note that these are not regular sockets. The chamfer in the opening has been machined off because the hex on the piston cap is so thin that a regular socket will slip off and damage the cap.
ES3131366 18mm
ES3131365 17m
This water pump and fan clutch toolkit will make disassembly much easier.
ES2627584
This required cam tool set allows you to lock the crankshaft and both camshafts in position to maintain engine timing for Vanos removal.
ES2778117
This sprocket turning tool allows you to rotate the exhaust camshaft easily during Vanos removal and installation. Although not an absolute necessity, it will save you a lot of time.
ES3200983

Component removal to get down to the Vanos system is pretty basic, and we’re betting if you’re going to tackle this job you don’t need us to step you through the easy stuff, but we’ll give you a quick run-down anyhow. The following items will need to be removed:
1. Air Box
2. Air Duct, Radiator Fan, and Shroud
3. Cabin Filter Housing (E39 Only)
4. Engine Top Covers, Valve Cover, and Ignition Coils
The Vanos system is located on the front of the engine at the top.

With the preliminary components and valve cover removed, you’ll have open access to the camshafts and the Vanos unit. Picking up from this point, begin by pulling off the plastic cover over the intake camshaft.

We’re going to lock the engine timing in place next and you’ll have to rotate the engine over, so begin by placing a socket and ratchet onto the crankshaft pulley center bolt.

Rotate the engine in a clockwise direction until the intake and exhaust camshaft lobes on cylinder#1 are pointing towards each other as shown.

At about the 11:00 position, there is a TDC mark on the crankshaft pulley and on the front of the engine. Rotate the engine in either direction as required so these two marks align. You may need to use a mirror and flashlight in order to see them clearly.

Safely raise and support the vehicle. From underneath, locate the hole for the crankshaft locking pin. It is on the driver side rear of the engine block, just above the oil pan. Remove the plug from the hole and insert the locking pin.
You may need to rotate the crankshaft in either direction, making a slight adjustment until the locking pin fully inserts through the block and into the flywheel/flexplate.

Back on the top side, remove the three valve cover studs on the rear of the cylinder head, and note the cast square on the end of each camshaft.

Slide the exhaust camshaft locking fixture (identified by the bolt hole towards the center of the cylinder head) onto the square end of the exhaust camshaft.

The exhaust camshaft has a hex cast into it in the middle so you can engage an open end wrench. If necessary, rotate the camshaft slightly back and forth until the camshaft locking fixture sits flat against the cylinder head.

Install the intake camshaft locking fixture in the same manner as the exhaust, rotating the intake camshaft back and forth as necessary until the locking fixture sits flat against the cylinder head.
Once both camshaft fixtures are in place and flat against the head, secure them together with the bolts and connecting piece that are included with the tool.

Remove the banjo bolt that holds the oil line to the Vanos (1), and unplug the Vanos solenoid connector (2).

Remove the engine lift bracket. It is held on by two bolts, one on top and one hidden underneath just on top of the coolant flange.

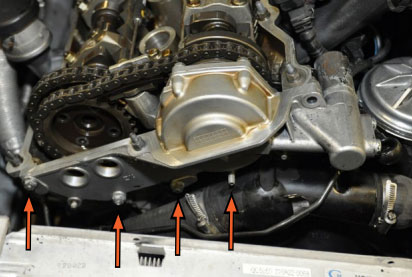
Locate the vacuum pipe that runs across the front of the Vanos and remove the two nuts that hold it in place (arrows).
We are performing this repair on an S52 engine. Some models may not have this vacuum pipe, but instead a cable bracket which you will need to remove.

Disconnect the vacuum hose from the diverter valve, then pull the vacuum pipe forward slightly, out of the way as shown.

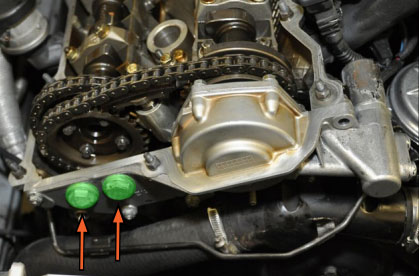
Remove the two Vanos exhaust sprocket access caps.

Place a rag underneath just in case you drop one, then remove the four exhaust cam sprocket bolts. The lower two are accessed through the sprocket cap holes. Be sure and remove the rag when you are done.

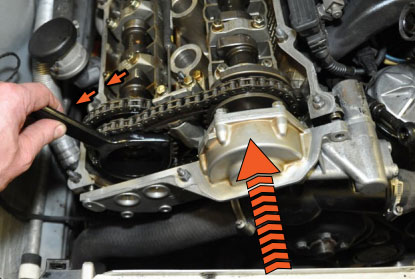
Press down on the timing chain tensioner, then insert a locking pin or similar tool through the tensioner housing and onto the chain pad. This will relieve tension on the chain.
Remove all of the (remaining) Vanos mounting nuts. Depending on model, such as the S52 we are working on, some nuts will already be removed.

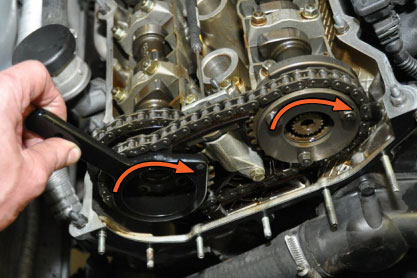
Engage the turning tool into the exhaust cam sprocket, then simultaneously rotate the sprocket clockwise and pull the Vanos off the cylinder head.
Removal is complete. It’s time to start the rebuild!

Place the Vanos unit on a clean work surface, then remove the five piston cover plate bolts.

Pull the piston cover plate and piston out of the Vanos housing, then thoroughly clean all of the components.

Closely inspect the cylinder walls of the Vanos housing. Marks or discoloration from the Vanos piston seal is normal, but the cylinder walls should be smooth and free from grooves or pitting.

Carefully cut the Teflon sealing ring and the o-ring underneath, then remove them from the piston groove. Be extremely careful not to score the piston groove.
The original Teflon seal and o-ring will be difficult and dangerous to remove with any other type of device other than the fine tip of an exacto knife. Be careful not to score or scratch the surface or the groove of the piston.

After removing both the Teflon sealing ring and the o-ring, thoroughly clean the piston groove.

Install the new o-ring into the piston groove.

Prepare the new Teflon sealing ring by dipping it into a container of warm water for a few minutes, or even holding it in between your hands. Start the Teflon sealing ring on one side, then guide it around and into the groove. As it nears the opposite side, you will feel tension build on the sealing ring as it reaches the point shown in the picture on the right. Hold the seal here, then continue with Step 8.

Using your fingers, keep constant tension on the Teflon sealing ring and slowly pull on it until it slips around the top of the piston and fully seats in the piston groove.

If you are installing a new ECS bearing ring to solve the well known Vanos “rattle”, skip to Page 25 and perform the Single Vanos Piston Repair. If you are not installing an ECS bearing ring or performing the anti-rattle repair, continue with reassembly on the next page.
Coat the Teflon sealing ring with clean engine oil, then start the piston back into the housing at an angle as shown.

Carefully rotate the piston fully into the cylinder, then line up the bolt holes on the cover plate with the holes in the Vanos housing.

Install all five bolts until they are all threaded in fully, then tighten them in an alternating pattern to 10 Nm (7 Ft-lbs).
Push the transfer gear (and piston) all the way into the Vanos housing.
For correct Vanos timing, you must make sure that the transfer gear remains in this position during installation.
You are now ready to reinstall the Vanos unit! Skip to Page 39 to continue.
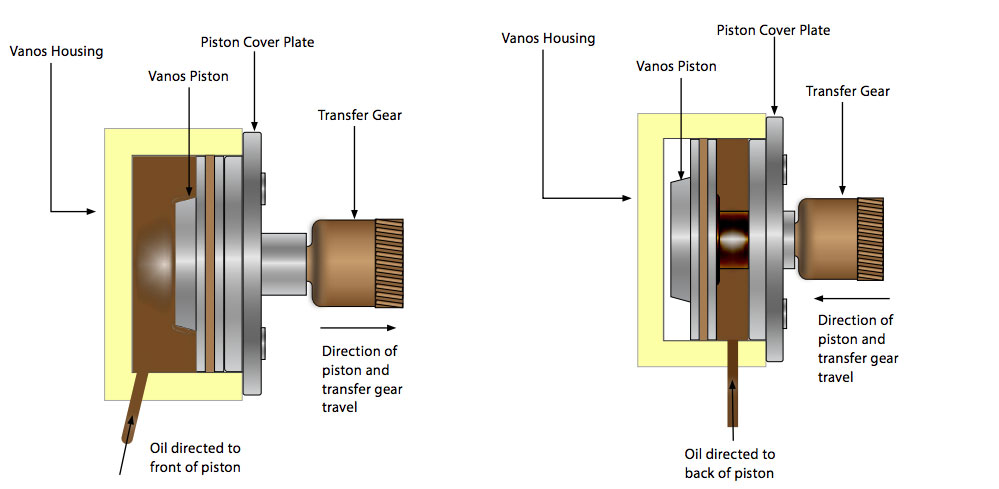
Before you continue, it’s best to get a deeper understanding of how the system works, as well as the terminology that we are using. Over the next few pages, we’ll explain the basic operation and theory of repair, then get back to the job on page 31. As you can see with what you already have apart, the piston protrudes through the cover plate, and the transfer gear (which is secured to the piston), is splined to the intake camshaft and sprocket. When the Vanos is assembled, the piston cover plate is fixed to the Vanos housing. When oil is directed to the front side of the piston, it is pushed outward, resulting in the transfer gear being pushed into the camshaft sprocket. When oil is directed to the back side of the piston, it is pushed back into the piston cylinder, resulting in the transfer gear being pulled back out of the camshaft sprocket. Since the transfer gear has two sets of angled teeth that are splined to the intake camshaft and sprocket, the in and out motion in turn causes the camshaft to be advanced or retarded.
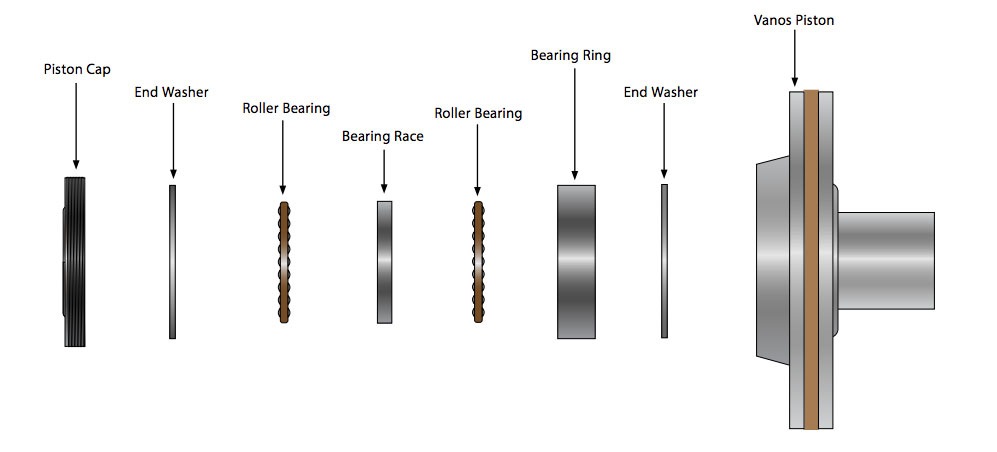
The actual Vanos “rattle” is caused by axial play in the bearings which are housed inside the piston. The key to solving this problem is to remove the axial play (tighten), and ideally, provide a slight preload on the roller bearings. To accomplish this, you’ll check the amount of play, install the new ECS bearing rings in place of the originals, then recheck the amount of play. Due to very strict tolerances and the different rates of component wear from car to car, some fine tuning may be required. After bearing ring installation, you may find that the bearings are still slightly loose (axial play), that they are too tight (not good), or that they have no axial play and a slight preload (perfect). If necessary, adjustments are made by removing material from either the new bearing ring (tightening the bearing) or the bearing race (loosening the bearing). This is a very critical adjustment, (approximately .005 -.015mm), but it’s easy to do. We’ll show you how in just a little bit but first, use the exploded view below to familiarize yourself with all of the piston components, then continue on the next page.
Axial Play, Radial Play, and Preload:

Any looseness in the piston bearings is axial play. This measurement is strictly determined by “feel” and is easily detectable. To check for axial play, hold the piston stationary with one hand and gently move the transfer gear in and out with the other. Side – to – side, or radial play, which is felt by moving the transfer gear left and right in relation to the piston, is normal. When bearing clearance is properly set, you should feel a smooth, even resistance when holding the piston and rotating the transfer gear.

When the piston is assembled, the bearing race and roller bearings fit inside the bearing ring (which we have made transparent in this illustration), and are then “sandwiched” in place as the end washers are seated against it. For Vanos rattle to be eliminated, there should be no clearance between the roller bearings, the bearing race, and the end washers.
What is the difference between the original bearing ring and the new ECS bearing ring, if an adjustment may still need to be made after installation? The new ECS Tuning bearing ring is actually much narrower than the original, getting the adjustment very close, so fine tuning is a quick and easy procedure.

This illustration shows the cause of axial play in the bearings. The bearings are too loose due to clearance between the roller bearings, the bearing race, and the end washers. The bearing ring in this case is, in effect, too wide. The bearings are tightened and clearance is eliminated by decreasing the width of the bearing ring.

In this illustration, the bearings would be too tight. The bearing ring in this case is, in effect, too narrow. When the piston is assembled, the end washers will “crush” the bearings as they attempt to seat against the bearing ring. In this situation, since you cannot increase the width of the bearing ring, to solve the problem you will loosen the bearings by decreasing the width of the bearing race.


Now that you understand the theory, we’ll get back to it. First, check for axial play in the Vanos piston bearings, then follow the flow chart below to check and adjust the axial play/preload of the Vanos piston bearings.

The piston cap must be removed so we can get to the components inside. You’ll have to hold the piston and cover plate in a vise, and there are only a couple safe ways of doing this. You must not damage or distort the piston in any way, or it will be ruined, so be careful. If you have nylon vise jaws, they will work perfect, and the only other alternative is a couple pieces of wood as we are using here.

Look closely at the hex on the end of the piston cap. You’ll see that it is very shallow. It is for this reason that you MUST use one of the special Vanos piston sockets. These sockets have the chamfered end machined off so they can grip the shallow hex. Using a regular socket will result in a damaged piston cap.

Hold pressure inward on the socket to prevent it from slipping, then loosen the piston cap.

Once you have loosened the piston cap, reposition the piston and cover plate so they are secured horizontally in the vise.

Unthread and remove the piston cap.

Lift out the first end washer and roller bearing.

Remove the transfer gear retaining bolt. Note that this bolt is LH thread, so it loosens in a clockwise direction.

Lift the remaining components out of the Vanos piston, clean them all thoroughly (if these aren’t spotless it can throw off your axial play/ preload), and lay them out in order. If this is the initial installation of the bearing ring, remove the original bearing ring from the line up and replace it with the new one, then skip to Step 12 on Page 37. If you have already installed the new bearing ring and need to tighten the bearing, proceed with step 10 on the next page. If you have already installed the new bearing ring and need to loosen the bearing, skip to step 11 on the next page.
To tighten the bearing (when axial play or no preload is present) – sand the bearing ring using the following procedure:

1. Place a sheet of 400 grit sandpaper on a solid, flat surface.
2. Using medium pressure, sand one surface of the ring back and forth 6-8”, approximately 30-40 times.
3. Rotate the ring 90 degrees, and repeat the sanding procedure.
4. Flip the ring over and repeat the sanding procedure.
5. Rotate the ring 90 degrees and repeat the sanding procedure.
This procedure will remove a very small amount of material, approximately .004 – .006mm from the total thickness of the race.
Thoroughly clean the bearing race and continue with step 12 on the next page
To loosen the bearing (when excessive force is required to rotate piston) – sand the bearing race using the following procedure:

1. Place a sheet of 400 grit sandpaper on a solid, flat surface.
2. Using medium pressure, sand one surface of the ring back and forth 6-8”, approximately 30-40 times.
3. Rotate the race 90 degrees, and repeat the sanding procedure.
4. Flip the raceover and repeat the sanding procedure.
5. Rotate the race 90 degrees and repeat the sanding procedure. Thoroughly clean the bearing race and skip to step 12 on the next page.
This procedure will remove a very small amount of material, approximately .004 – .006mm from the total thickness of the race.
Thoroughly clean the bearing race and continue with step 12 on the next page.

Reposition the piston and cover plate once again so they are secured vertically in the vise.

While holding pressure inward on the socket to prevent it from slipping, torque the piston cap to 40 Nm (30 Ft-lbs).
Return to Page 31 and follow the flow chart to check and adjust the axial play/preload on the Vanos piston bearings.
You may have to perform an adjustment procedure as many as three or four times in order to achieve the proper bearing preload.

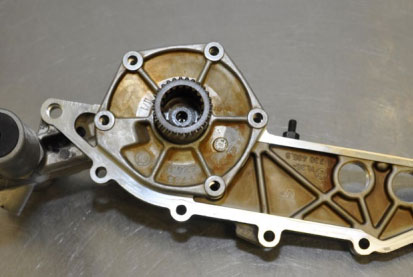
Make sure the old Vanos gasket is removed from the cylinder head, thoroughly clean the sealing surface and make sure the dowel pins are installed in the corner holes.

Slide the new Vanos gasket into place, making sure the ends are placed onto the dowel pins.
Engage the sprocket turning tool onto the exhaust cam sprocket and rotate it clockwise as far as possible. You will notice that this will also cause the intake sprocket to rotate clockwise as well.
To make sure that the sprockets are rotated as far clockwise as possible, you may want to rotate them back and forth a couple times. This will also give you a feeling for the movement of the sprockets, which can help you during Vanos installation in the next few steps.

Make sure the transfer gear is pushed all the way into the Vanos housing (step 12 on Page 24), then slide the Vanos unit onto the mounting studs.

The transfer gear has an inner and an outer set of gear teeth that are offset, so they will engage the camshaft and sprocket at different rotational points. While pushing inward on the entire Vanos unit, rotate the transfer gear by hand so the first set of teeth line up and allow the transfer gear to slide in until it stops at the second set of teeth.
For correct Vanos timing, you must make sure that the transfer gear remains pushed all the way into the Vanos housing during installation. Do not pull the transfer gear out of the housing during alignment and installation, instead be sure to move the Vanos inward as a complete unit.
Engage the sprocket turning tool onto the exhaust camshaft sprocket and rotate or “bump” it very slightly counter clockwise while pushing in on the entire Vanos unit at the same time. As soon as the second set of teeth on the transfer gear line up, the entire Vanos unit will slide inward until it meets the cylinder head.
It is critical for correct Vanos timing that the camshaft/ transfer gear teeth engage at their first possible alignment. Only very slight counter clockwise rotation is required for this to occur. If you are uncertain that you have achieved the first possible alignment, pull the Vanos unit off, return to step 3, and repeat the process.
With the Vanos unit fully seated against the cylinder head, install the mounting nuts and torque them to 8 Nm (6 Ft-lbs).
It is only necessary to installand torque the nuts that will not interfere with the installation and reassembly of other components.

Push down on the chain tensioner and remove the locking pin, then release the tensioner.

Place a rag underneath just in case you drop one, then install the four exhaust sprocket bolts and torque them to 20 Nm (15 Ft-lbs). Remove the rag when you are done.
Reinstall the two Vanos exhaust sprocket access caps and torque them to 50 Nm (37 Ft-lbs).
Remove the camshaft locking blocks.
Remove the crankshaft locking pin and reinstall the plug.
Not too bad, huh? All you have to do is reassemble the components you removed to access the Vanos: • Reconnect the vacuum pipe and cable bracket if equipped. • Reconnect the Vanos oil line and solenoid. • Reinstall the intake camshaft cover. • Reinstall the valve cover, ignition coils, and engine top cover. • Reinstall the cabin filter housing (if removed). • Reinstall the air duct, radiator fan, and shroud. • Reinstall the air box.
If you’re not already, this is a good time to change the engine oil and filter. No break in is required with your newly rebuilt Vanos unit, so once you’ve started the engine and performed a quality check of your work, you’re all ready to go!
Piston Access Plugs……………………………………………………………………………………………………………………….50 Nm (37 Ft-lbs)
Valve Cover Fasteners…………………………………………………………………………………………………………………..10 Nm (7 Ft-lbs)
Vanos Intake Cover Plate Bolts …………………………………………………………………………………………………….10 Nm (7 Ft-lbs)
Vanos Oil Line Banjo Fitting …………………………………………………………………………………………………………32 Nm (24 Ft-lbs)
Vanos Unit Mounting Nuts and Bolt ……………………………………………………………………………………………8 Nm (6 Ft-lbs)
Interested in purchasing?
BMW Single Vanos Repair Kit
Bring your BMW Vanos Unit back to its factory performance and get rid of that pesky rattle once and for all.


