
Part Number: ES#2207842
Ziza Interior Lighting Kit Locations
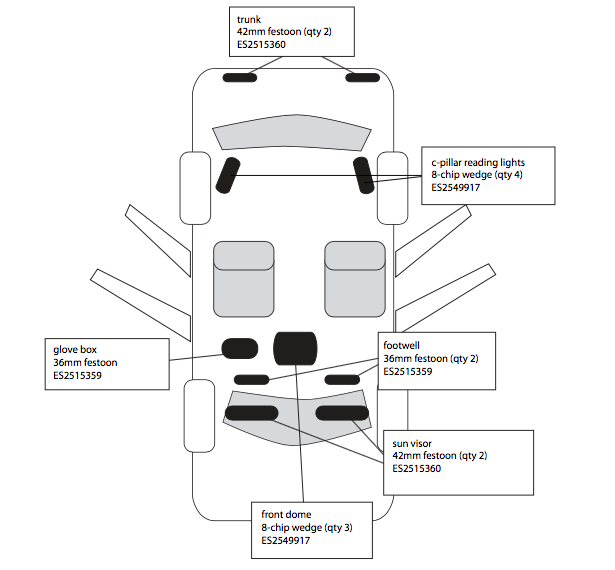
Complete Vehicle LED Installation
Front Dome – Step 1
Use the trim removal tool to pry down on the rear of the console in the areas indicated by our arrows.
Drop the light assembly down.

Front Dome – Step 2
This photo shows you the exact location of the metal spring clips you must compress to lower the dome light assembly.

Front Dome – Step 3
There are three wedge base bulb holders in the back of the light assembly.
- Twist and pull to remove them. Pull the original lament bulbs from the holders.
- Install an 8-chip LED in each of the bulb holders.

Front Dome – Step 4
- The LEDs are polarity sensitive. If they do not work when initially installed, remove the bulb holder and rotate it 180 degrees before reinstalling it.
With all LEDs installed and working, reinstall the light assembly in the headliner.

Vanity Lights- Step 1
- The two vanity lights are located in the headliner, above the sun visors. Pry at the long edge of the vanity light assemblies with your ngers or a trim removal tool to remove them.

Vanity Lights- Step 2
Remove the old lament style festoon from the bulb holder and install a 42mm festoon LED array in its place.
The light chips should face toward the lens, as shown.
The LED array is polarity sensitive. If it does not work initially, flip it end-for-end and retest.
Pop the light assembly back into the headliner. Repeat this process at the other vanity light.

Footwell – Step 1
Locate the footwell lights in the panels beneath the dashboard.
Use a trim removal tool to compress the plastic retainer clip on the light assembly (arrow) and drop it down.
Note the metal heat shield over the bulb holder.

Footwell – Step 2
Slide the heat shield off. Careful: The metal edges may be sharp, so use your trim tool to push if it won’t slide easily.
Remove the original lament bulb and replace it with a 36mm festoon array. The LED chips should face the lens.
The LED array is polarity sensitive. If it does not work initially, flip it end-for-end and retest before snapping it back in place in the under dash panel.
Repeat this process on the opposite side.

Glove Box – Step 1
Open the glove box. Use your trim tool to pry down on the right side of the light assembly (arrow).
Pivot the light downward and remove the original festoon lament bulb.

Glove Box – Step 2
Install a 36mm festoon in the bulb holder. The LED chips—turned sideways so you can see them here— should be rotated to face the lens.
The LED array is polarity sensitive. If it does not work initially, flip it end-for-end and retest.

Glove Box – Step 3
Align the control switch button on the light assembly with the notch in the glove box housing. Then pivot it upward until it snaps in place.

Rear Dome – Step 1
Rear passenger lighting is provided by dome light assemblies located in both C-pillar trim panels.
Use the trim tool to pry the lights from the liner. Insert the tip of the tool and compress the spring clips holding the lights in place.
Rear Dome – Step 2
The rear dome light assemblies have two bulb holders (locations indicated by arrows). Twist and pull the bulb holders to remove them. Pull each wedge base original bulb from its holder, and insert an 8-chip LED in its place.
The LEDs are polarity sensitive. If either does not work initially, remove the bulb holder, rotate it, and reinsert it in its socket to get it working.
Tip: Note the location of the copper colored wire clips in this photo. These are the retainer clips that must be compressed to release the housing from the headliner.

Rear Dome – Step 3
Snap the assemblies back into the headliner. Make sure all tabs and clips are fully engaged to hold it in place.
Repeat this process at the opposite side light.

Trunk – Step 1
The trunk lights are located in the tail light housings.
Press against the release clip to remove the trunk light assembly.

Trunk – Step 2
Pry the trunk light lens cover to remove it from the light housing.

Trunk – Step 3
Remove the original festoon lament bulb and install a 42mm festoon LED array in its place.
The LED chips should face upward as shown, toward the lens.

Trunk – Step 4
We suggest you bend the two electrical contacts upward (very slightly) to ensure a good electrical connection. Loose contacts can cause the trunk lights to icker or go out.
Snap the assembly back in place at the rear of the tail light assemblies, and test the LEDs. The LED array is polarity sensitive. If it does not work initially, ip it end- fore-end and retest.
Snap the lens cover back in place, and repeat the process at the trunk light on the opposite side.

Interested in purchasing?
Master LED Interior Lighting Kit – Sedan


