
Introduction:
Part Numbers: ES#2763045, ES#2763043, ES#25793, ES#2580544
When the DISA Valve on your M54 powered BMW fails it can cause a number of issues: • A loud noise in the engine bay
• Hesitation at low RPM
• Rough idle, & a “Check Engine Light” with lean codes
If the DISA Valve in your BMW is making noise we suggest you replace it immediately. The pin which holds the flap in place can slip out and get sucked into the engine, causing serious internal damage.

Replacing the DISA Valve in your M54 powered BMW is an easy project that an experienced technician will be able to complete in an hour or two. Plan accordingly based on your experience level. The DISA Valve is located on the intake manifold and can be accessed relatively easily. The DISA Valve kits which we have assembled here at ECS Tuning will make the hardest part of the job the easiest since they include all of the hardware necessary for added peace of mind. Before you begin, read and familiarize yourself with these instructions and make sure you have all the required tools on hand. Thank you for purchasing your BMW Disa Valve from ECS Tuning, we appreciate your business!
Required Tools:
• 3/8”Drive Ratchet: ES#2765902
• 3/8” Drive Torque Wrench: ES#2221245
• Flat and Phillips Blade Screwdriver(s): ES#2225921
• Torx Bit Sockets: T30: ES#11418
• Schwaben Hose Clamp Pliers: ES#2702616
• Schwaben LED Underhood Light: ES#2769963
• Schwaben Deluxe Two Shelf Service Cart: ES#2763365
• Schwaben Magnetic Tray: ES#1899375
• 3/8”Sockets: 13mm: ES#2763772
Installation:
Removing the original DISA Valve
Step 1:
Fender Covers, Underhood Light
Open the hood and protect the front bumper and fender with covers, then illuminate your work area.

Step 2:
Release all four latches which secure the air box lid to the air box. The latch on the driver’s side front is easy to reach, the other three are a bit more difficult to see.

Step 3:
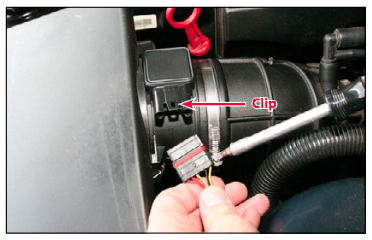
Flat Blade Screwdriver
Gently pry up on the clip on the Mass Air Flow sensor to release the connector, then pull the connector out of the sensor.
Step 4:
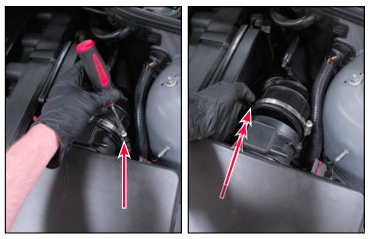
Flat Blade Screwdriver
Loosen the hose clamp securing the intake boot to the Mass Air Flow sensor, then pull the boot off of the sensor.
Step 5:
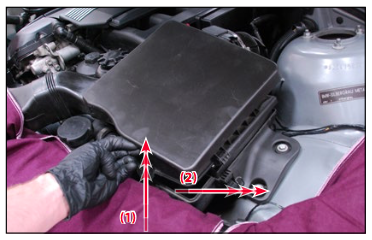
Gently lift up on the air box lid and move it slightly towards the driver’s side of the vehicle.
Step 6:
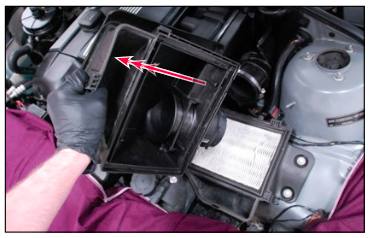
Remove the air box tube from the air box lid by gently pulling the tube out of the lid, then remove the air box tube from the cowl mounted intake in the same manner.

Step 7:
Remove the air box lid from the vehicle and set it aside.
Step 8:
Pull the breather hose off of the air intake boot then push the breather hose to the side.

Step 9:
Release the connector on the DISA valve by pushing in on the retaining clip with your finger, then pull the connector off of the valve. Push the connector and wiring harness off to the side so it is out of the way.

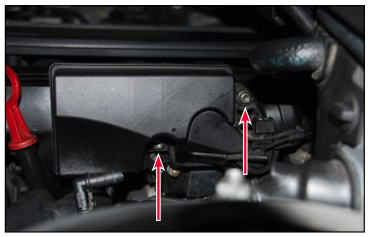
Step 10:
3/8” Drive Ratchet, T40 Torx Bit Socket
Locate and remove the two bolts which secure the DISA valve to the intake manifold.
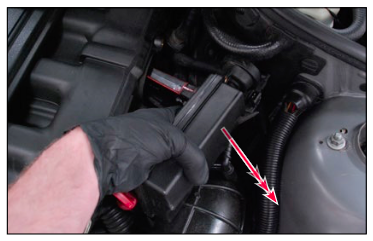
Step 11:
Begin by sliding the DISA valve out of the intake manifold approximately one inch. Place your finger on the valve as shown in the photo and rotate the flap downward until it is closed, if the flap is not closed it will be very difficult to remove from the intake manifold.

Step 12:
Turn the DISA valve slightly as shown in the photo in order to gain the necessary clearance to slide it out of the intake manifold, and remove it from the vehicle.
Installing the new DISA Valve:
Step 1:
Wipe away any contaminants from the gasket surface inside the intake manifold with a clean, lint-free towel. Place your finger on the valve as shown in the photo and rotate the flap downward until it is closed, and continue to hold the flap closed as you slide the valve into the intake manifold.

Step 2:
Press in firmly on the valve to make sure it is fully seated into the manifold.

Step 3:
3/8” Drive Torque Wrench, T40 Torx Bit Socket
Install the two bolts which secure the DISA valve to the intake manifold, then tighten them to 10 Nm (7 Ft/lbs).

Step 4:
Reinstall the DISA valve electrical connector by pushing the connector down onto the valve until it “clicks” into place.
Reinstall the breather hose into the air intake boot
Reinstall the air box tube into the air box lid and the cowl mounted intake Reinstall the air box lid onto the air box
Reinstall the air intake boot onto the MAF sensor and tighten the hose clamp Reconnect the MAF electrical connector

Your installation is complete!
Interested in purchasing?
DISA Valves
Having idle problems and low RPM hesitation? Located on the intake manifold. Includes mounting hardware


