Introduction:
The most essential of vehicle services, the oil change, sometimes raises the most questions. Most of us relate oil with lubrication, and it’s true that lubrication is its primary function, but it does a lot more than you think. There are many questions and theories about what type of oil to use and how often to change it. Here we will discuss the basics of oil, what it does, and why it is so important to extend the life of your engine. We will cover the different types of oil, filters, tools, and oiling systems and you will be prepared and confident to perform a successful oil change on your vehicle.

Oil Functions:
Lubrication:
Lubrication – reducing the friction between two surfaces, is the most basic and widely known function of engine oil. Your engine oil is the only material between the surfaces of the moving parts inside your engine. The camshaft, crankshaft and connecting rod bearings rotate on an extremely thin film of oil. Cylinder walls, chains, and valve train components are all lubricated as well as fuel pump push rods and distributors. Anywhere any type of component moves, there is engine oil for lubrication.
Cooling:
As the oil circulates throughout the engine, it absorbs heat from engine components then dissipates it to cooler areas. Under normal operating conditions, this cooling effect can remain internal to the oiling system. In heavy-duty and high-performance applications, additional oil cooling may be required and can be accomplished by the addition of engine oil coolers which circulate the oil through either a cooler that transfers heat to the engine coolant or to the air. Some engines also have additional internal cooling in the form of nozzles that spray the engine oil at high-temperature areas, such as the underside of pistons.
Cleaning and Corrosion Resistance:
As a benefit of having the inside of the engine coated with lubricating oil, the metal parts are not exposed to elements that cause rust and corrosion. The engine oil also collects and suspends soot and ash particles, generated from the combustion process, that would eventually build up as deposits on the internal surfaces of the engine. The oil will then release these particles into the oil filter element as it passes through.
Modern engine oils, however, enhance and modify certain beneficial characteristics by including additives:
• Chemical cleaning agents neutralize the impurities that are constantly being generated through normal use. • Dispersants prevent the contaminate particles that are suspended in the oil from gelling.
• Antioxidants inhibit rust and corrosion by minimizing the oil’s ability to react with the substances around it.
Other additives include chemical substances that help the oil to reduce friction, minimize wear, and allow the oil to flow better at higher and lower temperatures, making today’s engine oil extremely complex and multi-functional.
Chemical Reaction:
Exposure to high temperatures over an extended period of time will cause the structure of the oil to break down on a molecular level. This breakdown will reduce the viscosity of the oil (increasing heat and wear through friction) and causes the oil to become more acidic, leaving the engine components exposed to corrosion.
Contamination:
Engine oil eventually becomes saturated with the contaminants that it is cleaning from your engine, and over an extended period of time the oil filter will become overwhelmed. The oil will no longer be able to release these contaminants and will instead leave them as deposits inside the engine.
Contamination also occurs from the lingering presence of water condensation, caused by the incomplete removal of blow-by gasses, or the engine not reaching normal operating temperature on a regular basis. The condensation will react with the oil forming sludge and harmful acids. One of the most common problems, the tan colored, sometimes milky looking sludge that you may see on the inside of your oil cap and valve cover is a sign of contamination from condensation.
Oil can also be contaminated by excess fuel in an engine that is running improperly or by coolant in an engine that is developing internal problems.

Oil Types:
Conventional:
Conventional engine oil is a petroleum based oil which is refined from, of course, petroleum crude oil. Even though the refining process is quite advanced from what it was years ago, there are certain impurities and molecular irregularities that are inherent to conventional oil. The end result is a chemical composition that can vary considerably depending on a number of factors including the refining process.
Conventional oil does, however, contain many cleaning and anti-corrosion additives and is rated and adheres to all of the testing and grading standards developed for engine oil.
Due to the inherent impurities and molecular irregularities, conventional oil will not perform as well as synthetic motor oil and will require more frequent oil changes.
Synthetic:
Synthetic engine oil consists of the same molecular chain of hydrogen and carbon atoms as conventional oil, but with one distinct advantage: They are manufactured and chemically engineered to obtain a certain molecular composition with a precise and uniform structure. The final molecular composition of synthetic oils is designed and controlled with extreme precision, resulting in a final product that has predictable characteristics and consistent structural stability. For these reasons, synthetic oil will surpass the limitations of conventional oil, with qualities such as the ability to operate at higher and lower temperatures, resist breakdown caused by high temperatures, and remain cleaner by more efficiently collecting and releasing the contaminants in the engine.
Synthetic oil is rated and adheres to all of the testing and grading standards developed for engine oil.
Synthetic Blend:
Synthetic blends are exactly what you would think – a blend of conventional and synthetic oil. Why you ask? Synthetic oil has proven itself to be a superior performer without question, but it has a drawback, it is much more expensive. Synthetic blends are simply a way of providing an oil that is moderately better that conventional at a price that is more affordable than synthetic.
Oil Classification:
Quality standards and grades are established by independent automobile and oil industry organizations:
• The Society of Automotive Engineers (SAE) established a grading system using numbers to indicate how an engine oil flows at certain temperatures, otherwise known as the viscosity index.
• Associations such as the API (American Petroleum Institute), ILSAC (International Lubricant Specification Advisory Committee) or the ACEA (European Automobile Manufacturers Association) contribute to testing, technical standards, and ratings for engine oil.
Viscosity:
Viscosity is how we measure the oil’s ability to flow at certain temperatures. It can be thought of as the thickness or “weight” of the oil.
The viscosity grade is critical to your engine’s performance and protection. Be sure to follow your vehicle manufacturer’s recommendation for SAE oil viscosity.
The number with a “W” after it in a viscosity rating indicates the thickness or “weight” of the oil at 0 degrees Fahrenheit.
The number with no letter in a viscosity rating indicates the thickness or “weight” of the oil at 210 degrees Fahrenheit.
Oil rated with both numbers is considered multi-viscosity or multi-weight oil.

Service Ratings:
An oil’s service rating describes what type of engine and uses it has been formulated for.
Oil designed for cars, vans and light trucks falls under API’s “S” (Service) categories.
Oil designed for heavy duty trucks and vehicles with diesel engines falls under API’s “C” (Commercial) category.
Refer to the charts on pages eight and nine for service rating descriptions.
API Service Ratings for Gasoline Engines:

NOTE: The oil service rating is critical to your engine’s performance and protection. Be sure to follow your vehicle manufacturer’s recommendation for the correct service rating.
API Service Ratings for Diesel Engines:

NOTE: The oil service rating is critical to your engine’s performance and protection. Be sure to follow your vehicle manufacturer’s recommendation for the correct service rating.
Manufacturer Oil Specifications:
Most of the leading auto manufacturers have developed their own “terminology” or “codes” to identify the oil that they specify for use in their engines. They sell this oil through their parts department but keep in mind that all of their oil specifications meet current SAE, API, ILSAC, and ACEA technical standards and ratings. The following charts will help you “decipher” manufacturers “codes” when choosing oil for your car.
BMW/MINI Oil Specifications:
BMW Longlife-98 (BMW LL-98)
Special long-life engine oil, approved by BMW. Also meets ACEA A3/B3, API SJ/CD, EC SAE 5W-40. Usually required for BMWs manufactured before MY 2002. Obsolete since 2009.
BMW Longlife-01 (BMW LL-01)
Special BMW approval for fully synthetic long-life oil. Product meets ACEA A3/B3 and API: SJ/CD EC-II. Usually required for BMWs built after MY 2002. Can also be used where a BMW Longlife-98 oil is recommended.
BMW Longlife-01 FE (BMW LL-01 FE)
Fully synthetic long-life oil with fuel economy properties. Oils meeting this specification must have a low HTHS viscosity to meet the manufacturer’s fuel economy requirements. These oils are only suitable for the following engines: N1x, N2x, N54, N55, N63, N74.
BMW Longlife-04 (BMW LL-04)
Special BMW approval for fully synthetic long-life oil. Viscosities are SAE 0W-30, 0W-40, 5W-30 and 5W-40. Usually required for BMWs equipped with a diesel particulate filter (DPF). Can also be used where a BMW Longlife-98 or BMW Longlife-01 oil is recommended.
BMW Longlife-12 (BMW LL-12)
Special motor oil for certain approved gasoline engines and the following diesel engines only: Nx7K1, Nx7U1, Nx7O1 from the model year 2013. Not suitable for engines with 2 or 3 turbos.
BMW Longlife-14+ (BMW LL-14+)
Special motor oil for the following gasoline engines only: N20, Bx8 from the model year 2014. Not allowed for diesel engines.
Mercedes Oil Specifications:
MB 229.1
For petrol and diesel engines. Minimum quality required ACEA A2/B2 with additional limits on engine.
MB 229.3
For petrol and diesel engines. Minimum quality required ACEA A3 / B3 / B4 and MB 229.1. It can only certify 0/ 5 W-x oils.
MB 229.31
Multi-grade, low SPAsh engine oil, advised for both diesel and petrol engines of Mercedes-Benz, Smart, and Chrysler. Only low viscosity engine oils which can realize a 1,0% saving on used fuel in the M111 Fuel economy test (CEC L-54-T-96) can get this approval. In this test, the fuel savings are compared to the performance of the Reference oil RL 191 (SAE 15W-40).
MB 229.5
MB sheet for energy conserving oils for certain car and van engines. Approved oils must meet ACEA A3, B3 and B4 specification and some additional demands by Daimler Chrysler AG. Oil must be on the approval list.
MB 229.51
Low SAPS Long Life engine oil for diesel engines with particle filter meeting emission EU-4 -> standards.
MB 229.52
Oils meeting this specification must have lower ash content, at least 1% better fuel economy compared to the requirements of MB 229.31 and MB 229.51 and better oxidation stability for biofuel compatibility. Can also be used where an MB 229.31 or an MB 229.51 oil is required. Just like MB 229.5 and MB 229.51 this spec requires a long life oil.
Volkswagen/Audi Oil Specifications:
VW 500.00
Volkswagen specification for multi-grade engine oils for gasoline engines with SAE 5W-X/10W-X viscosity. This is an “old” oil specification and is applicable to engines built before the model year 2000 (up to August 1999). Oils with an approval made post-March 1997 were given an alternative, later VW specification.
VW 501.01
Conventional motor oils suitable for some VW engines built before MY 2000. This is an “old” oil specification and is applicable to engines built before the model year 2000 (up to August 1999). Oils with an approval made post-March 1997 were given an alternative, later VW specification.
VW 502.00
Oil for gasoline engines. The successor of VW 501.01 and VW 500.00 specification. Recommended for those which are subject to arduous conditions. It must not be used for any engines with variable service intervals or any which are referred to under other specifications.
VW 503.00
Long-life gasoline engine oil for VW cars with WIV (system for longer service intervals). Also meets ACEA A1, SAE 0W-30 or 5W-30 specification. VW 503.01
This specification is specifically for Audi RS4, Audi TT, S3 and Audi A8 6.0 V12 models with outputs of more than 180bhp, running with variable service intervals (30,000km or 2 years). Now superseded by the VW 504.00 specification.
VW 504.00
The VW 504 00 specification supersedes the VW 503 00 and VW 503.01 specifications. VW 504 00 oils are suitable for engines meeting the demands of Euro IV emissions standards.
VW 505.00
Passenger car diesel engine oil specification, minimum performance level CCMC PD-2. Lists viscosities SAE 5W-50, 10W-50/60, 15W-40/50, 20W- 40/50 requiring 13% max. evaporation loss and SAE 5W-30/40, 10W-30/40 requiring 15% max. evaporation loss.
VW 505.01
Special engine oil for VW turbo diesel engines with pump-injector-unit and for the V8 Common rail turbo diesel engines. Meets ACEA B4 SAE 5W-40 specification.
VW 506.00
These oils are suitable for diesel engines with extended service intervals of up to 50,000km / 2 years. Not for use on engines with a single injector pump. Oil change is indicated by the electronic service indicator. Viscosity is SAE 0W30.
VW 506.01
These oils are especially for “Pumpe-Düse” (unit injector or “PD” engines) running on extended service intervals (30,000 – 50,000km / 24 months). Oil change is indicated by the electronic service indicator.
VW 507.00
Low SAPS oils suitable for Euro 4 engines and almost all VAG diesel engines from 2000 onwards with extended service intervals, unitary injector pumps and also Pumpe-Düse (“PD”) engines. Excludes V10, R5 engines and VW Commercial vehicles without fitted DPF (diesel particulate filters) – these must use a 506 01 specification oil.
VW 508.00
This standard is not yet released. It will probably require a low SAPS oil with energy conserving properties.
Oil Change Intervals:
The age old rule has always been “every 3 months or 3000 miles”. This is quickly becoming an obsolete notion. Improvements in the refining technology of conventional petroleum based oils, synthetic oil technology, and advancements in engine design have extended the standard oil change interval.
Many modern vehicle oil change intervals are as high as 7500
miles, and some even higher. Always follow the manufacturer’s recommended service internal. Many vehicles have an advanced electronic system that calculates oil life depending on a number of factors including climate, mileage, speed, and even personal driving habits. These systems will warn you when you are approaching the target mileage for an oil change.
If you are ever uncertain if the oil should be changed or not, there are a couple of things that you can do:
1) Inspect the condition of the oil on the end of the dipstick. Clean oil will be transparent. As it gets dirtier, it starts to darken in color. If the oil is very dirty, it will be dark in color and no longer transparent. If it reaches this point, you have gone too long and it should be changed immediately.
NOTE: Diesel engine oil will typically be black in color, even immediately after an oil change. You will have to rely entirely on mileage to know when an oil change is due.
2) It never hurts to change your oil. If you are unsure of how long it’s been and it looks like the oil might be getting dirty, simply change it. It can only be good for your engine.
If your vehicle does not have an oil change interval calculator, keep track of them by using an oil change sticker, available at ECSTuning. com as ES#2808806.

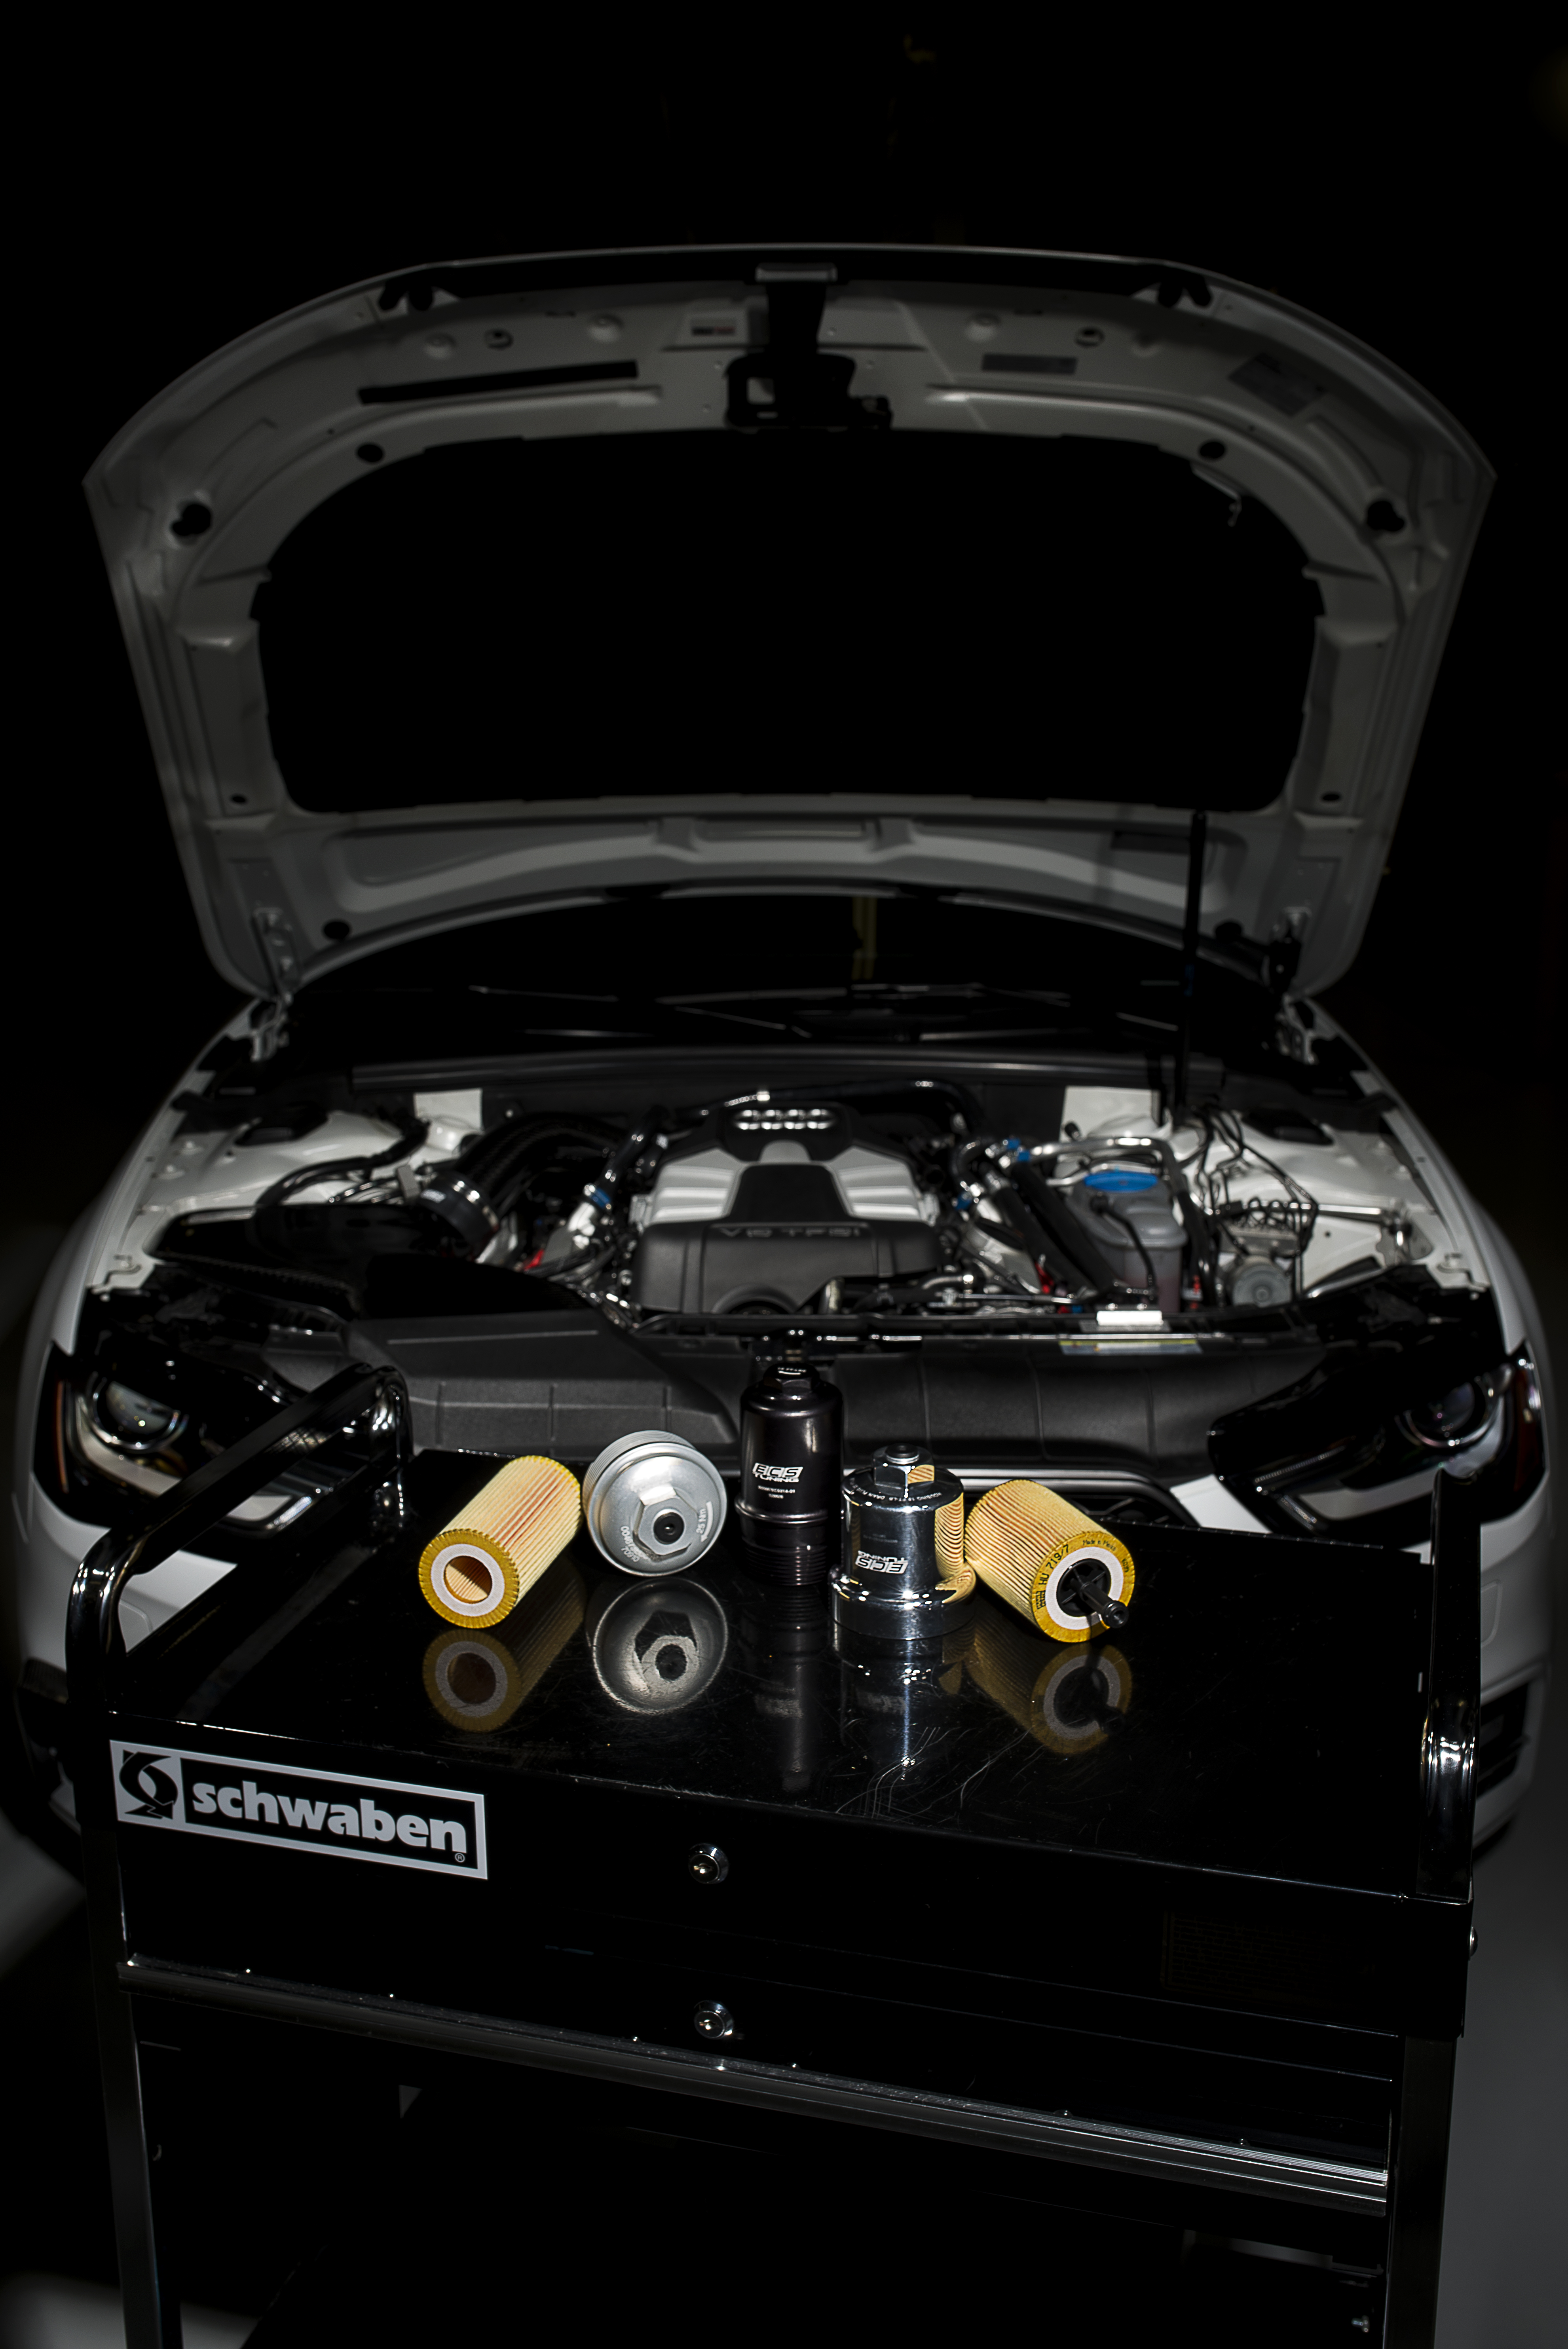
Oil Filters:
All oil filters, regardless of type, consist of the same basic components:

Spin-on Filter:
A spin-on filter is one of the older, more common filter designs. Spin-on filters are one piece units with all components contained inside a metal outer housing. Most spin on filters have fluted ends which allow for
the use of a matching oil filter cup wrench for removal. Some spin on filters have special fittings on the end and matching tools that can be used for removal. The seal fits into a groove on the end, and tightening/ installation instructions are almost always printed on the side.
Advantages:
1. There are no reusable components to wear out or get damaged, you are replacing the complete filter every time.
2. Installation is performed by hand, no torque wrenches or tools are required.
3. Spin-on filters are generally the quickest and easiest style of the filter to replace.
Disadvantages:
1. They generate more waste and are more difficult to completely drain. 2. They can be very hot and difficult to hold during removal.
3. They can be easily overtightened or under tightened.
4. There is no provision for draining prior to removal, making them much messier.

Cartridge Filter:
A cartridge style of filter is one in which the filter media is a separate replaceable element inside a removable outer housing. The housings are made of either plastic or metal, and the bypass valve, support tube, and anti-drain back valve (if equipped) are either part of the housing or built into the element. Most housings have a built-in hex for easy removal, some are fluted on the ends requiring a cup style wrench, and many have drain valves. Cartridge filters were originally used years ago and were eventually replaced by the spin-on style of filter, but are once again becoming the more popular style of filter.
Advantages:
1. There is much less waste generated, only the filter element is replaced. 2. The housings are easy to remove due to a built in hex on the ends.
3. Replacement elements are typically less expensive than a spin-on style of filter.
4. They have a specific tightening torque and they seal much better with very little opportunity for leaks.
5. They have a provision for draining before removal, making them much cleaner.
Disadvantages:
1. Original equipment plastic housings can become worn or cracked. 2. A greater number of tools is required for service.
3. Replacement housings can be expensive.

Drain Plugs:
Most original equipment drain plugs are made of steel and utilize an aluminum or copper sealing or “crush” washer. Some drain plugs are made of billet aluminum for weight savings and some also have a magnet in the end to pick up metal particles in the oil.
The aluminum or copper sealing washers are designed to crush slightly when the drain plugs are torqued to their proper specification. This not only creates a seal between the drain plug and oil pan but also prevents wear on the oil pan since the drain plug will be removed and installed over and over again.
In order to obtain the proper amount of crush on a sealing washer, it
is extremely important to always torque the drain plug to the proper specification published by the vehicle manufacturer. It is for this reason as well that the sealing washer should be replaced with each oil change.
Another reason to always torque the drain plug is that the threads are only designed to withstand the torque specification. If the drain plug is over torqued, the threads will begin to stretch and eventually damage the threads in the oil pan. Oil pan replacement can be expensive and time-consuming so it’s best to avoid it using proper service procedures.
When using a magnetic drain plug, always wipe the metal particles off when performing an oil change.
Always inspect the threads on the drain plug when you remove it. If they show any signs of wear or if the drain plug does not spin out easily, it is a good idea to replace the drain plug.
Crush washers are available separately, and also in kits with new drain plugs. It’s best to buy a “handful” at a time so you always have them when you need them.
Oil Service Tools:
Oil Filter Cup Wrenches:
Oil filter cup wrenches are designed to lock onto the fluted end of a “spin- on” oil filter or cartridge filter housing. They have a 3/8” square drive on the bottom so you can simply insert a 3/8” ratchet or extension for turning. They are available in many different sizes to fit the filter or housing on your application and are very effective for quick removal.
This 4-piece kit, available on our website as ES#1892107 covers many of the most common sizes on European cars. Some cup wrenches are available separately as well, visit our website to confirm the correct size for your application.
Oil Filter Pliers:
Oil filter pliers are designed to grip and remove “spin-on” style oil filters. They work well on all filters and eliminate the need for many different tools. They will, however damage the housing of the filter during removal, so if you will be reusing the oil filter, you will have to remove it by hand or use a cup wrench.
The pliers shown here are available on our website as ES#2748880 and have adjustable jaws to work in tighter locations.

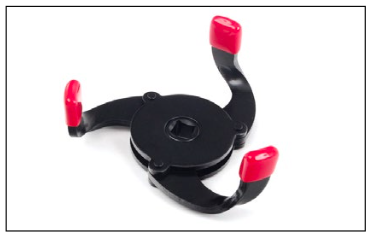
3-Jaw Adjustable Oil Filter Wrench:
These adjustable oil filter wrenches work great to grip and remove a “spin- on” style of oil filter. The fit a wide range of sizes, eliminating the need
for many different tools. They have a 3/8” square drive on the bottom so you can simply insert a 3/8” ratchet or extension for turning. These will, however damage the housing of the filter during removal, so if you will
be re-using the oil filter, you will have to remove it by hand or use a cup wrench.
The wrench shown here is available on our website as ES#2748752.
Specialty Tools:
Many of the large MANN or MAHLE “spin-on” styles of oil filters have a removal slot on the end of the filter and this tool can be used for quick and easy removal. It has a 3/8” square drive on the bottom so it can be turned easily with a 3/8” drive ratchet or extension.
The specialty tool shown here is available on our website as ES#2185250.

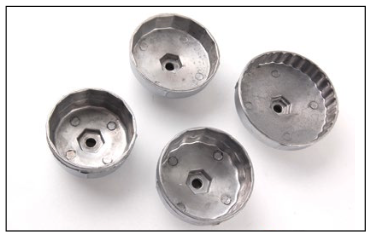
Filter Housing Sockets:
Many newer vehicles are equipped with a “cartridge” style of oil filter. The housings for these filters are equipped with a large 6-point head on the end for removal. Quite often they are located in tight areas, requiring a large and very shallow socket. Filter housing sockets are designed exactly for that job, with a 3/8” square drive in the end for easy use with a 3/8” ratchet or extension. The most common sizes, 32mm and 36mm, are available on our website, check your application for the correct tool.
32mm Filter Housing Socket: ES#2730723
36mm Filter Housing Socket: ES#240945

Filter Housing Drain Tool:
Some of the filter housings for the “cartridge” style of oil filters are equipped with a spring loaded valve which will allow you to thread in this tool and drain the cartridge before removal. This makes the job a lot cleaner and prevents messy spills.
The drain tool shown here is available on our website as ES#8616.

Multi-Size Drain Plug Wrench:
This multi-size drain plug wrench has eight different 6-point sockets incorporated into one tool. Sizes 12mm through 19mm will fit most drain plugs, and save you time when you only need to grab one wrench and know you have the size you need to get the job done.
The wrench shown here is available on our website as ES#2221249.

Drain Pan:
The most essential tool for the oil change. This 8-liter oil pan will handle the capacity of most engines and has a spout for easy pouring to transfer the used oil into a seal-able container.
The drain pan shown here is available on our website as ES#2748892.

Funnels:
Standard funnels are very useful for filling your engine oil while preventing spills on the top of the engine and to allow you to leave the oil bottle upside down to drain completely.
The funnel shown here is available on our website as ES#1899379. It comes with a screen and a removable 12” flexible neck.

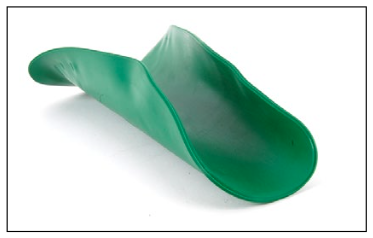
Form-a-Funnel:
The form-a-funnel is a very useful tool. It is made out of pliable nitrile rubber and can not only be formed into the shape of a funnel, but it can also be formed over frame cross members, hoses, lines, and cooled exhaust components to keep oil off of them while draining.
The form-a-funnel shown here is available on our website as ES#2184828.
Basic Oil Change Procedure:
Step 1:
Run the engine until it reaches operating temperature, then shut it off. This will ensure that all of the old oil completely drains out.

Step 2:
Safely raise and support the vehicle, and remove any insulation panels or skid plates, depending on how your vehicle is equipped, to allow access to the oil filter and drain plug.

Step 3:
Loosen the drain plug using a wrench of the exact size, so you do not risk stripping the or damaging the head of the drain plug.
CAUTION: Do not use a crescent wrench, any style of adjustable wrench, or vise grips to remove the drain plug, or damage to the head of the drain plug will occur.

Step 4:
Place a drain pan underneath, then unthread and remove the drain plug. Allow the oil to completely drain out until there is no longer a stream of oil, only an occasional drip. This may take 5-10 minutes.

Step 5:
Clean the drain plug and replace the crush washer. Be sure to inspect the threads on the drain plug for damage, and replace it if necessary. If you have a magnetic drain plug, be sure to wipe the collected particles off the end.

Step 6:
Wipe the opening of the oil pan clean, then reinstall the drain plug and torque it to the manufacturer’s specification.

Step 7:
Cartridge Filter
If your filter housing is equipped with a drain plug, remove it at this time and allow the oil to drain.
NOTE: Some cartridge style of filters may be located on the top of your engine, sometimes under the engine cover.

Step 8:
Cartridge Filter
Loosen the filter housing using the tool that corresponds to the style of housing that you have and unthread it until it becomes loose enough to spin by hand. Here we are using a 6-point housing socket.

Step 9:
Cartridge Filter
Unthread and remove the filter housing and drain the rest of the oil out of the housing.

Step 10:
Cartridge Filter
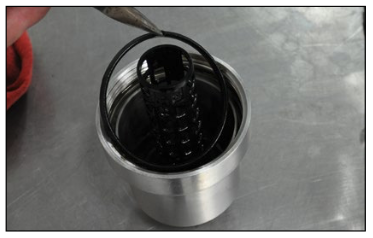
Pull the old filter element out of the housing.
NOTE: Some filter elements have a “top” and “bottom”. The new element should be marked, but it is a general good rule of thumb to look at the top and bottom of the original element as you remove it and note any differences.

Step 11:
Cartridge Filter
Remove the seal from the filter housing using a small pick or needle nose pliers.
On the housing shown here, the seal is on the inside and has a small tab that can be gripped with pliers. Some housings will have the seal located in a groove on the outside.
Step 12:
Cartridge Filter
Thoroughly clean the seal groove of the filter housing.

Step 13:
Cartridge Filter
Apply clean engine oil to the new seal included with your filter, and install the seal into the groove in the housing.

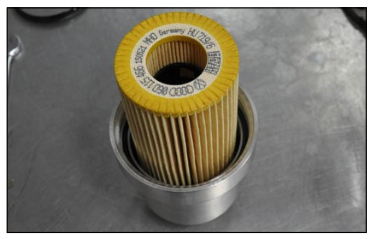
Step 14:
Cartridge Filter
Slide the new filter element in place into the housing.
NOTE: Some filter elements have a “top” and “bottom”. They will be marked accordingly and there is generally a noticeable difference that you will see the top and bottom. If your filter element has no markings and is the same on both ends, it can be installed either way.
Step 15:
Cartridge Filter
Thoroughly clean the filter housing base located on the engine.

Step 16:
Cartridge Filter
Thread the filter housing with the new element in place back onto the base and torque it to the manufacturer’s specification.

Step 17:
Cartridge Filter
Reinstall the housing drain plug (if equipped) and torque it to the manufacturer’s specification.

Step 18:
Spin-on Filter
Remove the filter using the correct tool, making sure to catch all of the old oil in a drain pan.
The photo on the left shows a spin-on filter with a special boss on end, using the corresponding tool for removal.
The photo on the right shows a spin-on filter with a fluted end, using a cup wrench for removal.

Step 19:
Spin-on Filter
Check the sealing surface to make sure the old filter seal did not stick to it, then clean the surface thoroughly.

Step 20:
Spin-on Filter
Apply clean engine oil to the seal on the new filter.

Step 21:
Spin-on Filter
Install the new filter and tighten it according to the instructions printed on the filter. Typically, once the seal contacts the base, you will tighten the filter an additional 1/4 turn by hand. Do not over tighten these filters.

Step 22:
Fill the engine with the correct capacity and type of oil as recommended by the manufacturer. Use a funnel to prevent spilling.

Step 23:
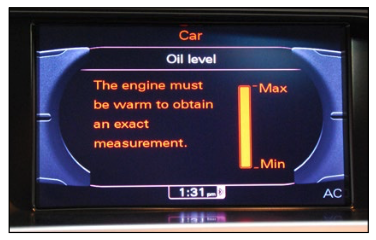
Start the engine and make sure the oil light goes out or the gauge registers pressure so you know that the oil is circulated through the filter. Check the engine oil level on the dipstick. It should be at “operating level”. Refer to your owner’s information if you have any questions regarding the proper reading of the dipstick.

Step 24:
Some vehicles do not have a dipstick and require you to use the onboard electronic system to check the oil level. Be sure and consult your owner’s information for the proper procedure.
TECH TIP: Always check your drain plug and filter for leaks before driving the vehicle.
Common Oil Filter Locations:


Interested in purchasing?
Oil Service Kits
Assembled By ECS


