Introduction:
Modern Engines are required to operate with high efficiency and low emissions. It’s because of these strict regulations that the intake, exhaust, and crankcase ventilation systems are designed to work together, instead of being completely different systems. Vacuum hoses are almost a thing of the past, especially any that you can actually get to, and when you can actually find one, such as for turbo control, it’s best to leave it undisturbed so you don’t create an unwanted leak. So when you need a vacuum port to hook up a boost gauge, supply a vacuum operated exhaust, or connect a vacuum gauge for diagnostics, quite often you’re wondering where to look. Luckily, ECS Tuning has been solving this problem for a number of years, and as with many other models, we have an affordable, effective solution for your Audi B9 A4. We have two, in-house designed boost taps that can be easily installed and tailored specifically to your car.

Manifold Boost Tap: ES#3136138
Our manifold boost tap utilizes the large, unused vacuum port on the end of the intake manifold. It features a very quick and easy installation requiring only a few basic tools, and the specially designed piercing sleeve that is included with the tap. You have the option of installing up to three ports, and it can be removed in minutes so you can change the port number or configuration down the road if you so desire. It’s also made from billet aluminum and etched with the ECS Tuning logo, so it’ll look great when you open the hood!
Throttle Body Boost Tap: ES#3136139
Our throttle body boost tap is a slimline design that installs between the throttle body and intake manifold. It’s very thin, so your vehicles operating systems don’t even know it’s there. This design keeps it secluded if you’re looking for an ultra clean or a more stock appearance. Up to two ports can be installed, and you can easily add or remove them without removing the boost tap. Also made from billet aluminum, quality is second to none. This is a true bolt on piece, and the installation is completely reversible if you need to return to stock.

Kit Contents:
Manifold Boost Tap:

Throttle Body Boost Tap:

Required Tools:
• Protecta-Sockets (for lug nuts): ES#2221243
• 3⁄8” Drive Ratchet: ES#2765902
• 3⁄8” Drive Torque Wrench: ES#2221245
• 3⁄8” Drive Deep and Shallow Sockets: ES#2763772
• 3⁄8” Drive Extensions: ES#2804822
• Hydraulic Floor Jack: ES#240941
• Torx Drivers and Sockets: ES#11417/8
• 1⁄2” Drive Deep and Shallow Sockets: ES#2839106
• 1⁄2” Drive Ratchet
• 1⁄2” Drive Extensions
• 1⁄2” Drive Torque Wrench: ES#2221244
• 1⁄2” Drive Breaker Bar: ES#2776653
• Bench Mounted Vise
• Crows Foot Wrenches
• Hook and Pick Tool Set: ES#2778980
• 1⁄4” Drive Ratchet: ES#2823235
• 1⁄4” Drive Deep and Shallow Sockets: ES#2823235
• 1⁄4” Drive Extensions: ES#2823235
• Plier and Cutter Set: ES#2804496
• Flat and Phillips Screwdrivers: ES#2225921
• Jack Stands: ES#2763355
• Ball Pein Hammers
• Pry Bar Set: ES#1899378
• Electric/Cordless Drill
• Wire Strippers/Crimpers
• Drill Bits
• Punch and Chisel Set
• Hex Bit (Allen) Wrenches and Sockets: ES#11420
• Thread Repair Tools: ES#1306824
• Open/Boxed End Wrench Set: ES#2765907
Installation:
Step 1:
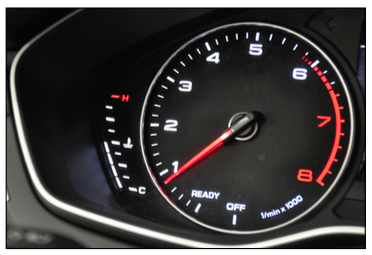
With the hood closed, start your engine and let it run until it reaches operating temperature.
CAUTION: Do not fail to warm up the engine as described. The intake manifold must be warm to the touch before you proceed. If you attempt to pierce the intake manifold while it is cold, it may crack or splinter.
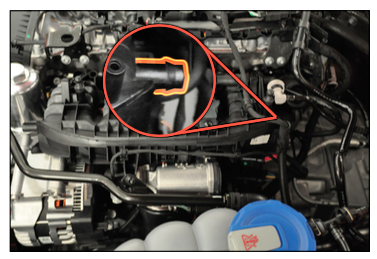
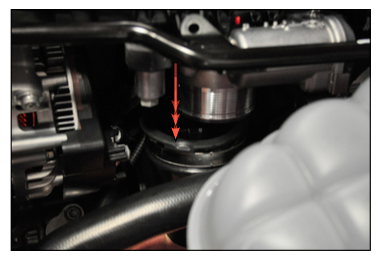
Step 2:
Locate the large, unused vacuum port on the intake manifold. It is located near the seam of the manifold, in the rear of the engine bay.
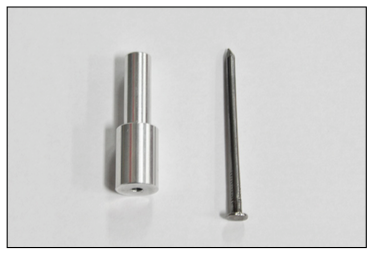
Step 3:
Remove the nail from the center of the piercing sleeve.
Step 4:
Slide the piercing sleeve into the vacuum port on the intake manifold until it is fully seated.

Step 5:
Slide the nail into the end of the piercing sleeve until you feel it hit the closed end of the vacuum port.
Intake Manifold Temperature Warning
Don’t forget, the engine should be completely warmed up as described in step 1 before you proceed.

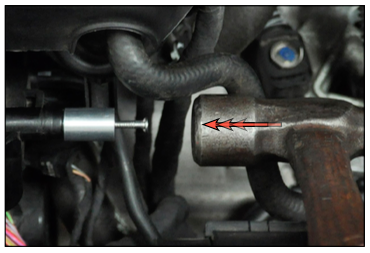
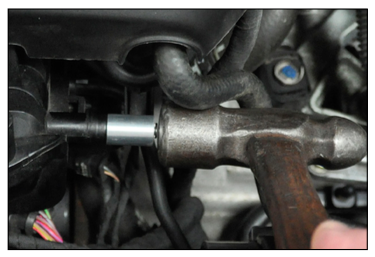
Step 6:
Using a ball pein hammer (not a really big one – the 16 oz hammer we are using here is plenty big enough), tap lightly on the nail in the piercing sleeve, just as if you are starting a nail in a piece of wood. After you tap on it just a few times, you will feel it begin to pierce the manifold.
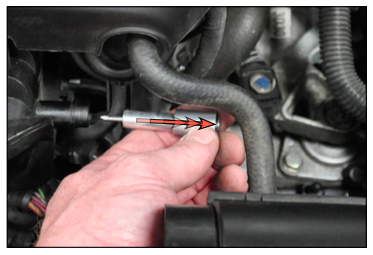
Step 7:
Just a couple more taps and the nail will easily pierce through the manifold. When the head of the nail is seated against the surface of the piercing sleeve as it is in this photo, you have successfully pierced the manifold.
Step 8:
Pull the piercing sleeve and the nail out of the intake manifold vacuum port.
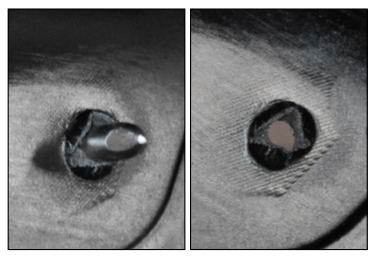
Step 9:
These unedited, cut-away views of the inside of the intake manifold demonstrate how the nail will smoothly and evenly pierce through the plastic, creating a perfect hole with absolutely no break off and no burrs.
Step 10:
Install the nipples and plugs into your boost tap depending on how many ports you need. Use the following installation guidelines:
Nipples: Install them using a drop of threadlocker, tighten them with your fingers.
Plugs: Install them using a drop of threadlocker, thread them in just until they are flush with the chamfer on the side of the boost tap. The threadlocker will seal them and hold them in place.

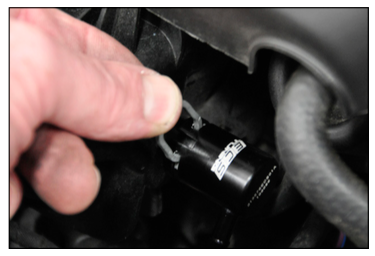
Step 11:
Push the boost tap onto the intake manifold vacuum port until it is fully seated, making sure to orient the nipple(s) where you want them.
Step 12:
Push the retaining clip into the groove in the boost tap until it is fully seated. Connect the hose for your accessories and your installation is complete!
Installing the throttle body boost tap:
Step 1:
The throttle body boost tap will be installed between the intake manifold and throttle body. It’s not necessary to remove the manifold, and you can actually just lower the throttle body slightly, then slide the boost tap in place. It’s difficult to get pictures of the process, so we’re going to show you some of them with the manifold off the car for clarity.

Step 2:
Flat Blade Screwdriver
Loosen the hose clamp on the throttle body hose and push the hose down off of the throttle body.
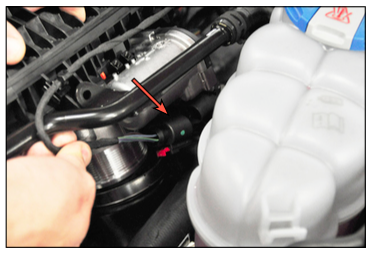
Step 3:
T30 Torx
In order to gain a little more working room, remove the T30 screw securing the coolant pipe to the intake manifold.

Step 4:
Disconnect the throttle body electrical connector by pulling out the red locking tab, then squeezing it gently to release.
Step 5:
T30 Torx
Now you can remove the four screws that hold the throttle body to the manifold. You can get to them fairly easily, but it’s hard to take a picture so we’ve removed the manifold to give you a better view.

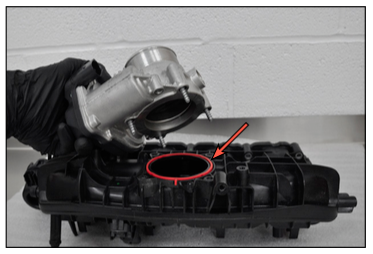
Step 6:
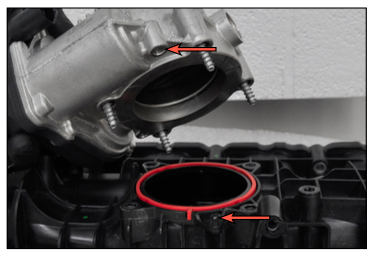
Here you can see that there is a seal between the manifold and throttle body. Make sure it stays seated on the manifold. Wipe the seal and the surface of the throttle body clean with a lint free rag.
Step 7:
Note also the locating pin on the manifold and the hole in the throttle body housing. Make sure that these are lined up when you reinstall it.
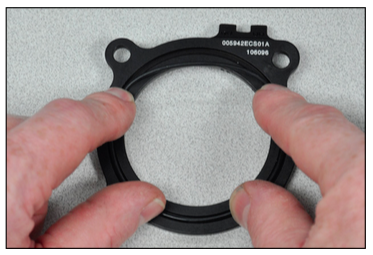
Step 8:
Apply a thin layer of the included grease onto the o-ring seal, then place it in the groove on the boost tap, making sure it is fully seated. The grease will hold the seal in place during installation, and can also be used to hold the intake manifold seal in place if necessary.
Step 9:
T30 Torx
Install the throttle body boost tap in place. The flat side goes against the manifold seal and the grooved side with the new seal goes against the throttle body.
Pay close attention to the fit of the throttle body. In some cases you may have to file or lightly grind down the casting nubs on the throttle body housing (arrows). They may contact the boost tap.
The correct torque for the throttle body screws is 7 Nm (5 Ft-lbs).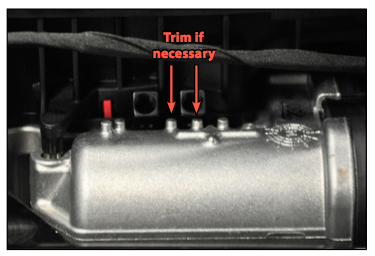
Step 10:
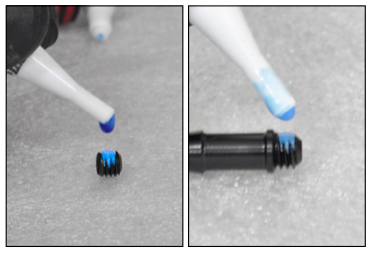
Apply a drop of the supplied thread locker to the threads of the nipple(s) and port plug based on how many ports you are going to use.
Step 11:
3mm Allen
Install the boost nipple(s) and/or port plug and tighten them until they are snug. The port plugs require a 3mm Allen wrench, the boost nipple(s) can be installed by hand.

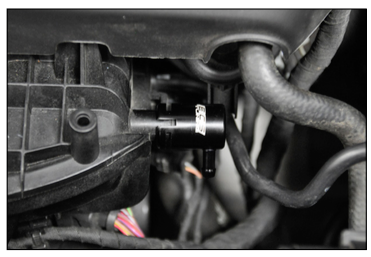
Step 12:
Connect the hose(s) to the boost tap nipple(s), reassemble the remaining components, and your installation is complete!

Your Audi B9 A4 Boost Tap installation is complete!
Interested in purchasing?
ECS Boost Tap Kits
ECS Tuning