Introduction:
Part Numbers: ES#3098866, ES#3098903
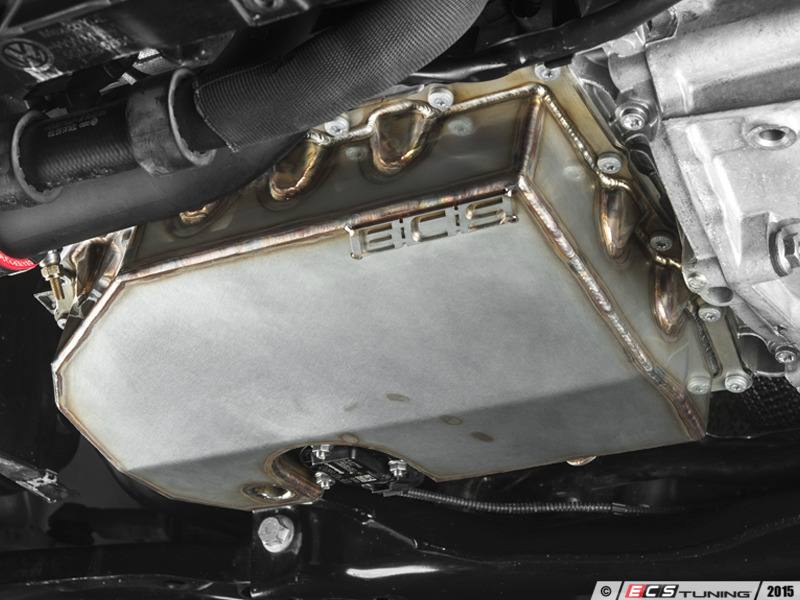
Never fear the road again – or anything it throws in your path. ECS Tuning’s Stainless Steel Oil Pans are as tough as they come. The latest addition to our ECS Tuning product line, these practically indestructible pans are the perfect armor plate for your TSI Volkswagen or Audi engine. Thick T304 Stainless Steel makes up the entire pan and they’re completely TIG welded for high quality, consistent welds, and the ability to withstand the unexpected. To top it all off, the beautiful construction provides an ultra cool fabricated look that sets these apart from any other pan, and makes them the perfect dress up for any engine!
Installing our new Stainless Steel oil pan is a routine operation that will only take you a couple of hours. If you’re due for an oil change, it’s even better, since you can “knock out two birds with one stone”. The pan is available separately, or as a complete kit with sealant, mounting bolts, oil level sensor nuts, and an ECS Tuning Magnetic Drain Plug. Keep in mind that if you purchase the pan only, it requires a special sealant and if you are replacing a factory plastic pan, you cannot use the original bolts. Our pan requires bolts which are much shorter than the ones used on a factory plastic pan.

One more thing – we also offer the pan with complete oil service kits specifically for your vehicle, including the filter and the additional oil required for the increased pan capacity.
If your vehicle is not equipped with an oil level sensor, you must order a level sensor block off plate and seal for this oil pan.
Block off plate: ES#3140168
Block off plate seal: ES#274942
Kit Contents:
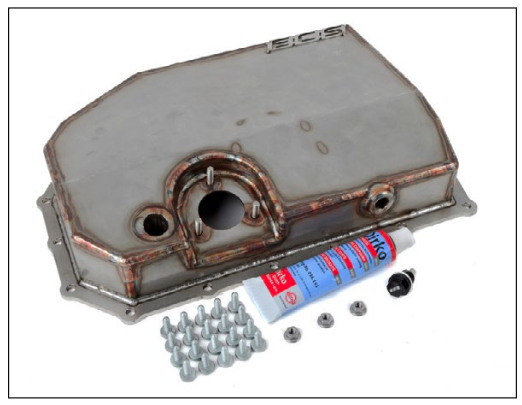
The complete ECS Tuning Stainless Steel Oil Pan kit comes with the following:
(1) ECS Tuning Stainless Steel Oil Pan
(1) ECS Tuning Magnetic Drain Plug
(1) Sealant Tube
(20) M6 x 16 Oil Pan Bolts
(3) M6 Oil Level Sensor Nuts
Required Tools:
• Protecta-Sockets (for lug nuts): ES#2221243
• 3/8” Drive Ratchet: ES#2765902
• 3/8” Drive Torque Wrench: ES#2221245
• 3/8” Drive Deep and Shallow Sockets: ES#2763772
• 3/8” Drive Extensions: ES#2804822
• Hydraulic Floor Jack: ES#240941
• Torx Drivers and Sockets: ES#11417/8
• 1/2” Drive Deep and Shallow Sockets: ES#2839106
• 1/2” Drive Ratchet
• 1/2” Drive Extensions
• 1/2” Drive Torque Wrench: ES#2221244
• 1/2” Drive Breaker Bar: ES#2776653
• File Set
• Air Nozzle/Blow Gun
• Drain Pan: ES#2748892
• Bench Mounted Vise
• Crows Foot Wrenches
• Hook and Pick Tool Set: ES#2778980
• OE Drain Plug Tool: ES#3082424
• 1/4” Drive Ratchet: ES#2823235
• 1/4” Drive Deep and Shallow Sockets: ES#2823235
• 1/4” Drive Extensions: ES#2823235
• 1/4” Drive Torque Wrench
• Plier and Cutter Set: ES#2804496
• Flat and Phillips Screwdrivers: ES#2225921
• Jack Stands: ES#2763355
• Ball Pein Hammers
• Pry Bar Set: ES#1899378
• Electric/Cordless Drill
• Wire Strippers/Crimpers
• Adjustable (Crescent) Type Wrenches
• Drill Bits
• Punch and Chisel Set
• Hex Bit (Allen) Wrenches and Sockets: ES#11420
• Thread Repair Tools: ES#1306824
• Open/Boxed End Wrench Set: ES#2765907
Installation:
Step 1:
T25 Torx Driver, Flat Blade Screwdriver
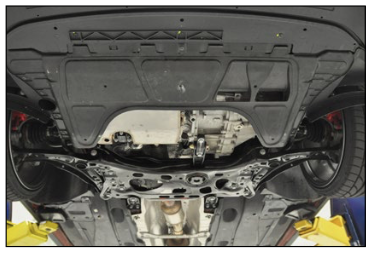
Safely raise and support the vehicle, then remove the insulation panel or skid plate, depending on what you have installed. The MK7 pictured here is equipped with the original lower insulation panel (highlighted in green).

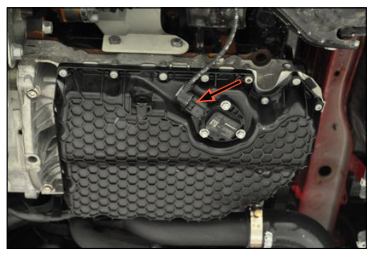
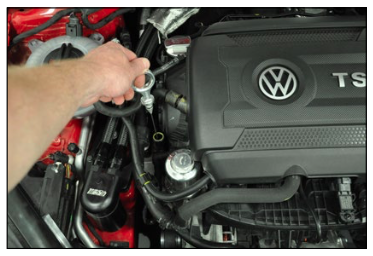
Step 2:
If equipped, disconnect the oil level sensor. This connector works by pressing the locking tab (arrow) to release it, then sliding it off. Secure the wire up out of the way.
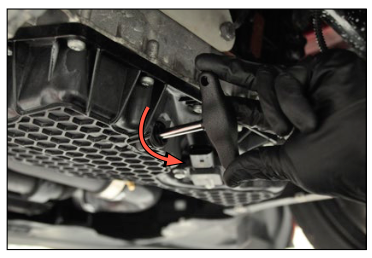
Step 3:
Drain Plug Tool or Boxed End Wrench
Remove the drain plug and drain the engine oil.
On a plastic pan, such as the one shown here on our MK7, the drain plugs require a specialty OE tool. Simply insert the tool into the drain plug, then rotate it counter-clockwise approximately one full turn and it will twist out of the oil pan. Be sure to catch the oil in a drain pan so it can be safely disposed of.
If your car is equipped with a steel pan, loosen and remove the traditional drain plug using the appropriate size boxed end wrench.
Step 4:
T30 Torx, 3/8” Ratchet, Extension
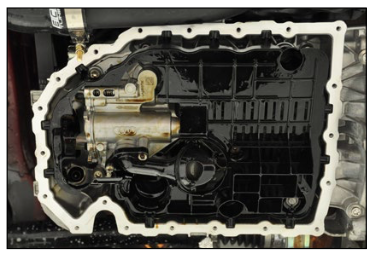
Remove the oil pan bolts (20 in all located around the perimeter of the pan), and lower the pan from the engine.
Plastic pans are equipped with a rubber seal and will separate easily from the engine block.
Steel pans do not utilize a gasket and are sealed onto the block. This type of pan will require that you carefully pry between the pan and engine block to separate the pan and remove it.

Step 5:
Thoroughly clean the oil pan mounting surface on the engine block.
Plastic pans with a rubber seal will not leave any residue and the block can be easily cleaned with brake cleaner and a rag.
Steel pans will leave sealant residue on the block, which will have to be carefully cleaned o with a scraper.
Step 6:
Be sure that the surface of the engine block is free of any old sealant, and wipe it clean using a rag and brake cleaner. The brake cleaner will remove any oily residue, which is necessary for the new sealant to work properly. Before you install your new oil pan, make sure that no oil has dripped out and ran across the sealing surface.
Step 7:
Prepare the oil pan bolts for installation. It is important that the bolts are ready to install. The oil pan uses a rapid curing sealant and once it is applied to the sealing flange, the pan must be installed immediately.
If you purchased a new kit with bolts, unpack them all.
If you are reusing bolts, make sure they are the correct length and make sure they have all been thoroughly cleaned of any old sealant or oil residue.

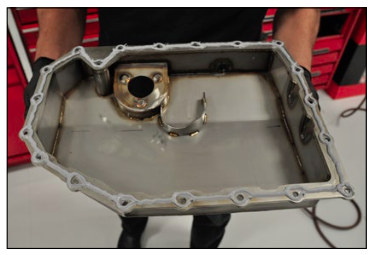
Step 8:
Wipe the sealing flange of the new oil pan clean using a rag and brake cleaner, then apply approximately a 1/4” bead of sealant around the perimeter of the flange and around each bolt hole as shown.
Do not use excessive sealant which could become trapped in the oil pick up screen.
NOTE: If you purchased the oil pan only and are supplying your own sealant, be sure and use a correct rapid-cure sealant designed specifically for form-in-place gaskets.
Step 9:
T30 Torx, 3/8” Extension, Ratchet
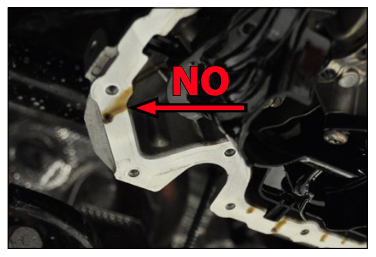
Position the oil pan into place, then install all of the bolts. Thread them in just until they are fully seated and draw the pan against the engine block. Note that one of the bolts is installed through the hole in the bottom of the pan (arrow).

Step 10:
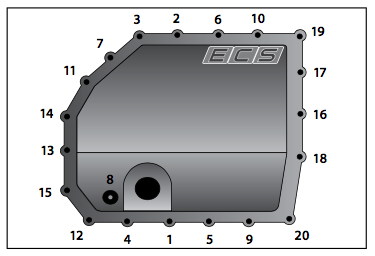
T30 Torx, 3/8 Torque Wrench, 3/8” Extension
Torque all of the bolts in two steps, using the sequence shown on the right.
Step 1. Torque all of the bolts to 8 Nm (6 Ft-lbs).
Step 2. Tighten each bolt an additional 45 degrees (1/8 turn).
Step 11:
10mm Socket, Ratchet
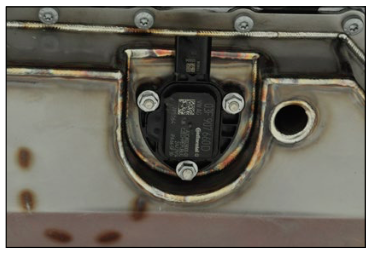
Remove the three nuts and pull the oil level sensor out of the bottom of the original oil pan.

Step 12:
10mm Socket, 1/4” Torque Wrench
Make sure the seal on the oil level sensor is clean and in good condition, then install the sensor into the new oil pan and torque the nuts to 9 Nm (6.6 Ft/lbs).
Step 13:
Re-connect the oil level sensor.
NOTE: The harness will route slightly differently than the original, however, there is still sufficient harness length to allow for drivetrain movement.

Step 14:
10mm Socket, 1/4” Torque Wrench
Install the oil level sensor block off flange and seal and torque the nuts to 9 Nm (6.6 Ft-lbs).

Step 15:
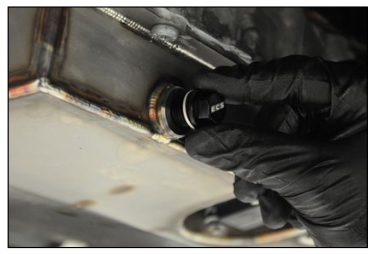
14mm Socket, 3/8” Torque Wrench
Install the new ECS Tuning magnetic drain plug and torque it to 30 Nm (22 Ft-lbs).
TECH TIP: Change your oil filter now for a complete service!
Step 16:
Allow the sealant to cure for at least an hour, then fill the engine oil and run the engine until it reaches operating temperature. Check to make sure that you do not have any leaks.
Don’t forget that this new oil pan has a larger capacity than the original. Be sure to add additional oil as necessary to make sure the oil level is “full” on the dipstick.
Step 17:
T25 Torx, Flat Blade Screwdriver
Reinstall your insulation panel or skid plate.
NOTE: If you ever remove the oil pan for any type of service, be sure to remove the bolts in the reverse order of installation.
Don’t forget, if you have an original insulation panel on your car, this is the perfect time to install one of our Street Shield Skid Plates to compliment your new oil pan!
Your installation is complete!
Interested in purchasing?
ECS Front 6-Piston Big Brake Kit
Upgrade to blue 6-piston F10 M5 calipers, ECS 2-piece rotors, and stainless steel brake lines. Includes fluid and all hardware.


