Part Number ES2102397
Preparations:
Estimated Installation Time: 2.0 Hour
Tools Required:
• 3/8-inch ratchet
• 5mm Allen-head
• 5mm long reach, ball-head Allen driver 8mm Allen-head
• 16mm socket or box end
Parts Required:
ECS Hybrid 1.8T Oil Pan Conversion Kit ES2102397
Volkswagen 337/20AE and 1.8T Jetta, Golf
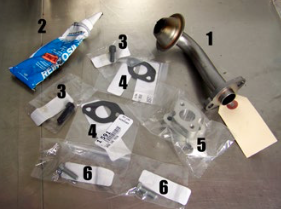
Kit Contents:
Hybrid Oil Pan
1) Oil pickup tube with o-ring
2) Tube sealer
3) Drain tube adapter-to-oil pan bolts (qty 2)
4) Drain tube adapter gaskets
5) Drain tube adapter
6) Drain tube-to-adapter bolts (qty 2)
Also needed:
4-5 quarts engine oil filter (optional)
Installation Instructions
This sequence shows how to install a hybrid oil pan on your 1.8T. The pan is “hybrid” because it has an aluminum upper housing with a stamped steel bottom that dents on minor impact, without shattering or cracking.
We have raised the car on a lift, and drained the oil in preparation.
Step 1:
Disconnect the turbo drain from the rear of the old oil pan. Two bolts.
Clean old gasket from the drain tube flange.

Step 2:
Work your way around the perimeter of the oil pan, removing the M7 (5 mm Allen-head) pan bolts.

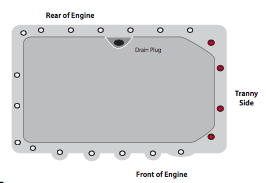
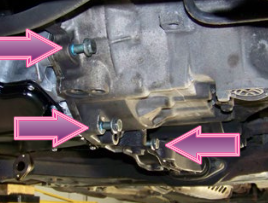
Step 3:
This image shows the approximate location of the pan bolts.
Timesaver Tip: The four M7 bolts (marked red) on the transmission side are hidden in recesses in the oil pan. If you do not know they are there, you may miss them. See the next steps for more.
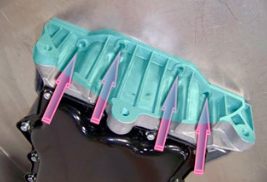
Step 4:
(We are working on a pan off the car so you can see better.) Arrows show the holes for the four transmission side pan bolts. Their location is easy to see now. In the car? It’s a different story; the bell housing blocks your view.
The blue-tinted area is covered by the bell housing with the pan installed. You’ll have to reach up with a long, ball-head Allen-head driver (arrows indicate access locations to the bolt holes).
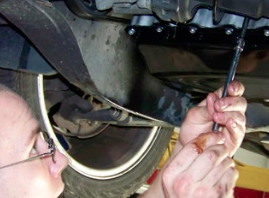
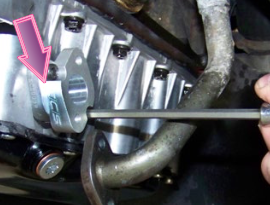
Step 5:
We replaced the arrows with a wrench so you can see how to remove the bolts. Angle the ball-head Allen wrench to reach all four Allen-head pan bolts. (Note: At your option, a 10mm swivel socket and extensions may also work; the OE bolts have both an internal and external hex.)
Make sure you remove all the pan bolts!

Step 6:
Remove the M10 bolts connecting the transmission bell housing to the side of the oil pan. Bolt heads: 16 mm socket or box wrench.
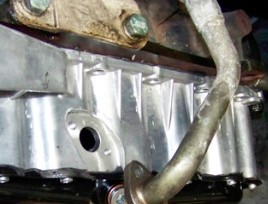
Step 7:
Remove the old oil pan. There is no pan gasket; only sealer. Remove all traces of sealer from the block sealing surface (tinted blue).
Clean the sealing area with spray gasket remover or other aromatic cleaners, like brake cleaner. Then wipe down the surface with a clean cloth. Make sure the engine block sealing surface is dry and oil-free.

Step 8:
Unbolt the oil pickup and bolt the new pickup in its place. Install a new o-ring, included in the kit.
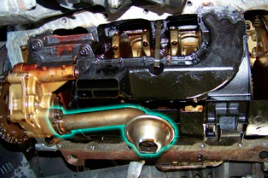
Step 9:
Prepare the new pan. Clean it as you did the engine block, even though it is new. We want a clean, dry surface.
Run a 2-3 mm bead of sealer on the pan sealing surface. That’s about 1/8 inch. No need for cake decorating! Too much sealant is a bad idea and does not seal better.
Why? Extra sealant can squeeze out, fall into the pan, and clog the oil pump pickup. Bad news.

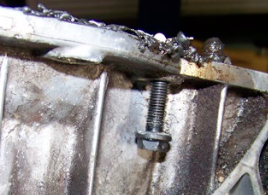
Step 10:
How not to apply sealer. The old pan has been off the engine before. Note how the over-application of sealer has left large globs of sealant hanging from the cover.
Suck one of these cured wads of sealant into an oil galley or the pump pickup, and you’ll damage the engine—or worse.
Step 11:
• Everything clean: check.
• Sealer applied to new pan: check.
It’s time to install the pan. Get the pan as close as possible to its installed location. Have an assistant guide you.
(If you slide the pan around too much as it meets the engine block, you’ll knock o the sealer. )
Step 12:
Install all M7 pan bolts and hand snug them, diagonally. We don’t want them tightened all the way until the bell housing bolts are installed.
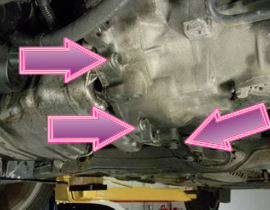
Step 13:
Install all M10 bell housing-to-oil-pan bolts and snug them (arrows). Draw them down, but don’t tighten them yet.
Go back and diagonally torque all M7 pan bolts installed in the previous step. 15Nm (11 ft-lb)
Final torque the M10 bell housing bolts. 45 Nm (33 ft-lb)
Step 14:
Install the drain tube adapter to the rear of the oil pan.
Use the kit gasket and Allen-head bolts in the kit.

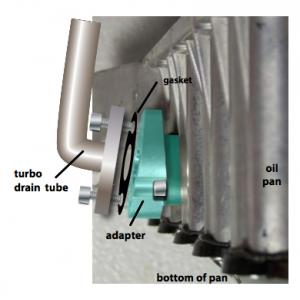
Step 15:
Bolt the turbo drain tube adapter to the oil pan. 10 Nm (7 ft-lb)
Make sure the ECS logo faces down, as shown.
Step 16:
Bolt the drain tube to the adapter with the remaining two bolts in the kit. (Installed adapter highlighted in blue.)
10 Nm (7 ft-lb)
Note how the drain tube tilts toward the engine as it rises. This is the correct position.
If you install the adapter upside down, you’ll have problems. Doing so angles the drain tube away from the engine; it will hit the drive axle.
Your installation should assemble like our image.
Step 17:
Double check drain plug tightness.
Lower the car and add oil. How much you add depends on whether or not you are changing the filter, and the size of the filter you use.
Changing the filter? Add four quarts for starters.
Run the engine, and top off the crankcase as needed.
Your hybrid oil pan is now installed.

Installation Complete
Interested in purchasing? Click HERE to shop now!