
Introduction:
This PDF has been created for informational purposes to help answer any questions you might have on what components make up the suspension on your vehicle, and how to recognize when they’re in need of replacement. After reading this PDF you will understand:
* How to recognize ball joints, tie rod ends, shocks, struts, bushings, and other suspension components
* How all of these components work and why they are important
* How to test suspension components, and how to recognize worn or failed parts
* How to use all of this knowledge to keep your vehicle on the road longer, and keep your vehicle safe and stable

A thorough inspection of your suspension can help prevent uneven tire wear, unpleasant noises around turns or over bumps, and even breakdowns caused by broken suspension components. An inspection is something which should be done as frequently possible, it’s often easiest to perform during a routine oil change, but it is also a good idea to at least perform a quick inspection any time the vehicle is being serviced.
Please note that this is a general guide for a suspension inspection. While you will gain a good understanding of suspension systems and component wear, some types of suspension are more complicated and difficult to understand and diagnose. If you are uncertain in any way as to the condition and safety of your steering and suspension, please consult with a professional automotive repair facility.
Installation Notes:
- RH refers to the passenger side of the vehicle.
- LH refers to the driver side of the vehicle.
- Always use the proper torque specifications.
- If applicable to this installation, torque specifications will be listed throughout the document and at the end as well.
- Please read all of these instructions and familiarize yourself with the complete process BEFORE you begin.
General Preparation and Safety Information:
ECS Tuning cares about your health and safety. Please read the following safety information. This information pertains to automotive service in general, and while it may not pertain to every job you do, please remember and share these important safety tips.
- Park your car in a safe, well lit, level area.
- Shut the engine off and remove the key from the ignition switch.
- Make sure any remote start devices are properly disabled.
- ALWAYS wear safety glasses.
- Make sure the parking brake is applied until the vehicle is safely lifted and supported.
- If using an automotive lift, be sure and utilize the factory specified lift points. Lifting a vehicle in an incorrect location can cause damage to the suspension/running gear.
- When lifting a vehicle using a jack, always utilize the factory specified lift points. Lifting a vehicle in an incorrect location can cause damage to the suspension/running gear. ALWAYS support the vehicle with jack stands.
- ALWAYS read and follow all safety information and warnings for the equipment you are using.
Front Suspension Components:

(1) – Sway Bar
* Transfers suspension movement to the opposite side when going around corners to keep the vehicle body from rolling excessively.
(2) – Sway Bar Bushings
* These bushings secure and align the sway bar to the chassis.
(3) – Front Tension Strut (also known as front position Lower Control Arm) * Guides the suspension as it travels up and down.
(4) – Front Lower Control Arm (also known as rear position Lower Control Arm)
* Guides the suspension as it travels up and down. Please note: some vehicles may also have front upper control arms as well.
(5) – Front Subframe (also known as Front Cradle or Crossmember)
* The front subframe is a very important structural component, as it is used to attach the suspension to the chassis, as well as carry the
weight of the engine, front differential, and possibly more depending on the application. The front subframe reduces the vibrations felt inside the cabin though the use of bushings at its mounting points.
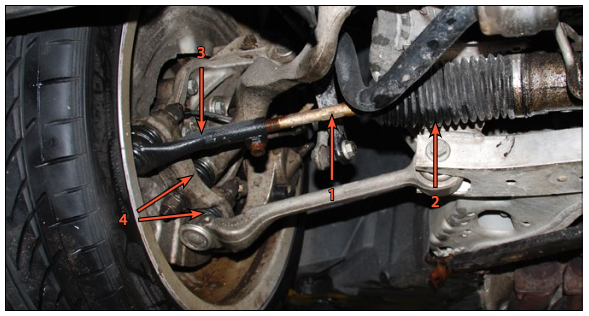
(1) – Inner Tie Rod End
* Connects the steering rack to the outer tie rod end.
(2) – Inner Tie Rod End Boot
* Protects the inner tie rod end by keeping out any outside contaminants. If these boots are damaged the inner tie rod ends can wear out
prematurely, causing loose steering and abnormal tire wear.
(3) – Outer Tie Rod End
* Connects the inner tie rod end to the steering knuckle.
(4) – Lower Ball Joints
* Ball joints are comprised of a ball and socket joint, much like your knee or hip. Ball joints allow movement between the control arms and the steering knuckle during suspension travel. Please note: Some vehicles may also have upper ball joints.

1 – Strut Assembly
* Dampens the up and down movement of the suspension.
2 – Front Coil Spring
* Coil springs carry the weight of the vehicle and are the main component which is responsible for ride height. 3 – Strut Mount
* The strut mount secures the strut to the chassis and holds it in place. On some vehicles, the strut mount incorporates a bearing to allow the suspension to pivot.
4 – Sway Bar End Link
* Connects the sway bar to the steering knuckle, or strut (depending on the vehicle).
5- CVAxle
* The CV axle transfers power from the transmission to the wheels, while allowing the suspension to travel up and down. 6- CVAxleBoot
* The CV axle boot protects the CV joint by keeping out any outside contaminants. If these boots are damaged the joints can wear out prematurely, usually resulting in a clicking noise while turning at lower speeds.

7 – Steering Knuckle
* The steering knuckle is the main carrier for the wheel bearings, brakes, and the wheels, and connects to the upper and lower suspension components.
8 – Wheel Bearing
* Wheel bearings are used to allow the wheels to spin freely and smoothly. These bearings will make noise or become loose when they need to be replaced.
9 – Wheel Hub
* Wheel hubs are where the wheels attach to the vehicle. Depending on the application the wheel hubs may be pressed into the wheel bearings, or th wheel bearings and wheel hubs may come as an entire assembly. 10 – Axle Nut or Bolt
* Secures the outer CV joint to the steering knuckle.
Rear Suspension Components:

* This list and diagram is only meant to be used as a general guide, as these components may have different names have different layouts depending on the application.
(1) – Rear Shock Absorbers
* The shock absorbers dampen the up and down movements of the suspension to provide a smoother ride.
(2) – Coil Springs
* Coil springs carry the weight of the vehicle and are the main component which is responsible for ride height.
(3) – Lower Control Arm
* Guides the suspension as it travels up and down. Please note: some vehicles may have multiple lower control arms.
(4) – Upper Control Arm
* Guides the suspension as it travels up and down. Please note: some vehicles may have multiple upper control arms.
(5) – Rear Subframe (also known as Rear Cradle or Crossmember)
* The rear subframe is a very important structural component, as it is used to attach the suspension to the chassis, as well as carry the weight of the rear differential, and possibly more depending on the application. (6) – Rear Subframe Mount
* Subframe mounts are also typically comprised of rubber and are responsible for reducing vibrations felt in the cabin of the vehicle.
Road Test:
* Professional driver on a closed course. Always drive safely and obey all traffic laws.

The first step in trying to diagnose a suspension or steering problem/noise should be a thorough road test. This is where we can really try to pinpoint a good starting point for our visual inspection later on.
Listen for any abnormal noises such as clicks, clunks, knocks, or grinding coming from the vehicle, and try to determine:
– What area of the vehicle they are coming from?
– Does the noise occur going around corners, over bumps, or is it related to wheel speed?
– Does the steering feel loose or vague?
– Does the vehicle pull to one side or the other?
Be sure to drive the vehicle on a variety of roads and speeds (as speed limits allow), bumpy side roads are a great place to nd suspension rattles, and the highway is a great place to hear a loud wheel bearing. It may be a good idea to have an assistant ride along to help determine where noises are coming from.
Bounce Test:
Once the road test has been completed, it’s time to start looking for the causes of your noises or poor ride quality. Begin on the ground and perform a bounce test.
Simply place your hands on the vehicle and push downwards several times, letting the suspension rebound after each push. Once you stop pushing down, the vehicle should rebound to ride height and stop there. If it continues to bounce, this is a clear sign of a worn out strut or shock. This test can be performed on both the front and the rear of the vehicle, it is best to test one wheel at a time.
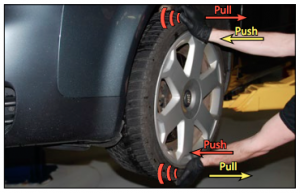
Initial Checks – Front and Rear:
Step 1:
Safely lift and support the vehicle so that all four wheels are off the ground. Place your hands on the left and right of a tire as shown, then alternately push and pull back and forth. Lightly push in on the left while pulling out on the right, (you are looking for play – not trying to turn the wheel) then lightly push in on the right while pulling out on the left.
This method will allow you to feel any loose components such as inner or outer tie rod ends, bushings, wheel bearings, or ball joints. If you are unsure if you feel anything loose, have an assistant visually look at individual components as you wiggle the wheel back and forth. The assistant should be looking for any component which shows play.

Step 2:
Following a similar pattern to step one, place your hands on the top and bottom of the tire as shown, then alternately push and pull back and forth. Push in on the top while pulling out on the bottom, then pull out on the bottom while pushing in on the top.
This method will allow you to feel any loose components such as ball joints, bushings, wheel bearings, and strut components. If you are unsure if you feel anything loose, have an assistant visually look at individual components as you wiggle the wheel back and forth. The assistant should be looking for any component which shows play.
Repeat this process for all 4 wheels.
Closer Inspection of the Suspension:
Example 1:
Look closely at all of the suspension components we covered on pages six through nine. Look closely at bushings for signs of collapse such as the control arm bushing in the photo.
This photo was taken on a vehicle that had been making a clunking noise when going over bumps. You can clearly see how the bushing is beginning to tear and wrinkle, and it has collapsed downward as a result.
Example 2:
Bushings will crack long before they collapse like the bushing in example one. You can look for cracks such as the rear control arm bushing in the photo.
This photo was taken under the same vehicle as an example one. You can see how the bushing is beginning to crack near the control arm. It’s very likely this bushing won’t make noise at this time, but if it is not replaced it will continue to deteriorate.
Remember that control arms are used to keep suspension components in line as the suspension travels, but if the bushings are worn it can have an adverse effect on alignment angles and cause uneven tire wear or could cause the vehicle to pull to one side or the other.
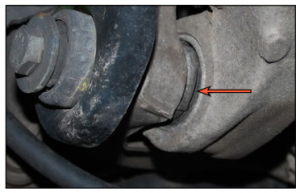
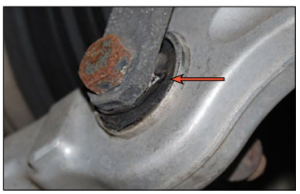
Example 3:
Here we see a pair of outer tie rod ends. The tie rod end on the right is brand new and has not been installed on a vehicle before. Notice that the rubber boot has no tears or damage, the threads on the stud are clean and show no signs of damage. We also have zero movement/play in the joint.
The tie rod end on the left was removed from a vehicle which had a large amount of play in the steering wheel. We can see that the boot is badly torn, and when we performed a shakedown like we showed on page 12 we could feel a large amount of play in both outer tie rod ends. We also found there was a large amount of movement/play up and down (see the arrows in the photo), this is a clear sign of a worn out joint which is in need of replacement.

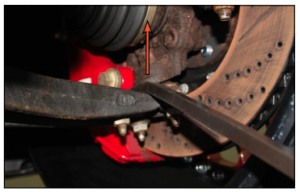
Example 4:
We can also use a pry bar to find a bad ball joint as shown in the photo. Place a pry bar between the control and the knuckle, being careful to not damage or puncture the ball joint boot. Pry up on the knuckle and look for any vertical play in the ball joint, if there is vertical play this means the ball joint must be replaced.
Please remember, if you find a worn steering component such as a ball joint or tie rod end, replace these parts as soon as possible. If they are left alone they will eventually wear out so badly that the joint could separate from the socket, which could cause a serious accident.
Example 5:
Closely inspect the shocks/struts on both the front and the rear of your vehicle. Signs of wear include oil leaking from the inside and torn/ripped protective boots. Symptoms of a worn out shock can include a loud
and rapid thumping noise when going over bumps, and the vehicle may bounce more than it should when going over bumps.

Example 6:
This is also a good opportunity to inspect other vehicle systems while you are under the vehicle. These systems can include:
* Brakes
* Tires
* Exhaust
* Engine
* Transmission
* C/V Axles

You Are Ready To Inspect And Diagnose Your Suspension!


