Introduction:
• Makes your hatch open completely with the push of a button
• Simple installation
• Complete with all necessary components
• Utilizes your original key fob

Installing the Volkswagen MK5/6 Jetta SportWagen Hatch Pop Kit is a simple project that you can complete in about 10 minutes, however, VAG-COM coding is required for some cars. Most MK6 VW’s will already be coded to allow the hatch pop kit to work, but most MK5 VW’s will require coding and VAG-COM diagnostic software will be required for this. If you do not have access to VAG-COM diagnostic software, please consult a professional repair facility before beginning. Thank you for looking to ECS Tuning for all your performance and repair needs. We appreciate your business!
Kit Contents

2 Gas Struts
Required Tools
Small Flat Blade Screwdriver
VAG-COM Diagnostic Scan Tool with Coding Ability (2009 MK5 VW’s)
Shop Supplies and Materials
Standard Shop Supply Recommendations: We recommend that you have a standard inventory of automotive shop supplies before beginning this or any automotive repair procedure. The following list outlines the basic shop supplies that we like to keep on hand. Shop supplies with a hyperlink are available on our website.
- Hand Cleaner/Degreaser
- Pig Mats – for protecting your garage floor and work area from spills and stains
- Spray detailer – for rapid cleaning of anything that comes into contact with your paint such as brake fluid
- Micro Fiber Towels – for cleaning the paint on your car
- Latex Gloves – for the extra oily and dirty jobs
- Medium and High Strength Loctite Thread lock compound – to prevent bolts from backing out
- Anti-Seize Compound – to prevent seizing, galling, and corrosion of fasteners
- Aerosol Brake/Parts Cleaner – for cleaning and degreasing parts
- Shop Rags – used for wiping hands, tools, and parts
- Penetrating oil – for helping to free rusted or stuck bolts and nuts
- Mechanics wire – for securing components out of the way
- Silicone spray lube – for rubber components such as exhaust hangers
- Paint Marker – for marking installation positions or bolts during a torquing sequence
- Plastic Wire Ties/Zip Ties – for routing and securing wiring harnesses or vacuum hoses
- Electrical tape – for wrapping wiring harnesses or temporary securing of small components
Installation Notes
- RH refers to the passenger side of the vehicle.
- LH refers to the driver side of the vehicle.
- Always use the proper torque specifications.
- If applicable to this installation, torque specifications will be listed throughout the document and at the end as well.
- Please read all of these instructions and familiarize yourself with the complete process BEFORE you begin.
General Preparation and Safety Information
ECS Tuning cares about your health and safety. Please read the following safety information. This information pertains to automotive service in general, and while it may not pertain to every job you do, please remember and share these important safety tips.
- Park your car in a safe, well lit, level area.
- Shut the engine off and remove the key from the ignition switch.
- Make sure any remote start devices are properly disabled.
- ALWAYS wear safety glasses.
- Make sure the parking brake is applied until the vehicle is safely lifted and supported.
- If using an automotive lift, be sure and utilize the factory specified lift points. Lifting a vehicle in an incorrect location can cause damage to the suspension/running gear.
- When lifting a vehicle using a jack, always utilize the factory specified lift points. Lifting a vehicle in an incorrect location can cause damage to the suspension/running gear. ALWAYS support the vehicle with jack stands.
- ALWAYS read and follow all safety information and warnings for the equipment you are using.
Hatch Pop Kit Installation:
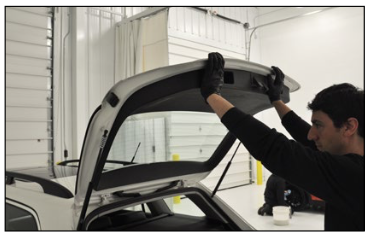
Step 1:
Open the rear hatch and support it so it will not close once the original struts are removed. You can support it with a prop rod or similar tool, or even easier, enlist the help of a friend.
The hatch will not stay open with only one strut. The hatch must be supported at all times during this installation.
Step 2: Small Flat Blade Screwdriver
Remove both original struts by prying out the retaining clips at the top and bottom, then pulling the strut ends off of the ball studs.
Step 3:
Prior to installing, make sure that the ball sockets on the gas struts are aligned properly to the ball studs. If they are not, they can be adjusted easily by holding the base of the strut and rotating the rod, using a screwdriver in the end of the ball socket as shown in the picture on the right.


Step 4:
Install both new struts by simply pushing the ends onto the ball studs. There is no need to remove the clips from the new struts, they will spread slightly as you push them on then return to their original position when the ball socket is seated.
Make sure both of the spring ends are located at the top as shown in the picture.

Step 5:
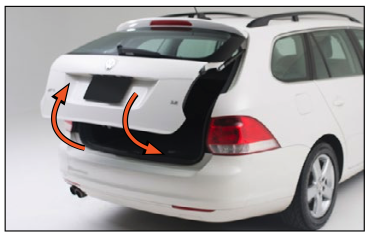
Carefully close and open the hatch to make sure the struts are properly installed.
Due to the springs on the new hatch struts, you will notice additional effort required to close the hatch when it nears the bottom.
Step 6:
Most MK6 VW’s should already be programmed for your hatch pop kit to work. Simply push and hold the hatch release button on the key fob and enjoy! Your installation is complete!
Most 2009 MK5 VW’s require VAG-COM coding for your hatch pop kit to work. If you have installed this on a 2009 MK5, push and hold the hatch release button on the key fob to see if it releases the hatch. If not, proceed to the next step for VAG-COM coding.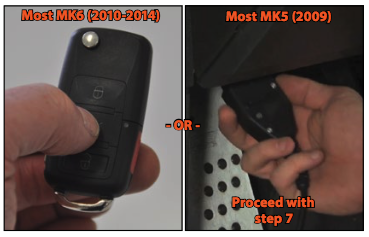
Step 7: VAG-COM


Step 8:
Disconnect VAG-COM, close the hatch, push the button, and enjoy!
Your MK5/6 Jetta Sportwagen Hatch Pop Kit installation is complete!
Interested in purchasing? Click HERE to shop now!
Proper service and repair procedures are vital to the safe, reliable operation of all motor vehicles
as well as the personal safety of those performing the repairs. Standard safety procedures and precautions (including use of safety goggles and proper tools and equipment) should be followed at all times to eliminate the possibility of personal injury or improper service which could damage the vehicle or compromise its safety.
Although this material has been prepared with the intent to provide reliable information, no warranty (express or implied) is made as to its accuracy or completeness. Neither is any liability assumed for loss or damage resulting from reliance on this material. SPECIFICALLY, NO WARRANTY OF MERCHANTABILITY,
FITNESS FOR A PARTICULAR PURPOSE OR ANY OTHER WARRANTY IS MADE OR TO BE IMPLIED WITH RESPECT TO THIS MATERIAL. In no event will ECS Tuning, Incorporated or its a liates be liable for any damages, direct or indirect, consequential or compensatory, arising out of the use of this material.