Introduction:
Parts Required:
ZF Automatic Transmission Service Kit ES#2523327
Kit contents:
• Transmission filter
• Transmission oil pan gasket
• Drain Plug
• Fill Plug
• Red Line Dexron ATF-D4 (7 liters)
• (Optional) pan bolts
Tools We Used:
• T27 Torx
• 6 mm hex
• 8 mm hex driver
• long handled ratchet
• bead thermocouple digital temperature sensor
• torque wrench
• level
• catch tray/drain
• clean, lint free towels
• Motive Power Fill fluid transfer pump
Getting Started
- Start with the transmission cold. 30oC or less is recommended. That’s 86 degrees F.
- Raise the car safely. If you’re working without a lift, be sure to jack at the factory lift points. Back up your hydraulic jack with sturdy jack stands, rated for the load.
- Since we need to raise and level the car, if you are working with floor jacks, you’ll need four stands.
- The transmission in our 525i has no dipstick or dipstick tube. The entire drain and fill are done from beneath the car, so don’t work alone.
- Since the engine will be running as we refill the transmission, work somewhere with adequate ventilation; and pipe the exhaust to the outside. Exhaust gases are poisonous. Carbon monoxide is colorless and odorless, and even at low concentrations, it can be lethal. Exposure to smaller concentrations commonly causes severe headaches.We’ll start you o with a list of repair steps, followed by a detailed photo sequence.
Product Overview:
Here’s a quick outline of the transmission service procedure, followed by a more detailed explanation that includes photos and illustrations.
1) Start with the transmission cold (below 30oC).
2) Raise the vehicle. Make sure car is level, fore-and-aft and side-to-side. Don’t guess; use a level.
3) Loosen the ll plug. Unscrew the transmission drain plug; drain the fluid.
4) Loosen the pan bolts, allowing the pan to tilt slightly downward toward the drain hole. This drains more fluid and reduces spillage when the pan is removed.
5) Remove the remaining pan bolts; drop the transmission pan.
6) Remove the two screws holding the filter to the valve body. Remove the old filter. Make sure the old filter sealing ring comes out with the filter.
7) Install the new filter. Reinstall the attachment screws.
8) Install the new pan gasket on the pan.
9) Reinstall the transmission pan. If using the old bolts, apply blue thread locker. Reinstall the drain plug and torque to 35Nm (26 ft-lb).
10) With the engine still off, add fluid through the fill hole until fluid just starts to drip from fill hole.
11) Start the engine and let it idle. Continue to add fluid.
12) Move the gear selector lever from Park to D, pausing for 3-5 seconds, and then to R, pausing again for 3-5 seconds; allow the engine to idle during this process.
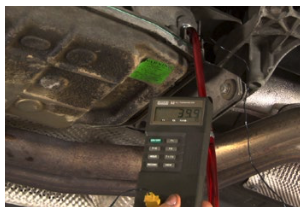
13) Continue to add fluid while monitoring the transmission fluid temperature; temperature may be monitored using the correct vehicle scan tool interface or with a thermometer.
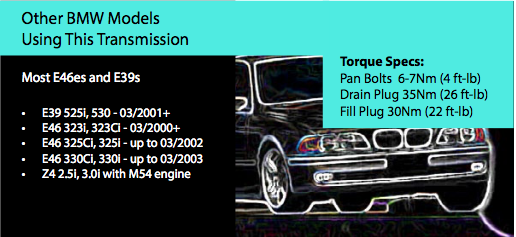
14) Continue to add fluid. The transmission is full when fluid drips from the ll hole at a fluid temperature between 30 and 50oC (40oC ideal target).
15) Replace the ll/inspection hole plug and torque to 30Nm (22 ft-lb).
16) Test drive and check for leaks.
Installation:
Step 1:
The transmission must be level, both fore-and-aft and also from side-to-side. The transmission oil pan on this ZF tapers toward the drain, so place your level on the lip of the oil pan, parallel to the base of the transmission, as we’re doing here.
You’ll see why this is important when we start adding fresh fluid.

Step 2:
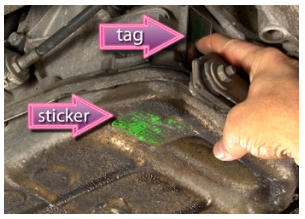
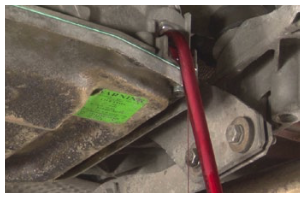
With the car raised, locate the colored sticker on the pan. Several different color stickers have been used on different applications over the years.
The sticker color identifies the transmission by type and lists information about the correct fluid and fluid ll temperatures. Take this seriously. Using the wrong fluid will cause big problems.
If the sticker is damaged, illegible, covered with tar, or missing, refer to the identification plate riveted to the rear of the transmission body, near the fill plug.
Step 3:
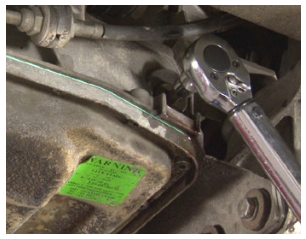
Crack the fill plug loose using an 8mm hex head driver and a long-handled ratchet or breaker bar.
Do this first. We don’t want to drain the transmission and then find out we can’t refill it.

Step 4:
Next, take a 6mm hex, and remove the transmission drain plug. Drain the fluid into a pan and save it for proper recycling.

Step 5:
Using a T27 Torx driver, start loosening the pan bolts. Work your way around the perimeter of the pan. Loosen the bolts so the pan tips downward slightly to remove as much fluid as possible through the drain hole.
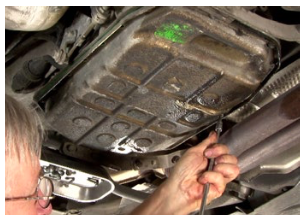
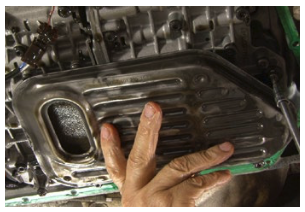
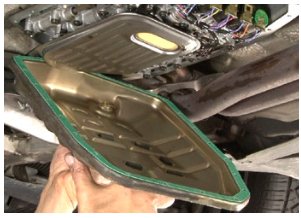
Step 6:
Now drop the oil pan. There are several magnets inside the pan to attract tiny iron particles that might escape the filter. Expect to find a gray residue inside the pan, and a gray paste covering all of the magnets.
Step 7:
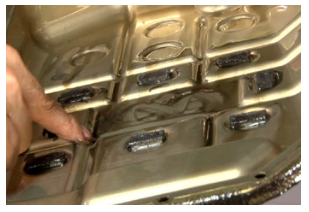
Remove the magnets and wash the inside of the pan. Wipe it clean with a lint-free cloth and then blow it dry with compressed air.

Step 8:
Wipe the magnets clean to remove the paste-like coating. You may need to wipe them several times.
Place the clean magnets back in the pan in their original locations.
Cover the pan and lay it aside for now.

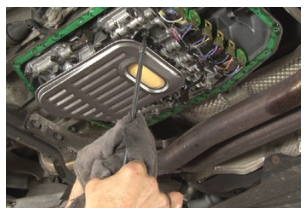
Step 9:
Use your Torx driver to loosen and remove the two filter attachment screws holding the filter to the valve body. With the screws removed, wiggle the filter side to side as you pull down to remove it.
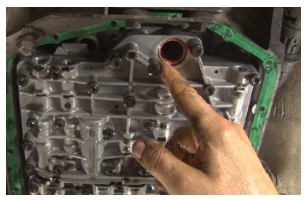
Step 10:
The circular seal at the filter tube may stick in the fluid inlet at the valve body, so take a small screwdriver or pick and pry it out. Just be careful not to damage the metal hole where the seal sits in the transmission.
Step 11:
Remove the old pan gasket. Note that the original factory-installed gasket uses no sealers of any kind, and comes o easily.

Step 12:
Lube the filter neck seal lightly with clean transmission fluid. Reinstall the filter and hand tighten the two filter attachment screws.
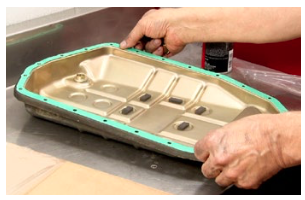
Step 13:
Place the pan gasket on the oil pan. No additional sealer is recommended. Do not use gobs of sealant from a tube. Even a small glob of sealer will cause huge problems if it gets sucked into an internal fluid passage.
Step 14:
Clean the gasket mating surface on the transmission body. Use an aromatic cleaner that leaves no residue, like alcohol.
Replace the pan, keeping the holes in the gasket aligned with the holes in the pan.
Step 15:
If you’re reusing the old bolts, a drop of medium strength thread locker (blue) is a worthwhile precaution. Hand snug the attachment screws.
Pan bolt final torque is only 6-7 Nm (4.5-5 ft-lb).
Note: ECS Tuning stocks replacement bolts, should you need them.

Step 16:
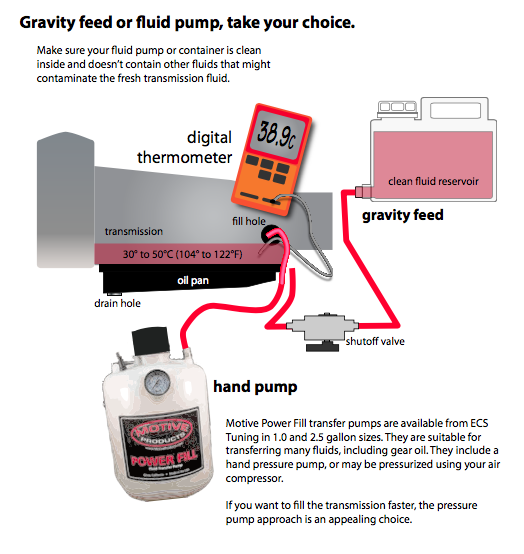
Now it’s time to refill the transmission. Use a hand pump or gravity feed to add fluid to the transmission until it just starts to drip from the fill hole.
Step 17:
Start the engine.
Place your foot on the brake and move the gear selector lever from Park to Reverse, pausing there for 3-5 seconds. Then move the selector into Drive, pausing again for 3-5 seconds before returning the gear selector to Park. This fills the transmission internal cavities and passages with fresh fluid.

Step 18:
Continue adding fluid through the fill hole. Add fluid until it starts dripping from the ll hole at a temperature somewhere between 30 and 50oC. The exact temperature at which the transmission begins to drip fluid will vary.
Just remember that the transmission temperature should never get hotter than 50oC when the fluid starts running out the fill hole.
IMPORTANT: If the fluid temperature does reach 50oC before the tranny is full, replace the fill plug first. Then stop the engine, and let the transmission cool.
Do NOT stop the engine without replacing the fill plug or you’ll dump fluid out the fill hole and have a nasty mess to clean up.
Step 19:
When the transmission is full, replace the fill plug and torque it to 30Nm (22 ft-lb).
Time for a test drive.
Step 20:
For those who think that transmission service is overkill, we offer before and after shots of the tranny fluid.
Which fluid would you rather have in your expensive transmission?
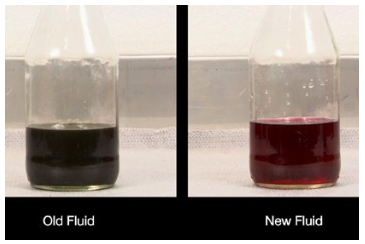
This concludes our transmission service. We feel that periodic fluid and filter changes at 60,000 to 65,000 miles are essential if your transmission is to live long and prosper.


