
As some TT owners discovered through painful experience, waiting too long to replace the timing belt can result in expensive engine repairs when a broken belt lets pistons and valves bump in the dark.
Today, we’ll replace a timing belt and water pump on a 2003 TT 1.8T 225 HP engine, code BEA. Even though our car has only 50k miles on the odometer, its original timing belt is a decade old, and many experts recommend that belt replacement intervals should be based on age as well as mileage, especially on interference engines like this one.
While the 1.8T engine design is a mainstay in many VW/Audi cars, its packaging in the TT and the tight belt fit on the sprockets creates a few challenges we’ll document here.
For First Time Installers:
If this is your first T-belt installation, you may be a little nervous about whether you have the belt properly timed. This is certainly an important consideration, especially on “interference” engines where incorrect belt timing can result in engine damage.
To take some of worry out of the process, you can add a few dabs of paint on the timing belt teeth as an added reference and safeguard.
With the engine timing marks properly aligned (see page 5), place two small dabs of paint on the old timing belt teeth on either side of the camshaft sprocket timing mark.


(We prefer using a tube of automotive touch up paint that comes with its own brush. This paint dries very quickly and does not rub off easily.)
In addition to the timing marks, add a separate arrow indicating direction of rotation.


Place a dab of paint on the small raised nub on the face of the crank sprocket and on the belt tooth next to it.


Quick Tip:
For added convenience, you can also place a single paint mark on the timing belt tooth at the top of the sprocket, and a matching mark on the raised boss on the aluminum housing behind the sprocket. That way, if the crank moves, you’ll know at a glance. (Just be sure the flywheel mark is aligned at TDC when you apply the marks!)


After removing the old belt, clip it to the new belt using large binder clips to keep the belts perfectly aligned, tooth for tooth. (Much faster and more accurate than counting teeth!)
Using the paint marks on the old belt for reference, add matching paint marks on the new belt, including the direction-of-rotation mark.
Now when you install the new belt, you can use the normal engine timing marks on the cam and flywheel and check your installation with the paint marks for a fail-safe installation.
Special Note: After the belt is timed and tensioned, bar the engine over two complete crankshaft revolutions and double check the timing marks, which should align again. It takes 720 degrees of crankshaft rotation to complete a complete engine combustion cycle. The crankshaft turns exactly twice as fast as the camshaft; 720 degrees for each 360 degrees of camshaft rotation.


DO NOT be concerned that the paint marks do not align again after two crank revolutions; they will not. Paint marks are used only for initial timing. Refer only to the cam and flywheel marks after turning the engine over by hand.
Getting Ready
Battery Disconnects and Keep Alive Memory: Most instruction sheets begin with a recommendation to disconnect the battery. This general caution is included because cranking the engine over with the timing belt removed results in immediate and costly engine damage. (Those wishing to forego this step should at least remove the keys from the ignition and hide them until the job is complete.)
Caution: Disconnecting the battery commonly erases memory in the powertrain controller and any other control module with “keep alive” memory. If you want to keep these data in memory (emissions related OBD information, radio presets, etc.), a “memory saver” can be connected that supplies low current voltage to volatile memory. These backup power supplies do not have enough wattage to operate the starter.
Jacks and Jack Stands
Timing belt replacements require you to work both under the hood and under the car. If you have a lift, great. If not, please use a hydraulic jack large enough for the load and work on a hard, flat, stable surface. Once the car is raised to working height, please support it safely, using ANSI-approved jack stands. Do not rely solely on the hydraulic jack. We strongly suggest that you have a buddy assist you for convenience and safety.
You’ll need some way to support the engine while the right side motor mount is removed, and some way to raise and lower the engine slightly to make wiggle room at different stages of the installation. If you choose to use a hydraulic floor jack, locate it under the engine in a spot where it cannot slip.
We’ll be using an engine support bar that straddles the engine compartment. Its threaded rods and attachment chains let you safely raise and lower either side of the powertrain from above. This tool is also useful for other repairs, including transmission removal, engine mount and clutch replacements.
This affordable engine support bar has a 1000 pound lift capacity, and can be adjusted to straddle different width engine compartments. Powder coated for durability, its padded support legs prevent paint damage. It comes apart for easy storage when not in use.


Here’s a bullet-point overview of the TT Timing Belt installation. For more detail, please see the diagrams and photos on the following pages. For those of you who have never tackled a timing belt before, we have a special section at the end showing how to use a few carefully placed paint marks as a quality control check to ensure correct T-belt timing.
Install new fasteners wherever specified, especially Torque-to-Yield bolts.
- Remove the right beauty cover above the coolant bottle. Check antifreeze concentration.
- Remove the top engine cover.
- Raise the car. Remove the right front wheel.
- Open the coolant pressure cap. Remove the belly pan. Open the drain valve at the lower radiator hose. Retighten when done.
- Detach the coolant bottle, power steering, and charcoal canister. Pull them aside.
- Loosen the charge pipe clamp nuts and clamps. Disconnect the pipe from the rubber air inlet. Tilt the pipe up and prop it out of the way.
- Remove the accessory belt and belt tensioner.
- Remove the top timing belt cover (2 snap clips).
- Remove the lower side shield (two nuts on chassis studs on the bottom of the chassis rail).
- Bar the engine over to TDC (flywheel mark) with camshaft mark aligned with rear timing cover mark.
- Remove the vibration damper from the crankshaft (4 bolts)
- Remove the lower timing belt cover (5 bolts).
- Support the engine.
- Unbolt the chassis engine mount and remove it.
- Raise and lower engine as needed to remove the three engine mount-to-engine block bolts.
- Screw the 5×55 threaded rod into the tensioner; compress the tensioner piston and remove the belt.
- Remove the water pump (three bolts). Clean away all spilled coolant.
- Rotate the mount clockwise into the area vacated by the water pump and remove it.
- Remove the old tensioner (two bolts) and tensioner roller (8mm hex).
- Install the new tensioner and tensioner roller.
- Use the threaded rod to compress the tensioner as described on page 6.
- Hang the new belt over the cam sprocket. Let the rear of the belt hang over the tensioner roller.
- Reinstall the side mount on the block with one loosely installed bolt.
- Install the new water pump. Lube the o-ring with fresh coolant.
- Verify camshaft and flywheel timing mark alignment.
- Install the new timing belt on the cam and crank sprockets and the water pump. All belt slack must be on tensioner side.
- Double check timing marks again before releasing the tensioner.
- Bar the engine over by hand two complete revolutions and check timing mark alignment.
- Reinstall the top timing belt cover.
- Reinstall the motor mount on the block.
- Reinstall the lower timing cover.
- Reinstall the balancer on the crankshaft.
- Reinstall the accessory belt tensioner and accessory belt.
- Raise the engine to normal height and reinstall the top chassis mount.
- Remove the engine hanger.
- Reinstall the remaining components: top engine cover, coolant bottle, power steering reservoir and right beauty cover.
- Fill the cooling system.
- Start the engine.
- Bleed the cooling system.
Overview of the system components involved in timing belt replacement:
Bolt locations and torque specs are displayed for your convenience.
Belt installation is best performed with the help of a special tool that is described on the next page.


The TT timing belt is a tight fit on the engine and water pump sprockets. If you use the factory recommended method, however, belt removal and installation is much easier.


Remove the Old Belt Screw a 5 x 0.8 x 55mm long threaded rod into the threaded hole in the tensioner body. The head of the rod should stick up through the notch in the tensioner roller arm.
Place a washer over the stud and then thread on a 5mm nut. Tighten the nut until the roller arm compresses the tensioner far enough to let you slide the belt off the sprockets.
Install the New Belt In similar fashion, when installing the new tensioner and tensioner roller on the engine, install the threaded rod, nut, and washer.
Turn the nut again to compress the new tensioner piston until the grenade pin can be pulled out easily by hand. Pull and discard the pin.
Making sure that all timing marks are properly aligned, route the new timing belt over the camshaft sprocket, water pump, and tensioner roller. (At this point, the belt will be too tight to install onto the sprockets.)
Continue tightening the nut on the threaded rod. Not too far. Just enough to compress the tensioner piston until the belt can be installed over the sprockets.
Installation Note:
All timing belt slack should be on the tensioner side. There should be no belt slack on the water pump side of the belt.
Installation Note:
After double checking the timing marks, remove the nut, washer, and stud. With the grenade pin removed, the tensioner piston will push outward as the nut and rod are removed, tensioning the belt. Bar the engine over by hand two complete revolutions and double check the timing marks to be sure they are properly aligned. If you are a first-time installer, check pages 18 and 19 for additional tips on belt timing.
Step 1


Under the hood, unscrew the threaded retainer (upper arrow) and remove the right side beauty cover.
To make extra room, you can also remove the front left cover, which is held in place by push pins.
Service Tip: To remove push pins, press the center pin inward to its next stop (inset photo). Then pry the main pin body from its hole.
Step 2


Check anti-freeze concentration. Do this first to save time later. We prefer a refractometer for this task, since it is more accurate than $2 floating ball testers.
If the coolant mix is 50/50 water/antifreeze, then you can top off the system later with a 50/50 mix and know the final concentration will be correct.
If the system starts with too much water or antifreeze, you’ll need to plan ahead and correct the makeup coolant concentration to end up at the optimal 50/50 ratio, or drain and refill the system.
Step 3


Remove the top engine cover.
- Turn the two front retainer clips a quarter turn and remove them (arrows).
- Then lift the front of the cover and slide it forward off the two retainer tabs at the rear.
Step 4


Raise the Vehicle Please support the vehicle safely and work with a buddy. Cars are heavy, and gravity never sleeps. Working without a lift? Back up your hydraulic jack with ANSI-approved jack stands.
Drain the Cooling System Open the plastic petcock at the base of the lower radiator hose to drain the coolant after loosening the coolant recovery bottle cap. This won’t drain the entire system; you’ll still get a good amount of water from the block when you remove the water pump later. Then close the drain.
Remove the Right Front Wheel Insert a hooked pulley through one of the holes in the center cap and pull straight out to remove the cap.
Remove the right front wheel.
Step 5


Remove the coolant bottle.
- Unplug the coolant level sensor.
- Free the two small diameter lengths of convoluted tubing from the side of the bottle.
- Remove the two Philips head screws holding coolant bottle (arrows), and lift it up far enough to disconnect the two coolant bottle hoses (outlet and return).
- Remove the bottle from the car.
Step 6


Suction as much power steering as possible from the fluid reservoir.
Step 7


Disconnect the rear hose from the power steering fluid reservoir.
Using a 5mm hex driver, remove the single long attachment bolt. Lift the reservoir and pull it forward with the front hose still connected. Position it out of your way.
Service Tip: Plug the rear (open) hose to prevent fluid leakage.
Step 8


Remove the nuts from the charge pipe clamp studs (arrows).
Pivot the clamp half shells upward and twist them 90 degrees to remove them.
Loosen the hose clamp at the front of charge tube and separate the rubber hose from the front of the tube.
Lift the front of the charge pipe up far enough to place a box (or similar prop) under it to keep it out of your way.
Step 9


Using a 15mm open end, pivot the accessory belt tensioner and insert a drill bit or hardened steel pin into the installation holes, as shown. (VW has a special tool for this: T10060A.)
The pin locks the tensioner in the relaxed position away from the belt.
Note: If you are reusing the old belt, mark it for direction of rotation and reinstall it the same way or risk premature belt failure.
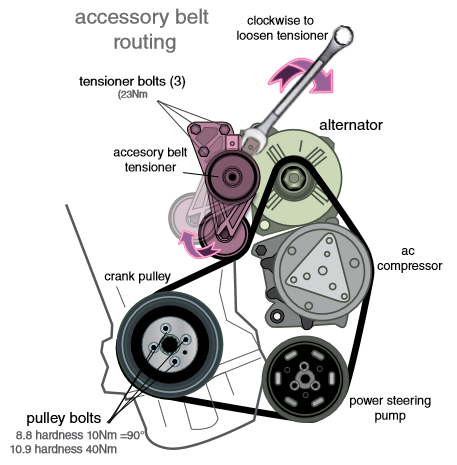
This illustration gives you a better view of acessory belt routing and components.
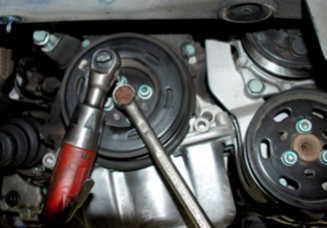
Attach a 15mm open end to the raised boss on the belt adjuster. Turn the wrench in the direction shown to pivot the tensioner roller away from the accessory belt.
Service Tip: Belt tensioners do wear out. Their bearings fail and their internal tension spring weakens.
If you are installing a new belt on a high-mileage engine, it is advisable to install a new tensioner at the same time. Old tensioners commonly allow belt slippage and shorten belt life.
Step 10

After removing the belt, unbolt the accessory belt tensioner bracket and remove the tensioner from the engine.
Keep an eye on these three bolts. Note the location of the charge tube support racket.
Step 11


Pry off the spring clips (two clips at front and rear) from the upper timing belt cover and lift it off to expose the camshaft sprocket and belt.
Step 12


Inside the wheel well, remove the lower splash shield from the right side. It is held in place by two stamped nuts that screw onto chassis studs. One is visible in our photo (arrow). The other is accessible from beneath the car.
Step 13


Remove the crankshaft pulley. Use a 6mm hex head driver to remove the four bolts.
Using a 12-point 19mm wrench, bar the engine over until the timing marks on cam and crank are aligned.
Step 14

Remove the five bolts from the lower timing cover. (The fifth bolt screws through the cover into the water pump. It is out of view in this picture.)
Remove the cover and lay it aside.
If you wish to add paint marks at cam and crank sprockets, this is the time to do it. (See our First Time Installer blurb at the beginning of the article)
Step 15


Support the engine
Step 16


Unbolt and remove the top section of the left motor mount.
Step 17


Remove the top bolt holding the lower engine mount to the engine block.
Step 18


Raise and lower the engine as needed to remove the remaining two bolts holding the mount to the engine block.
Step 19


Remove the belt from the sprockets.
Step 20


Remove the three bolts from the water pump. The pump seals to the engine with an o-ring that may stick in place.
Pry at the top and bottom of the water pump to work it from its hole in the engine.
Step 21


If you want more elbow room, rotate the engine mount forward into area vacated by the pump and wiggle it out of the car.
Unbolt the tensioner roller (8mm hex driver) and the tensioner using (10mm socket or box wrench). (See fastener locations page 5.)
Clean the front of the block and bolt on the new tensioner (arrow).
Step 22


The tensioner roller ships with a short length of tubing on the bolt threads to keep the roller spacer (arrow) from falling off during shipping.
This washer must be in place when you bolt the roller to the engine to ensure correct belt alignment.
Step 23


Install the roller and torque to specs. Using the instructions on page 6 of this pdf, install the threaded rod and prepare the tensioner.
Note: If you removed it, don’t forget to slide the motor mount into position before installing the new water pump.
Step 24


Before installing the new water pump, lubricate the o-ring with clean antifreeze to make it slide into the engine more easily.
Alternately snug, then torque the pump bolts to specifications.
Installation Note: We always apply a drop or two of medium strength thread locker to the pump bolts for added peace of mind.
Step 25


Route the new timing belt into position, working it around the motor mount legs.
Using the description on page 6, install the new timing belt on all the sprockets.
Reinstall the lower timing belt cover. Apply medium thread locking compound, tightening fasteners to 10Nm.
Step 26


Raise or lower the engine to align the top engine chassis mount and the lower engine mount. Bolt them together.
Complete kits from ECS contain all bolts that should be replaced.
Step 27


Complete the installation of the underhood components and accessories removed earlier.
Step 28


Fill and bleed the cooling system. Audi recommends using a vacuum fill device similar to this one. It uses shop air and venturi vacuum to pull a partial vacuum in the system. Turning a valve on the tool connects it to a container with fresh coolant that is then sucked into the system. You can purchase our Schwaben Vacuum Bleeder Tool here, which performs this function.


If you do not have a fill tool, you’ll have to add fresh coolant at the coolant bottle, and bleed the system manually.


Set the heater to max hot, then run the engine for several minutes at high idle until the heater blows hot and the radiator cooling fan comes on.
You may need to shut the engine down and repeat this process more than once to purge all air from the system. Just remember that the system will be under pressure when hot, so don’t open the pressure cap to correct the coolant level until the system cools.
Interested in purchasing?
Audi TT MK1 and VW MK4 1.8T Timing Belt Kit