
Introduction:
Today we’re going to install our new Street Shield Skid Plate on our MK7 Volkswagen GTI. The fit and instructions are the same for the Audi 8V A3, and it fits FWD and 4-Motion models as well. This only requires a few basic tools, and will only take about 30 minutes of your time. We are installing it on a lift, but all you really need is a little extra room under the front so if you if you support your car on jack stands or drive it up on ramps, you’ll have plenty of room.

Here are all the tools you’ll need:
1. Flat Blade Screwdriver
2. Pick
3. T25 Torx Driver
4. 5mm Allen
Kit Contents:

Required Tools:
Tool Recommendations: The following list of tools are part of a standard automotive tool set, and are used in various combinations for most automotive repairs. The tools required for this installation are highlighted in red, but we recommend you have this complete standard selection to overcome any issues that may arise such as rust, corrosion, or broken and stripped fasteners. The specific tools required for each step will be listed by the step number throughout these instructions, and any tools listed below with a hyperlink are available on our website.
• Protecta-Sockets (for lug nuts) ES#2221243
• 3/8” Drive Ratchet ES#2765902
• 3/8” Drive Torque Wrench ES#2221245
• 3/8” Drive Deep and Shallow Sockets ES#2763772
• 3/8” Drive Extensions ES#2804822
• Hydraulic Floor Jack
• Torx Drivers ES#11417
• 1/2” Drive Deep and Shallow Sockets ES#2839106
• 1/2” Drive Ratchet
• 1/2” Drive Extensions
• 1/2” Drive Torque Wrench ES#2221244
• 1/2” Drive Breaker Bar ES#2776653
• Crows Foot Wrenches
• Hook and Pick Tool Set ES#2778980
• 1/4” Drive Ratchet ES#2823235
• 1/4” Drive Deep and Shallow Sockets ES#2823235
• 1/4” Drive Extensions ES#2823235
• Plier and Cutter Set ES#2804496
• Flat and Phillips Screwdrivers ES#2225921
• Jack Stands ES#2763355
• Ball Pein Hammers
• Pry Bar Set ES#1899378
• Bench Mounted Vise
• Punch and Chisel Set
• Hex Bit (Allen) Wrenches and Sockets ES#11420
• Thread Repair Tools ES#1306824
• Open/Boxed End Wrench Set ES#2765907
Shop Supplies and Materials:
Standard Shop Supply Recommendations: We recommend that you have a standard inventory of automotive shop supplies before beginning this or any automotive repair procedure. The following list outlines the basic shop supplies that we like to keep on hand. Shop supplies with a hyperlink are available on our website.
• Hand Cleaner/Degreaser
• Pig Mats – for protecting your garage floor and work area from spills and stains
• Spray detailer – for rapid cleaning of anything that comes into contact with your paint such as brake fluid
• Micro Fiber Towels – for cleaning the paint on your car
• Latex Gloves – for the extra oily and dirty jobs
• Medium and High Strength Loctite Thread lock compound – to prevent bolts from backing out
• Anti-Seize Compound – to prevent seizing, galling, and corrosion of fasteners
• Aerosol Brake/Parts Cleaner – for cleaning and degreasing parts
• Shop Rags – used for wiping hands, tools, and parts
• Penetrating oil – for helping to free rusted or stuck bolts and nuts
• Mechanics wire – for securing components out of the way
• Silicone spray lube – for rubber components such as exhaust hangers
• Paint Marker – for marking installation positions or bolts during a torquing sequence
• Plastic Wire Ties/Zip Ties – for routing and securing wiring harnesses or vacuum hoses
• Electrical tape – for wrapping wiring harnesses or temporary securing of small components
Installation Notes:
• RH refers to the passenger side of the vehicle.
• LH refers to the driver side of the vehicle.
• Always use the proper torque specifications.
• If applicable to this installation, torque specifications will be listed throughout the document and at the end as well.
• Please read all of these instructions and familiarize yourself with the complete process BEFORE you begin.
General Preparation and Safety Information:
ECS Tuning cares about your health and safety. Please read the following safety information. This information pertains to automotive service in general, and while it may not pertain to every job you do, please remember and share these important safety tips.
• Park your car in a safe, well lit, level area.
• Shut the engine off and remove the key from the ignition switch.
• Make sure any remote start devices are properly disabled.
• ALWAYS wear safety glasses.
• Make sure the parking brake is applied until the vehicle is safely lifted and supported.
• If using an automotive lift, be sure and utilize the factory specified lift points. Lifting a vehicle in an incorrect location can cause damage to the suspension/running gear.
• When lifting a vehicle using a jack, always utilize the factory specified lift points. Lifting a vehicle in an incorrect location can cause damage to the suspension/running gear. ALWAYS support the vehicle with jack stands.
• Always read and follow all safety information and warnings for the equipment you are using.
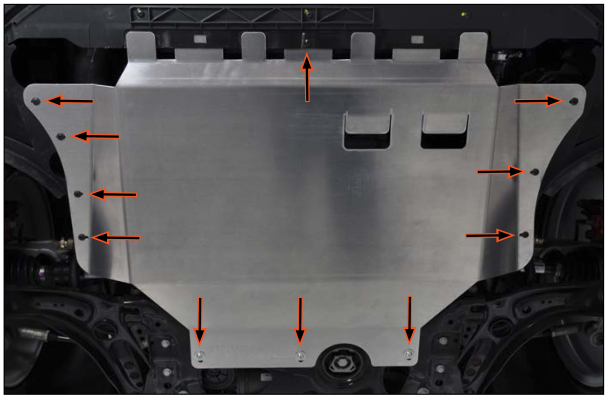
Removing the Original Insulation Panel:
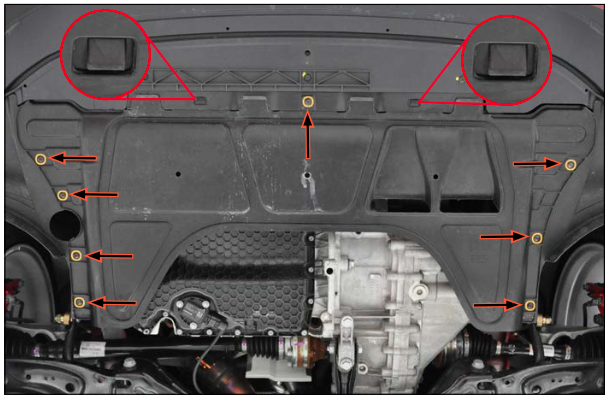
To remove the original insulation panel, first, remove the eight screws around the perimeter using a T25 Torx driver (see note). Next, release the two forward hooks using a flat-blade screwdriver and pull the panel rearward to remove it.
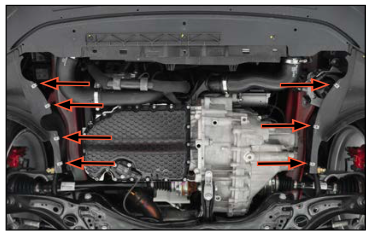
NOTE: Some vehicles may be equipped with full-length insulation panels, which will include three additional mounting bolts at the rear.
Installing the New Street Shield Skid Plate:
Step 1:
Locate the seven-speed nuts on the side wings.
Step 2:
Pick Tool
Pry them all off using a small pick or screwdriver and replace them with the new ones included in the kit.
NOTE: The side wing speed nuts and mounting screws are the same as the OE panel hardware. We include new ones with the kit since they are commonly worn out, but you may choose to reuse your original speed nuts and screws if they are in good condition.

Step 3:
Install the single Front Speed Nut onto the front center of the new Street Shield skid plate. Make sure the open hole is facing the bottom side of the Street Shield and the “threads” are on the top.

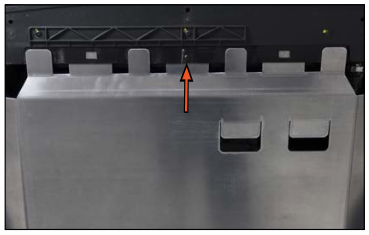
Step 4:
T25 Torx
Slide the new skid plate into place, making sure the tabs on the front edge alternate and fit into the lower core support as shown. Thread one of the mounting screws into the front center to keep the skid plate from sliding backwards.
NOTE: Be sure to support the rear of the skid plate until the rear bolts are installed in the following steps so the full weight of it is not supported by the lower core support.
Step 5:
Inspect the drawing on the right for the correct placement of the rear mounting hardware, then proceed with step 6.
NOTE: The washers and spacers may appear very similar, however, you will be able to see upon inspection that the spacers are thicker than the washers.
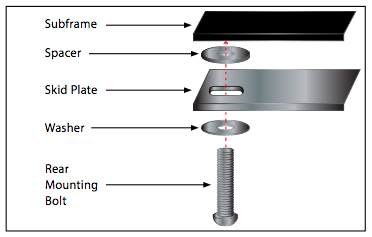
Step 6:
5mm Allen
Install the rear mounting bolts, washers, and spacers into the three rear mounting holes of the skid plate, making sure to place a washer onto each bolt and position the spacers between the skid plate and the subframe, as shown in step 5. Thread all of the bolts in loosely but do not tighten them at this time.
NOTE: It is not uncommon for the threads in the subframe to be rusty or corroded. If the bolts do not thread in easily, chase the threads in each hole prior to installing them.

Step 7:
Install the seven remaining side wing screws, then tighten all eight Torx screws with a T25 Torx driver, and finally tighten the three rear mounting bolts using a 5mm Allen wrench or socket.
Your Street Shield Skid Plate Installation is complete!
Interested in purchasing? Click HERE to shop now?


